This tutorial lets you set up your own hosting server. It can be installed in a virtual machine, or on a dedicated server. It works on 32 and 64 bits processors. This LAMP and mail server is provided with: Apache, PHP, MySQL, Exim and many other utilities. LAMP and mail are controlled by VestaCP control panel. You will not spend money to set up this server. All software is free!

LAMP and mail server
This software is automatically installed with VestaCP control panel:![]()
- Nginx web server as light front-end;
- Apache web server as application back-end;
- Exim mail server;
- SpamAssassin antispam solution
 ;
; - ClamAV anti virus engine;
- Dovecot IMAP/POP3 server;
- VsFTPD ftp server;
- MySQL database server;
- PHP popular web scripting language;
- Webalizer web site log analysis tool;
- AWStats web site log analysis tool;
- RoundCube modern webmail client;
- phpMyAdmin mysql database management tool;
- Bind Domain Name System (DNS) protocols;
- RRDtool system graphs;
- Firewall;
- Backup/Restore.
All this software lets you to run your WordPress, Magento, Joomla websites and obtain maximum flexibility.
Network requirements
In order to set up a professional hosting service, perfectly working also for business purposes, you need:![]()
- a dedicated server or a cloud server;
- a very good Internet connection (generally provided with the server);
- a dedicated IP address (here called yourIP);
- a web domain (here called yourdomain.com) where you can access DNS parameters.
If you just want to make tests, or test your WordPress websites, you can simply start with a VMware virtual machine installed on your PC. You can set your static IP address within your intranet. VMware is free for non commercial purposes.
Other requirements
![]()
![]() Once you have your dedicated, cloud or virtual server, you need some extra software to install on your PC to configure and maintain your server. All this software is free:
Once you have your dedicated, cloud or virtual server, you need some extra software to install on your PC to configure and maintain your server. All this software is free:

- WinSCP: allow you to browse all server folders and to edit files;
- ExtraPutty: allow you to type and execute all Linux commands.
Without this software, you will only access your server locally: very inconvenient!
Step 1: install CentOS 6.5
 There are many tutorials to teach you how to install CentOS 6.5. Please refer to them to install the Linux operating system. Do not install CentOS 7, because VestaCP (until now) does not support it.
Tips: Select Basic Server, and check CentOS in the additional repositories field.
Configure all network parameters and enable your remote root SSH access to your server.
If you choose a dedicated or cloud server, ask your provider to install CentOS 6.5 for you and give you SSH access credentials.
Step 2: access your server via SSH
Now it is time to configure WinSCP and ExtraPutty to remotely access your LAMP and mail server. If access fails, maybe you should open port 22 on your firewall and direct it to your server internal IP address.
ExtraPutty
Run ExtraPutty. In configuration, type your IP address (Internet or intranet) in the host name field, chose SSH protocol and use port 22. You can save settings to avoid configuring every time you run the program. Then click Open to access your server.
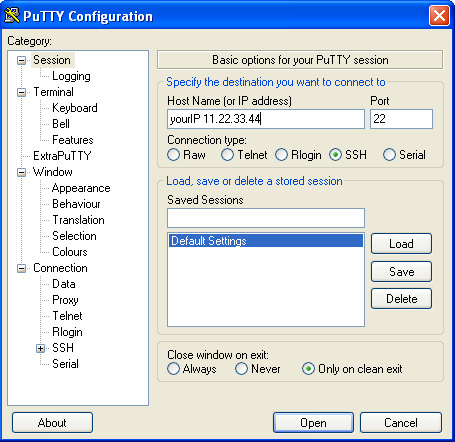
Once connected to your server, access to it by typing “root” as login and your password. When you type your password, you will not see any character, but once you press enter, you will access your server.
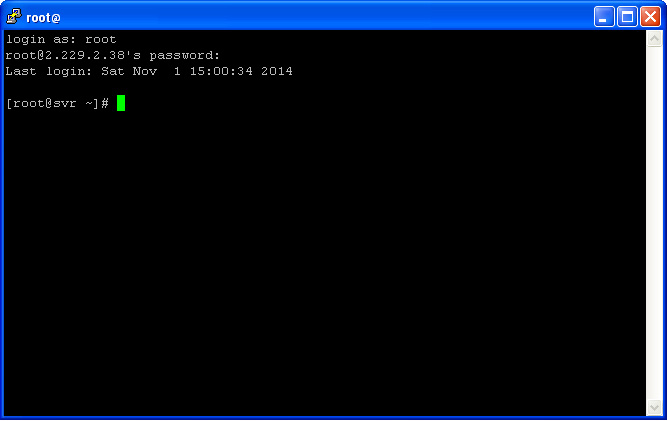

Now you can run Linux commands and also run VestaCP installation script as specified below.
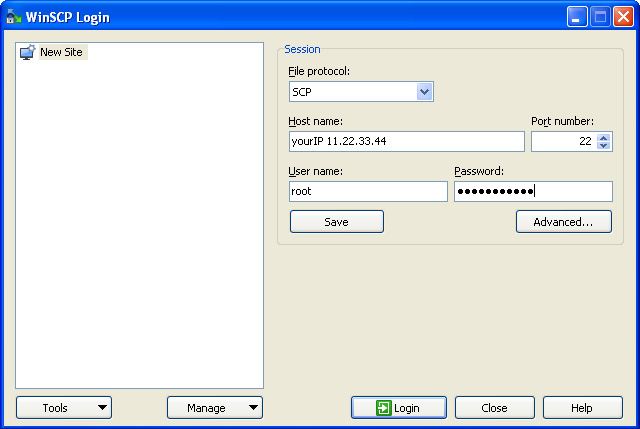
WinSCP
Run WinSCP. In configuration, choose New Site, choose SCP protocol, type your IP address (Internet or intranet) in the host name field and use port 22. Type also your SSH credentials (user name: root, password). You can save settings to avoid configuring every time you run the program. Then click Login to access your server.
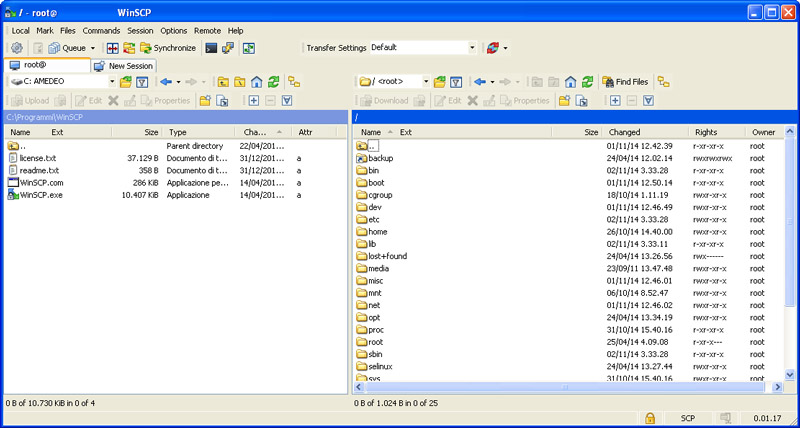
Now you can browse your LAMP and mail server folders. Double click a file to edit it.
Step 3: configure CentOS
Using WinSCP, edit /etc/selinux/config look for SELINUX= and set SELINUX=disabled.
Using ExtraPutty, run system-config-firewall and disable the firewall.
Reboot the server: just type reboot on ExtraPutty and press enter.
If you ordered a professional dedicated or cloud server, maybe these set up have been already performed.
Step 4: configure your server name
It is important to properly set your server name.
If you expect that emails you send with your server will be delivered, you must perform these actions outside your server:
- choose a name that includes your domain. I.e.: servername.yourdomain.com;
- you must have a static IP here called yourIP, with reverse DNS resolving to servername.yourdomain.com; maybe you must contact your service provider in order to set this option;
- now, it is important you go to the DNS panel of your domain and add an A record: servername A (points to) yourIP.
In your server, use WinSCP: edit /etc/sysconfig/network and set HOSTNAME=servername.yourdomain.com (your server name).
Step 5: install VestaCP
Install VestaCP: the script will also install all necessary software to set up your LAMP and mail server.
Access your server with ExtraPutty.
Download installation script, type: curl -O http://vestacp.com/pub/vst-install.sh
Run installation script, type: bash vst-install.sh
Tip: no need to retype all these lines to ExtraPutty. Just select and copy a single line from your browser, than go to ExtraPutty and right click with your mouse. The line will be pasted automatically! Press enter to execute it.
Please type all requested information. Please note that, at the end of installation script, you will be provided with user name and password to access VestaCP control panel and configure your hosting services.
If your server has more than 3Gb free RAM, SpamAssassin and ClamAV will be automatically installed. Otherwise you need to execute following commands manually (via ExtraPutty) in order to install them:
ClamAV installation
yum install clamd
wget http://c.vestacp.com/0.9.8/rhel/clamd.conf -O /etc/clamd.conf
wget http://c.vestacp.com/0.9.8/rhel/freshclam.conf -O /etc/freshclam.conf
gpasswd -a clam exim
gpasswd -a clam mail
freshclam
chkconfig clamd on
service clamd start
sed -i “s/ANTIVIRUS.*/ANTIVIRUS_SYSTEM=’clamav’/” /usr/local/vesta/conf/vesta.conf
SpamAssassin installation
yum install spamassassin
chkconfig spamassassin on
service spamassassin start
sed -i “s/^#SPAMASSASSIN/SPAMASSASSIN/g” /etc/exim/exim.conf
sed -i “s/^#CLAMD/CLAMD/g” /etc/exim/exim.conf
service exim restart
sed -i “s/ANTISPAM.*/ANTISPAM_SYSTEM=’spamassassin’/” /usr/local/vesta/conf/vesta.conf
Step 6: firewall port forward
Before accessing to your VestaCP control panel, you may need to open some ports in your firewall. Do not forget to forward these port to the internal IP address of your LAMP and mail server. Of course, if you ordered a professional dedicated or cloud server, these set up have been already performed.
Ports to open and to forward to the server:
- 20, 21 (FTP);
- 22 (SSH);
- 25 (SMTP);
- 53 (DNS);
- 80, 8080 (WEB);
- 110 (POP3);
- 443 (HTTPS);
- 465 (SMTP over SSL);
- 587 (SMTP);
- 995 (POP3 over SSL);
- 8083 (VestaCP control panel).
Now you are ready to access your LAMP and mail server. You can upload your files, set up your databases, configure your mail accounts and start your personal hosting service!
To access VestaCP, use your Internet browser and type the following address:
https://11.22.33.44:8083/ where 11.22.33.44 is yourIP. Do not forget to use HTTPS and not HTTP.
To access VestaCP control panel, you need user name and password provided by the installation script described in Step 5.
Done?
Your server is now perfectly working. But you need to add some protection against hackers and misfortune…
It’s really a very beneficial part of information. I am delighted which you shared this useful advices along with us. Thank you!
Amedeo, this is a very useful post. I will highly recommend your site!
Awesome blog! Exceptional. I’ll bookmark your site along with make rss feeds also.
Your Internet site offered all of us having precious information. Thank you.
Great post. I used to be checking constantly this blog and I’m impressed!
Very useful information.
Thank you!
Awesome content! I’ve setup a new server and it worked immediately.
This post is very interesting! It helped me a lot! Thanks.
This post offers understanding content. Useful and well explained.
Great things here. I am incredibly grateful to peer this page. I set up dedicated servers and this content is super!
Howdy, many server administrators will likely achieve positive results through your post. Thank you!
You’re in reality a good web master. The site loading speed is incredible. Moreover, contents are masterwork. You’ve done a magnificent work on this matter!
Hi there, just became aware of your post through Google, and found that your way to set up a server is truly informative.
You wrote some good points there. Good work!
Note that if you host your website on your PC, the your site is likely to respond more slowly than traditionally-hosted sites.