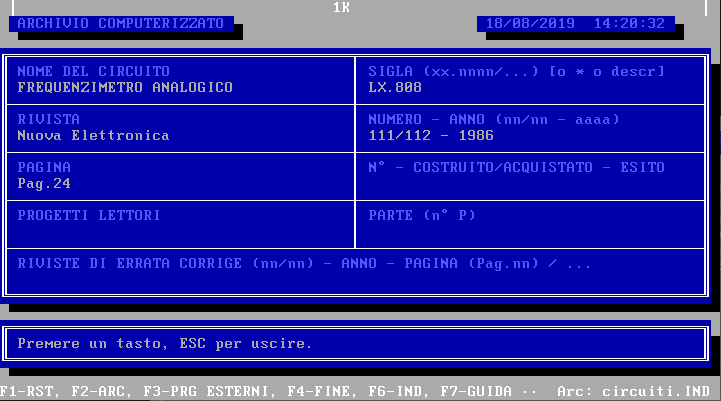
Addresses is a database, a storage program, which I started planning in 1992, when I was not yet 15 years old, and I updated until 1994. I created addresses for personal use and also business (for the Italmec company). The software allows you to customize the description of all the fields in the table, so you can catalog different data (for example: drawings, customers' names, songs, list of programs, etc ...).

INDIRIZZ, program manual for data storage
General informations
The use of the program is very simple as all available functions are displayed in the table or at the bottom of the screen (functional keys). To select a topic in the table, you need to press the number corresponding to the desired data on the keyboard. To call instead a function, press the requested functional button, located on the upper part of the keyboard (F1, F2, etc ...).
The movement in the insertion table takes place with the arrows up and down, which move from one field to another (previous up, following the Jun ').
Memory
The address program is equipped with a memory that is used for the system of the names and for other steps. The screen displays, on the bar at the top, the amount of memory available, with a number in the center, which expresses the number of available kilobytes. If this number drops considerably and prevents some functions, press F1 (rearrangement) and the number will get up. If (it can happen) the number remains low, it is necessary to exit the program and return. It is obvious that if there are no errors, previous procedures are useless.
If the memory is insufficient to list all the subjects (ie when all 60,000 characters of memory are exhausted) you have to delete some names and use two separate archives. On average, the program manages to keep hundreds of names, based on the length (in characters) of the names.
Memory bar:
│ ▓▓▓▓▓▓▓▓▓▓▓▓▓▓▓▓▓ 60k ▓▓▓▓▓▓▓▓▓▓▓▓▓▓▓▓▓▓ │
The program is equipped with a clock (top right) with time and date, connected to the central one of the computer.

Saves
The program performs saves, this guide and the archives are on a separate files, so the use of the program must take place on hard disk or at least on an always inserted spot. If you use the disk (containing all the program files) the saves are made useless, unless they are made on another spot.
It is advisable to install this program in a separate directory, both on a disk and hard disk in order to keep everything ordered.
The recommended directory is: C:INDIRIZZ, but the program works equally in all other directories.
The rescues of the archive are made, each name, on the hard drive (provided that the program is not installed on a disk) quickly but to carry them out on a disk (every now and then it is good), it is necessary to use the special program, which copys all the files of the archive. The selection is 5 to the main menu, but the commands will be explained in the appropriate chapters.
INDIRIZZ program commands
Each selection that can be made is now described in these chapters.
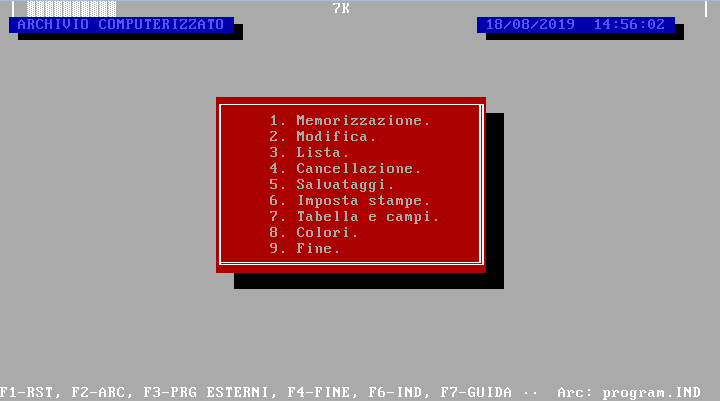
1. Storage - Main menu
This selection allows you to insert subjects (names) in the archive. The archive must be specified with a name with the F2 selection, treated later.

At the table (definable with titles and automatic fields explained below) you can type the data you need. At the end you will be asked to confirm the data: press S to edit in case of error, or any other key to confirm the data.
2. Edit - Main menu
With this command you can vary data previously entered in the archive.
At the table you can move within the fields with arrows or with ENTER and you can type in each field, which will be searched in the archive and shown with all the other data, editable by pressing M. Pressing another key displays the next name with the selected characteristics.
The search is automatic, for example having a subject called GIUSEPPE ROSSI, typing ROSSI (among many different), you see the first ROSSI in the archive, then also the following ones. Keep in mind that in GIOACCHINO ROSSINI it is displayed anyway, because ROSSI is a part of the name.
Having: GIUSEPPE VERDI
Vivaldi Street 3
Milan
and: ANTONIO VIVALDI
Mozart Street 6
Varese
and: SEBASTIAN BACH
Vivaldi Street 4
Rome
(I neglect the other data as a phone, etc ...)
Selecting in the table below the field VIA, Vivaldi (attention, the uppercase letters differ from lowercase, a is different from A) the first name highlighted will be GIUSEPPE VERDI (in order of insertion), pressing a key other than M (which modifies), SEBASTIAN BACH will be displayed, because he also lives in via Vivaldi.
If, on the other hand, you type Rome in the cities field, only SEBASTIAN BACH will be displayed, unless other names are entered, including BATTISTA PERGOLESI who lives in Rome or Romavecchia (because Rome is included in Romavecchia).
3. List - Main
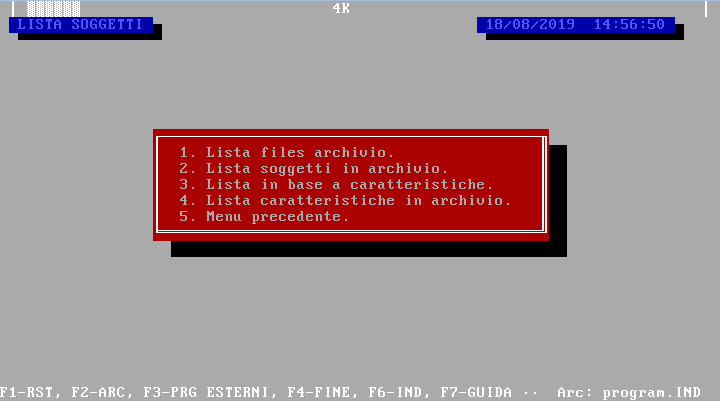
The list selection will appear another table, from which you can select other options.
1. ARCHIVE FILES LIST
2. LIST OF SUBJECTS IN THE ARCHIVE
3. LIST BY CHARACTERISTICS
4. LIST OF FEATURES IN THE ARCHIVE
5. PREVIOUS MENU
PREVIOUS MENU, as with all other tables, returns to the first menu in order of selection.
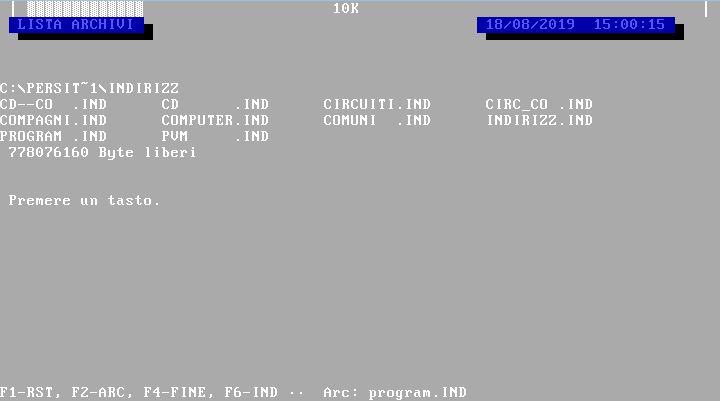
1. Files list Archive - List menu
With this option you can view all the archives in the directory on the screen. Keep in mind that files in an archive have two extensions: . INX and . IND.
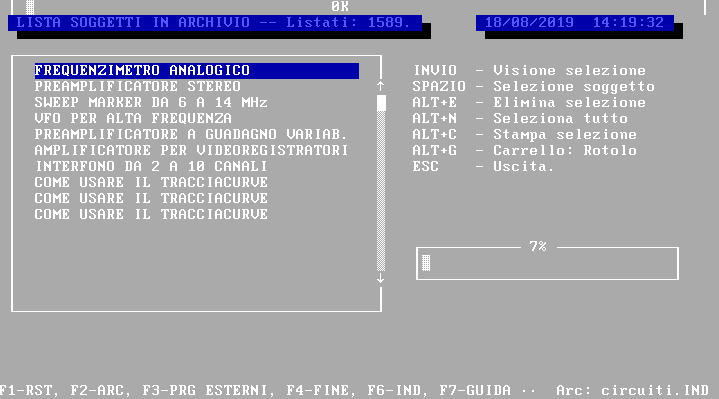
2. List of subjects in the archive - List menu
This command is useful to view all the names present in an archive. By moving with the arrow keys it is possible to slide the whole list, which will be in alphabetical order (123ABC) or in order of insertion (based on the F2 selection, system).
Re-discussing memory, this command consumes a lot of memory (based on the number of names) and the consumption is also double if you prefer an alphabetical order.
This command has utilities for printing and viewing names (subjects).
ENTER allows you to see each name selected with SPACE.
SPACE selects or deselect a name from memory. Keep in mind that once you press ESC (exit the previous list menu), all selections will be lost.
Alt+E (simultaneously) deselects all selected subjects.
ALT+N (simultaneously) selects all listed subjects.
ALT+C (simultaneously) prints the names selected on paper (P - Program definable with selection 6 Main menu, then selection 1 print menu; F - flanked (column) defined with selection 6 main menu, then select 2 print menu; t - prints all data with the table; L - print only the list of subjects; A - not printing).
ALT+G (simultaneously) prints as a roll, that is, without spaces between the pages, or as a manual, definable with Sel 6 and then 3, that is, spaces every n lines.
3. List based on features - List menu
At the table, select the desired data, in the desired fields. Then indicate the field to be listed. By selecting 1, all the names corresponding to those data will be listed (as for the previous list, with all the options) (see EDIT for information on the selection to the table and LIST SUBJECTS IN ARCHIVE for information on commands and options in scrolling mode of the list). Pressing numbers 2 to 8 will display the characteristics regarding the selected field.
4. List of characteristics in the archive - List menu
This command shows (does not allow you to process, i.e. printing, view full table ...) only the characteristics in the archive.
At the request of the feature, by typing the corresponding number, all the data of the various subjects referred to that field will then be displayed.
This selection is useful for checking, in the parallel archive, the cities (example) inserted and the missing ones.
Admitting that the number 3 corresponds to via, typing it to the request, all the routes inserted in the archive corresponding to that field will be displayed.
4. Cancellation - Main menu
This selection also displays another menu.
1. DELETION OF ARCHIVES
2. CANCELLATION SUBJECTS
3. DELETION FEATURES
4. PREVIOUS MENU
1. Cancellation Archives - Cancellation menu
This command erases whole archives, therefore it is advisable to use this selection with caution. If you have not made a save on a disk, this option will destroy the archive and it will no longer be possible to recover it (with the exception of advanced dos controls, such as Undelete, etc ...).
2. Subject cancellation - cancellation menu
This selection erases the names from the archive. ATTENTION: if there are two subjects with the same name, both will be deleted, the program will ask for only a confirmation. Once a subject is canceled, this is no longer recoverable.
3. Features cancellation - cancellation menu
This selection erases the fields from the archive. For example, if you want to cancel all the subjects residing in Varese, Varese should be typed to the request for the field and the number corresponding to the city to the second question.
Attention: all subjects corresponding to the specific characteristic will be deleted and it will not be possible to recover them.
5. Savetages - Main menu
With this specification, it is possible to create rescues on the Current Archive Disk (changeable with F2) or recover those previously saved. The parallel archives will not be saved or recovered together with the main one, but must be treated as real archives.
1. SAVING ARCHIVE TO FLOPPY
2. RECOVERING ARCHIVES FROM FLOPPIES
3. COPY ARCHIVE SETTINGS
4. ARCHIVE COPY
5. PREVIOUS MENU
1. Safe Archive on Floppy - Salvataggi menu
This command indicates another table, with other specifications. Remember to always keep the slicet disk.
Indicate the destination disk - The selection indicates the disk on which the current archive must be saved on the computer (A: O B :).
Indicate the Directory on the destination disc - Type the Destination Disk Directory on the side in which the archives must be saved. If the saying does not exist, the program will ask for confirmation to create it.
START SAVING - The command begins the saving operation of the archive.
Last rescue of the archive on the disc - is an indication of the date of the last rescue of the archive and errors (if they happen) during the copy.
Floppy disc 3"1/2: per salvataggi e recuperi, il foro deve essere coperto.
Floppy disc 5"1/4: per salvataggi e recuperi, il foro deve essere libero.
2
The commands are identical to the floppy SAVE function, but it changes the word SAVE TO recovery to recovery and, of course, the function as this command retrieves data from the floppy disk to take it to the hard drive.
ATTENTION: the current archive on a disk will be copied to that of the hard drive, with consequent cancellation of the last.
3
This function is similar to the saves described above, but copies the current archive files (of which no extension should be indicated) to a directory or other file.
You will not copy the names with their data, but only the table and the printer settings.
ATTENTION: The program does not create directory so, typing an incorrect, error will occur. The name of the destination archive must always be indicated.
Copy archive to a directory:
C:COPIESINDIRIZZ
The archive will be copied to the Copies Directory with Directo Name.
Copy archive to the same directory:
ADDRESS
Assuming that the current archive was work, it will be copied with another name, that is, addresses.
4. Archive copy - Salvataggi menu
This command has the same function as the previous one, but copies the whole archive, including information regarding the subjects.
6. Set of prints - Main menu
With this selection you can set the prints SIDE BY SIDE (as a list, column) and PROGRAM (for example a letter).
1. PRINT PROGRAM SETTING
2. SIDE-BY-SIDE PRINT SETTING
3. MEASURE PRINTER PAPER LINES
4. PREVIOUS MENU
1. Program print setting - Print menu
This is a particular print, that is, the positions in the sheet of the various fields are programmable. It is not possible to support two or more fields and even print the last field, the longest, generally reserved for annotations. To print it, you have to use everything in the list printing (selection 3 main menu, then selection 1 or 2 list menu).
At the bottom of the screen are the various commands:
Space - It inserts a phrase into the sheet.
Tab - recalls the field of fields and saves. Make sure you saved (S) before going out (U). ESC to return to the sheet. Press a number for a field: each name will have different fields.
ALT+N (simultaneously) (or +G or +C or + E) are the various text styles, and precisely normal (80 cpr), larger (40 cpr), condensed (132 cpr), emphasized (bold at 80 cpr).
2. Print setting flanked - Print menu
This specification allows you to print various names, with other data (fields) side by side.
It is useful, for example, to print lists of people with the corresponding telephone numbers. The available characters are 80 (one line).
Pressing a number will activate the corresponding field and prompt you for the number of characters to use for the field.
T is used to give a title at the top of the page.
S saves changes.
ESC comes out, remember to save.
3
It is used to set the length of the paper in the printer. It is useful for printing the list in manual mode: the computer will ask for confirmation before inserting the other sheet.
Type S to print a number on each printer line. The latest number printed on paper must be digested to address to store it. I need to enter an already known number, without reprinting all the numbers on paper.
7. Ridefinition table, table and fields - Main menu
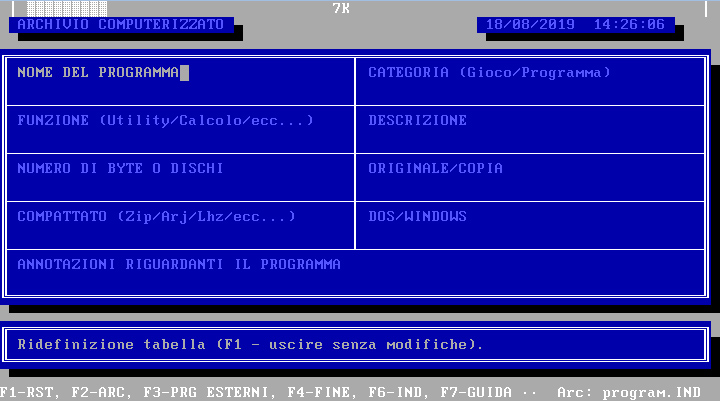
The command allows you to set the names of the fields, the mathematical operations between them and even the default characters.
1. REDEFINE FIELDS
2. OPERATIONS BETWEEN FIELDS
3. DEFAULT FIELDS
4. PARALLEL ARCHIVE FIELDS
5. MAIN MENU
1. Ridefinisci fields - Table menu
Set the insertion table. There are eight fields of 35 characters and one of 76. The last field is not printed with the program print.
The automatic research field is what is sought in the parallel archive. That is, having a Cap-Comune-Provincia space and typing Palermo, the computer will look for that name in the same field as the parallel archive, making changes to the current name (prefixes, etc ...). The parallel archive must be created.
2. Operations between fields - less table
The command allows you to carry out mathematical operations (+ additions, - subtractions, * multiplications, / divisions, ^ elevations to power n) between two fields and to return the result in a third field.
Select the operation to be carried out (the first, second, etc ...) with the corresponding number (1 .. 9) and press M. will be canceled the old operation and replaced by the one to be typed.
To save press S (The cursor must be on OPERATION:).
3. Default fields - fewer table
With this selection it is possible to write a certain word IN A field ALWAYS. Wanting to insert many subjects, all starting for A223-, you can put as SUBJECT this writing, which will be re-presented each time.
4
If the ordering of the fields of the current archive was different from that of the parallel archive, that is, if field 2 in the current archive corresponded to field 5 of the parallel archive, it can be indicated to direct to direct the changes to be made differently.
The first view (above) corresponds to the fields of the parallel archive, the one lower than the fields of the current archive.
Premendo C, di potrà digitare il campo dell'archivio parallelo (sorgente "Campo //"), poi quello dell'archivio corrente (il corrispondente "Campo ar").
You cannot direct two sources to the same destination. By typing the number 0 as the destination, you will be told to ignore the target field (it has no matches or is useless).
To save press S, ESC to exit.
8. Color SET - Main menu
This command is useful to vary the colors of addizz. Then indicate the number of color to vary (written above each window or next to the writings) and modify it with + and -. During the variation of the color, pressing ESC cancels the last modification and the previous color is reported. End retains the modified color and reports the default color.
Pressing ESC, when prompted for the color number, will exit the command with the ability to save or even lose color changes.
9. Fine - less main
The selection corresponds to F4 and exits the program.
FUNCTIONAL KEYS
The functional keys can be pressed anywhere in the DIRECT PROGRAM. Some interrupt the ongoing process.
RESET
F1 - Risystem
Restart the program, it is useful when the memory drops too much and causes errors. If even this key does not fix the memory, restart the program by exiting and returning.
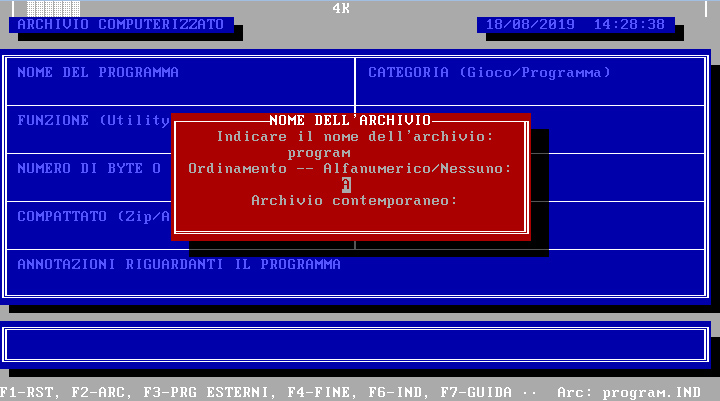
ARCHIVE NAME
F2 - Archive
Set the current archive, the system system (alphabetical or none) and the parallel archive.
CUSTOMIZED PROGRAMS
F3 - Personalized programs
Pressing F3, with any operation in progress, displays the menu of external programs, that is, executable programs (.COM, . EXE, . BAT and DOS commands), definable.
DEFINITION OF EXTERNAL PROGRAMS
Prg
Prg
...
PREVIOUS MENU
Le selezioni "prg" sono i programmi definiti dall'utente in DEFINIZIONE PROGRAMMI ESTERNI.
Definition of external programs - Selection 1 Programs menu
It is possible to insert dos programs that you start by pressing F3 and the corresponding number, without interrupting the ongoing process.
To do this you just have to specify some data.
Press the number corresponding to the program to be entered (1 .. 8). If the program already exists, it will be modified according to the specifications.
Press M to change or enter the data. At the request for the name of the program, you will have to type the label with which you direct will call the program in the external programs window.
Name of the executable file specifies the name of the file you direct must search to start it. The file extension (.com, etc ...) should not be specified. The command also include parameters.
Parameters ahead of the command line already defined some internal data to address, such as the name of the current archive, etc ... simply by specifying the corresponding letter.
Press S to save your changes, ESC to exit.
END
F4 - fine
He leaves the program.
ADDRESS
F6 - Address
Indicates the version and date of INDIRIZZ.
GUIDE
F7 - Guide
Invoke this guide, each command or table is available.
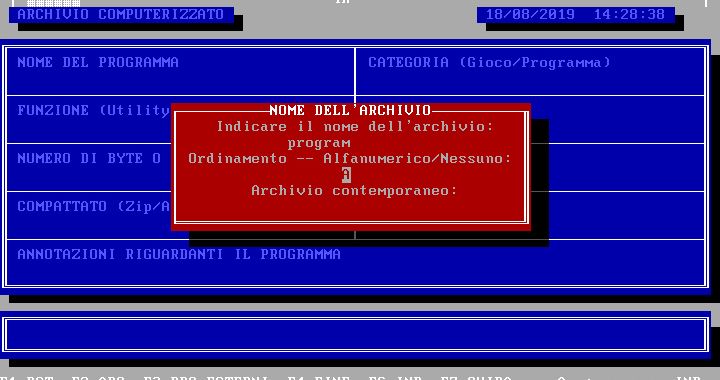
CONTEMPORARY or PARALLEL ARCHIVE
The parallel archive is nothing more than a common archive, normally created, which intervenes to modify the name in insertion, based on information contained in it, called by the automatic search field, definable in the table with Sel 7 and then 1.
To insert the ZIPS, set in the parallel archive, so that when you type the city, the program will automatically add prefix, cap, etc ..., determinable by the operator, to the program, it is necessary to create the contemporary archive (F2 for the name, no contemporary archive to be selected), insert nominatives (type + on the first dial (field) to not go out), by typing in the desired fields that the program will bring to the program. real archive.
If the fields of the current archive did not correspond to those of the parallel archive, everything can be correct with selection 7 (table) and then 4 (parallel archive fields).
/+ adds the change at the beginning of the field.
/* adds the change to the end of the field.
If you do not type either /+ or /*, the field will be replaced with the inscription.
Example:
PHONE: /+0332/
WORK: /+0332/
In this case, assuming that the automatic research field is Cap-Citta-Prova, typed this in the parallel archive, in the insertion archive, typing Varese in the field, the program will make changes, that is, add the prefix 0332/ to the phone number (at the beginning) of the house and the company and will replace Varese, 21100-Varese.
The initial + is used to indicate to the program that the field is not empty.
All other fields do not change.
Attention: with this method of archiving (parallel archive) it is not possible to use the list (subjects all +), but you can see them with EDIT (Selection 2 Main Menu).
SYNTHESIS:
- Create a parallel archive complete with table settings and content as desired.
- Create the current archive (F2) and enter the name of the parallel archive.
- Set the table, remembering to indicate the automatic search field (Sel 7 and then 1).
- If the fields do not correspond to those of the parallel archive, use the special command (Sel 7 and then 4).
- Insert the names and check the changes it addresses (when you type the automatic search field).
Conclusions
Even if some steps may seem difficult, the direct program is very simple and immediate to use, it takes only a little patience and, over time, all the functions, the keys and the rest will be learned.
In any case, the commands are written in a simple and immediate way. The functions are summarized at the bottom of the screen and, if some steps are laborious, the program will still give precise indications. If that were not enough, this guide is always available, that is, by pressing F7, at each function, it will always be available and on the appropriate chapter.
Programming language: Microsoft GwBASIC.
Project start: September 1992. State: for personal and business use.