If you set up a Linux LAMP and mail server, you need to add some protection. There are a lot of hackers and spammers around your server. And also some misfortune. What I suggest is:

- install some utilities against hackers or spammers;
- install a good backup software.
All software here described is free.
 Server protection against hackers or spammers
APF - Advanced Policy Firewall
Server protection utility: APF, Advanced Policy Firewall, is a firewall system based on Linux iptables.
To install APF, use ExtraPutty to access your server via SSH and follow this procedure:
cd /tmp
wget http://www.rfxn.com/downloads/apf-current.tar.gz
tar -zxvf apf-current.tar.gz
cd apf-9.7-2 *** go to the directory just decompressed ***
sh install.sh
Tip: no need to retype all these lines to ExtraPutty. Just select and copy a single line from your browser, than go to ExtraPutty and right click with your mouse. The line will be pasted automatically! Press enter to execute it.

When you have installed APF, you can use WinSCP to delete the file /tmp/apf-current.tar.gz file (that you have downloaded with wget command) and the installation folder /tmp/apf-9.7-2 (that you have created uncompressing the .gz file with tar command).
Now, it is time to configure APF.
Important step: add your static IP addresses to /etc/apf/allow_hosts.rules. This setting will leave you a door to access your server even if you blacklist yourself (i.e. by typing several times the wrong password).
Using WinSCP, find and set the following settings in /etc/apf/conf.apf:

- DEVEL_MODE="0"
- SET_MONOKERN="0"
- IFACE_IN="eth0" and IFACE_OUT="eth0"
- IG_TCP_CPORTS="20,21,22,25,53,80,110,443,465,587,995,8080,8083"
- IG_UDP_CPORTS="20,21,53"
- IG_ICMP_TYPES="all"
You can add your personal settings, like the Ethernet interface or the ports to check.
Start APF.
Using ExtraPutty, type the following commands:
/usr/local/sbin/apf -s
service apf start
chkconfig apf on
Useful APF files and paths:
- Config path: /etc/apf/conf.apf
- Executable path: /usr/local/sbin/apf
- Log file: /var/log/apf_log
BFD - Brute Force Detection
Server protection utility: BFD, Brute Force Detection, is a shell script for parsing application logs and checking for authentication failures. If somebody type the wrong password several times, it is blacklisted and prevented to access the Linux server.
You need to have APF installed before installing BFD.
To install BFD, use ExtraPutty to access your server via SSH and follow this procedure:
cd /tmp
wget http://www.rfxnetworks.com/downloads/bfd-current.tar.gz
tar -xvzf bfd-current.tar.gz
cd bfd-1.5-2 *** go to the directory just decompressed ***
sh install.sh
When you have installed BFD, you can use WinSCP to delete the file /tmp/bfd-current.tar.gz file (that you have downloaded with wget command) and the installation folder /tmp/bfd-1.5-2 (that you have created uncompressing the .gz file with tar command).
Configuring BFD.
Important step: add your static IP addresses to /usr/local/bfd/ignore.hosts.local. This setting will leave you a door to access your server even if you blacklist yourself (i.e. by typing several times the wrong password).
Using WinSCP, find and set the following settings in /usr/local/bfd/conf.bfd:
- EMAIL_ALERTS="1"
*** if you want email alerts when someone has been blocked, you may receive a lot of daily mails! *** - EMAIL_ADDRESS="your@email.address"
Using WinSCP, go to the /usr/local/bfd/rules folder and edit following files, adding the right log path:
- exim_nxuser file: add the correct EXIM log path and file, find the LP line and change to: LP="/var/log/exim/main.log"
- exim_authfail file: add the correct EXIM log path and file, find the LP line and change to: LP="/var/log/exim/main.log"
- check all files referring to installed software and verify that log path is correct
Start BFD.
Using ExtraPutty, type the following command:
/usr/local/sbin/bfd -s
Useful BFD files and paths:
- Config path: /usr/local/bfd/conf.bfd /usr/local/bfd/rules
- Install path: /usr/local/bfd
- Executable path: /usr/local/sbin/bfd
- Log file: /var/log/bfd_log
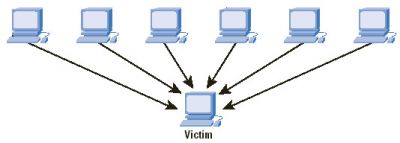 DDOS deflate - Distributed Denial Of Service deflate
DDOS, or distributed denial of service, is an attack where multiple compromised computers are used to target a single server, causing the service unavailable to its users. Server protection utility DDOS deflate blacklists all IPs that cause an excessive server usage.
To install DDOS deflate, use ExtraPutty to access your server via SSH and follow this procedure:
cd /tmp
wget http://www.inetbase.com/scripts/ddos/install.sh
sh install.sh
Configuring DDOS deflate.
Important step: add your static IP addresses to /usr/local/ddos/ignore.ip.list. This setting will leave you a door to access your server even if you blacklist yourself (i.e. for excessive server usage).
Using WinSCP, find and set the following settings in /usr/local/ddos/ddos.conf:
- NO_OF_CONNECTIONS=300
- BAN_PERIOD=1800
- EMAIL_TO="your@email.address"
Of course, you can change above settings. Even if you set your email address to receive alerts, you will not receive a lot of emails. DDOS attacks are not so frequent.
Useful commands:
- Restart DDOS deflate: sh /usr/local/ddos/ddos.sh -c
- List all the connected IPs to the server: sh /usr/local/ddos/ddos.sh
Install and configuration path: /usr/local/ddos
By installing APF, BFD, DDOS deflate you should have added sufficient server protection to your machine. You can have a look to http://www.rfxn.com for other server protection ideas.
Just wish to say your article is as astonishing. The clearness on your submit is just nice and that
I can assume you're knowledgeable օn server protection.
Thank you a million and please continue the enjoyable work.
Zippo
Very interesting article. It worked for me.
I really like your post... very nice and useful!
Thanks a lot.
I emailed this blog post page to all my friends, for the reason that it is important to protect servers.
Hey There. This is a very well written article about server protection. I will make sure to bookmark it and come back to read more of your useful information. Thanks for the post.
It's really an excellent and helpful piece of information. I'm happy that you shared your server protection tips with us.
Please keep us informed like this. Thanks for sharing.
A properly configured firewall will restrict access to everything except the specific services you need to remain open. Exposing only a few pieces of software reduces the attack surface of your server, limiting the components that are vulnerable to exploitation.
I must say you have very interesting content here.
You stated it perfectly!
Everyone should care about his server protection. Thanks.