In today's video tutorial, let's see how build a Paddle for Arkanoid, for use with the Commodore 64. We only use a 9-pole D-Sub connector, a 470 kohm (linear) potentiometer, and a microswitch.

With regard to the aesthetic aspect, you will certainly be able to do better! I focus mainly on the hardware part and the software part.
The first part of the video is not inherent in how to build a Paddle for Arkanoid.
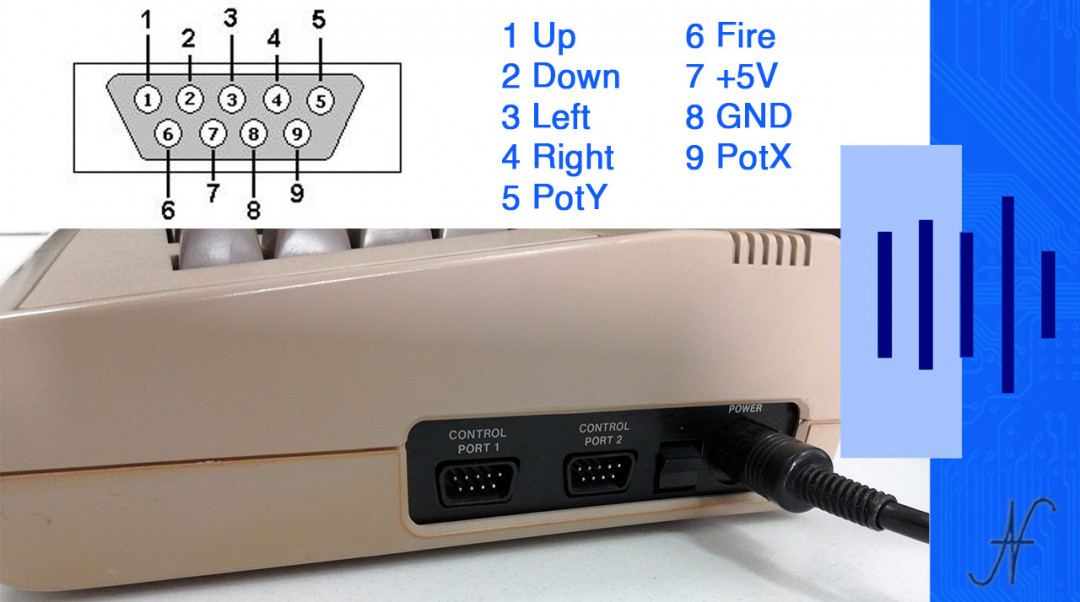
In each of the Joystick ports (the control ports) of the Commodore 64, there are a couple of analog inputs. They are located in pins 5 (PotY) and 9 (PotX) of each joystick port and allow you to connect a potentiometer and read its position.
The first experiment I carried out, which unfortunately failed, concerns the measurement of a voltage on these two inputs.

Having failed to measure a DC voltage via the analog inputs of the Commodore 64's control ports, I do not publish, on this page, the details of the test.
Build a Paddle for Arkanoid, test it with two potentiometers
The second part of the video relates to the measure of the position of the tree of two potentiometers, using the Control 1 control 1 of the Commodore 64 (the Joystick 1 door).
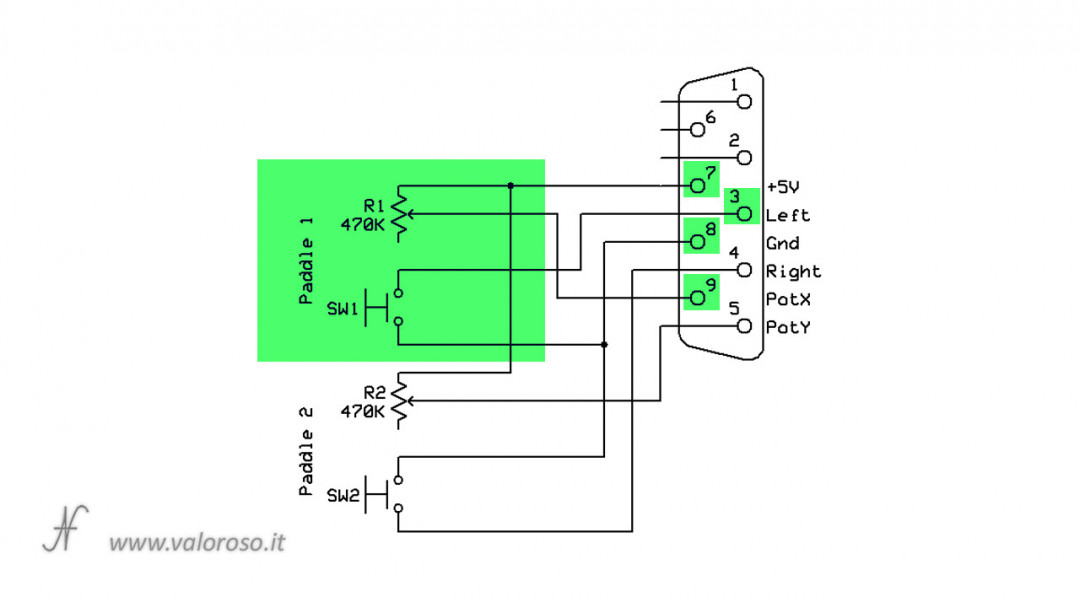
As can be seen from the scheme below, two linear 470 kohm potentiometers are needed, as well as the 9-pole D-Sub tract connector.
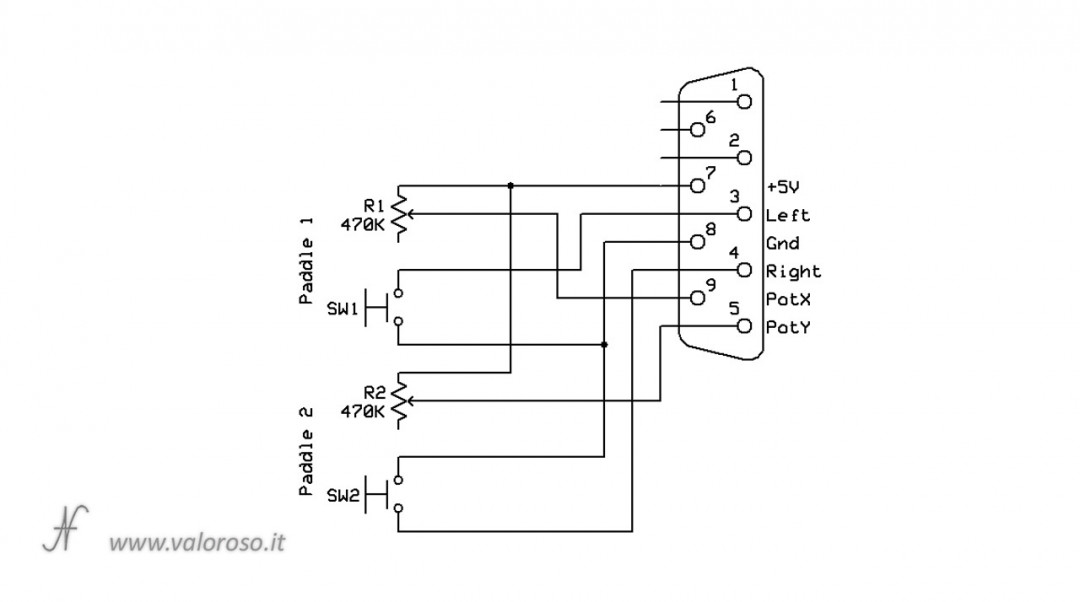
For now I do not connect the fire buttons, but only the two potentiometers.

As for the links:
- the contact 7 of the joystick port is the 5V power positive, common for the two potentiometers: it is the red wire;
- the sliders of the two potentiometers are connected to the pins 5 and 9 of the joystick holder (they are the gray and pink wires);
- the power supply negative does not serve the potentiometers.
After connecting the circuit to joystick port 1, you can turn on the Commodore 64 and launch the test program in Basic, which is available at the bottom of this page.
The value shown to monitor varies from 0 to 255 and depends on the position of the potentiometer shaft. Both potentiometers work well.
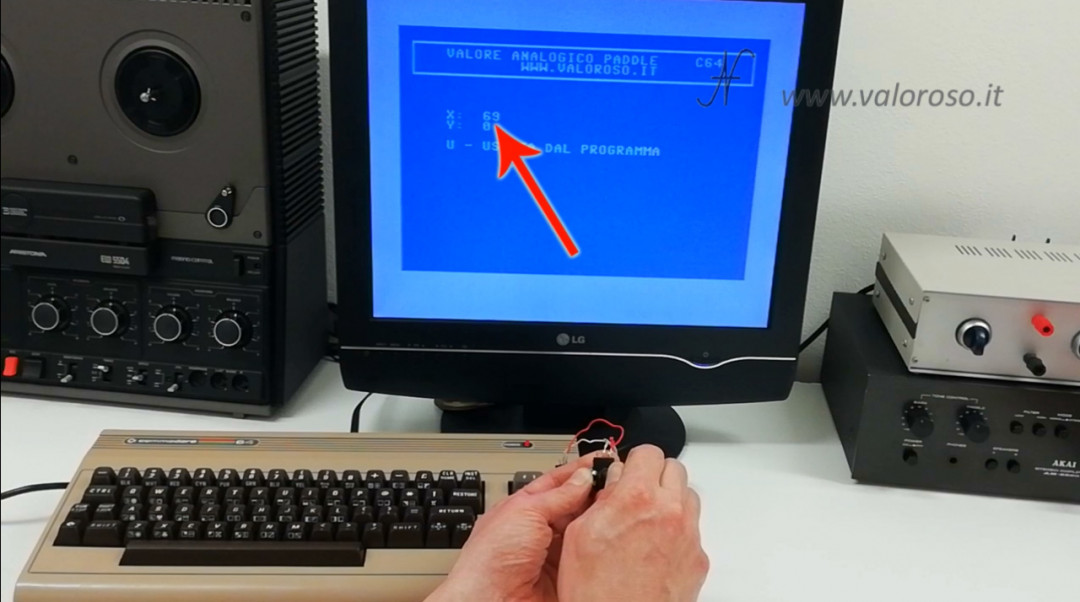
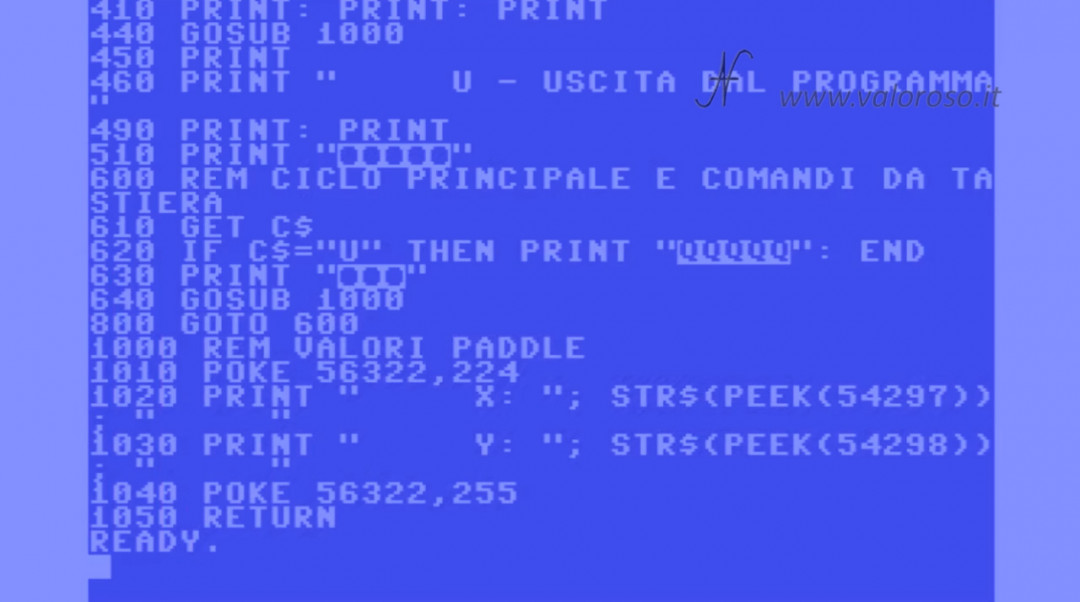
With regard to the basic program, the reading of the values of the two potentiometers is carried out using two instructions:
PEEK(54297)
PEEK(54298)
To avoid sporadic misreading, disable scanning of the Commodore 64 keyboard before reading the analog value, and then enable it after reading.
Keyboard scanning is disabled using the following command:
POKE 56322,224
To enable keyboard scanning again, after the analog values are measured, you need this command:
POKE 56322,255
The result obtained brings us closer and closer to our goal: to build a Paddle for Arkanoid!
Building a Paddle for Arkanoid, for the Commodore 64
To play Arkanoid you don't need two paddles, but only one. So we can only connect the potentiometer 1 to the joystick port.
The 5V power supply positive, present on the pin 7 of the joystick port, feeds the potentiometer (red wire).
The potentiometer slider is connected to pin 9 of the joystick port: it is the gray wire.
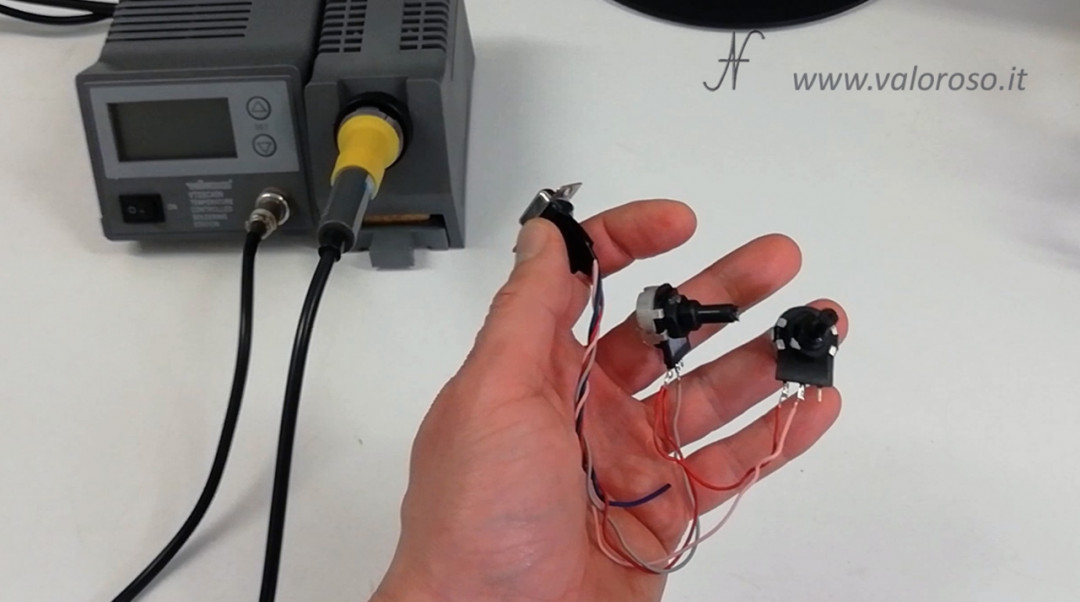
To make the paddle usable, you also need the FIRE: in the experiment, use a microswitch.
The microswitch is connected between the power negative, the 8 pin of the joystick port (blue wire), and the contact of the left position of the joystick, which then is the pin 3 of the joystick port (green wire).
And here are the completed links! Before joining the switch to the potentiometer, it is good to isolate everything.
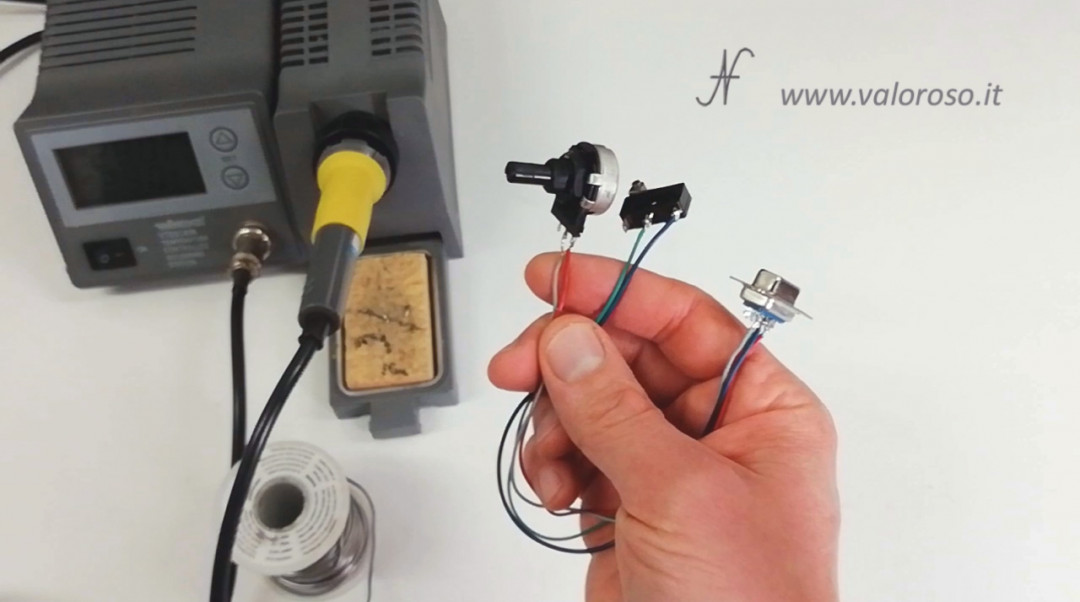
At this point you can join the potentiometer to the fire microswitch. To do this, I use a copper wire, which I balance on the potentiometer and pass into the holes of the switch. In the video, I explain the details.
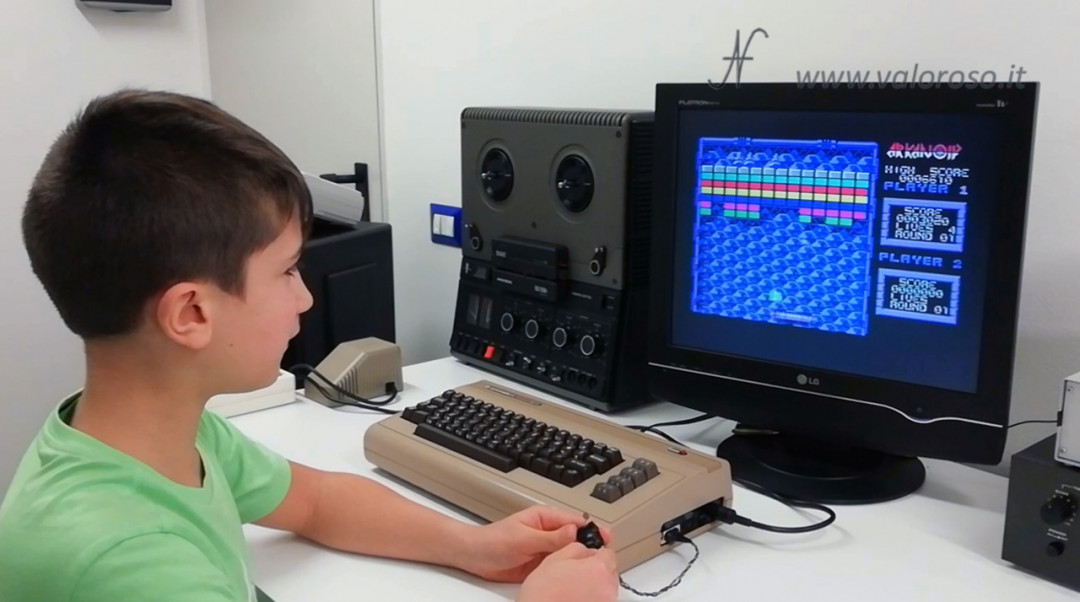
The DIY Paddle for the Commodore 64 is finished. It's very ugly, but it works!

It is obviously possible to improve this paddle with a nice container, a suitable knob and a longer cable.
Use Arkanoid with the Paddle
To use the paddle on Arkanoid, after loading the game, from the main menu you have to press P, on the Commodore keyboard.
Then press FIRE on the paddle we just built.
And... start the game!
Program listing in Basic to read the analog values of the paddle with the Commodore 64
And here is the listing of the program in Basic to read the analog values of the potentiometers connected to the control port 1 of the Commodore 64.
The program is available in two formats:
- C64-PADDLE. TXT, in text format, to analyze it on a PC (this file can not be immediately loaded or transcribed on the Commodore 64: to convert it into PRG you have to use C64LIST);
- C64-PADDLE. PRG, to be unpacked, in loadable and bootable format from the Commodore 64.
A very interesting video.
Thanks so much!
Arkanoid is eternal!