Welcome to the sixth installment of the Basic Programming course. Today we see how to write and read a file in Basic, with instructions Open, Close, Print # and Input #.

Learn to program in Basic, on which computers?
Even the example program we are analyzing today can be run on various 8-bit Commodore, such as the Commodore 64, C16, Vic20, Commodore 128 and PET. You can run it on emulators, such as the VICE and the CCS64.
If you use the emulator, remember to connect a virtual D64 disk to drive 8, otherwise the example program will not be able to write and read the file.
Furthermore, the example program is compatible with the GwBasic of the old DOS for IBM PCs, which you can run in the DOSBox emulator. For those unfamiliar with it, DOSBox allows you to run old DOS programs, even on Windows 10. You can also run it with QuickBasic QB64 and the PC-Basic, which allows you to emulate GwBasic on Windows 10.
Writing and reading a file in Basic: the variants of the listing of the example program
Here is the listing of the program to write and read a sequential access file in Basic. At the bottom of this page, you can download it. The use of instructions Open, Close, Print # and Input # it is slightly different between the Commodore Basic and that of IBM PCs.

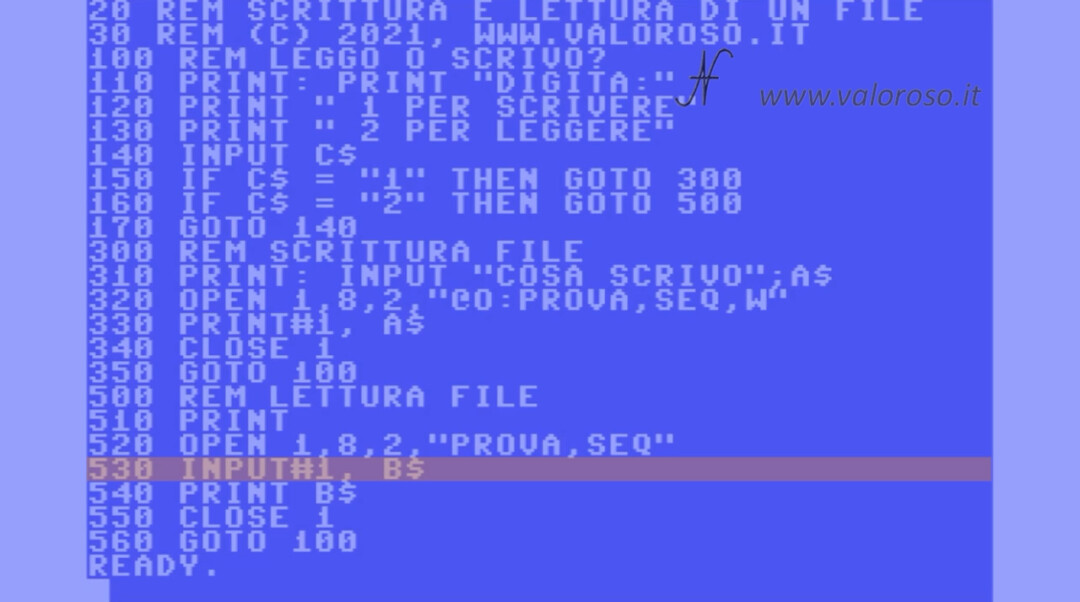
Listing for Commodore Basic:
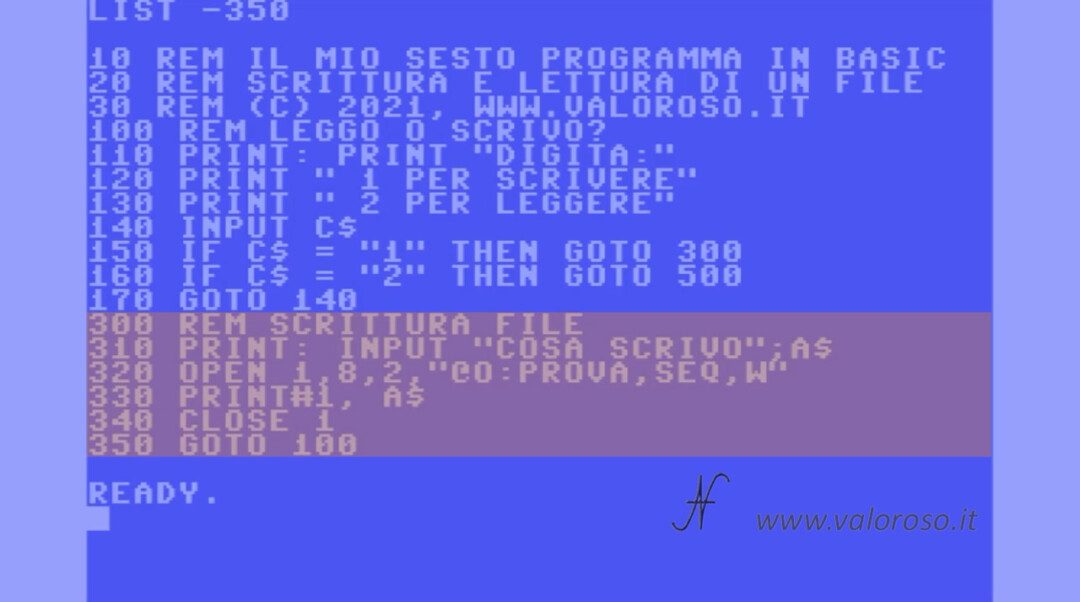
10 REM IL MIO SESTO PROGRAMMA IN BASIC
20 REM SCRITTURA E LETTURA DI UN FILE
30 REM (C) 2021, WWW.VALOROSO.IT

100 REM LEGGO O SCRIVO?
110 PRINT: PRINT "DIGITA:"
120 PRINT " 1 PER SCRIVERE"
130 PRINT " 2 PER LEGGERE"
140 INPUT C$
150 IF C$ = "1" THEN GOTO 300
160 IF C$ = "2" THEN GOTO 500
170 GOTO 140

300 REM SCRITTURA FILE
310 PRINT: INPUT "COSA SCRIVO";A$
320 OPEN 1,8,2,"@O:PROVA,SEQ,W"
330 PRINT#1, A$
340 CLOSE 1
350 GOTO 100

500 REM LETTURA FILE
510 PRINT
520 OPEN 1,8,2,"PROVA,SEQ"
530 INPUT#1, B$
540 PRINT B$
550 CLOSE 1
560 GOTO 100
Listing for QuickBasic QB64, GwBasic and PC-BASIC:
10 REM IL MIO SESTO PROGRAMMA IN BASIC
20 REM SCRITTURA E LETTURA DI UN FILE
30 REM (C) 2021, WWW.VALOROSO.IT

100 REM LEGGO O SCRIVO?
110 PRINT: PRINT "DIGITA:"
120 PRINT " 1 PER SCRIVERE"
130 PRINT " 2 PER LEGGERE"
140 INPUT C$
150 IF C$ = "1" THEN GOTO 300
160 IF C$ = "2" THEN GOTO 500
170 GOTO 140

300 REM SCRITTURA FILE
310 PRINT: INPUT "COSA SCRIVO";A$
320 OPEN "PROVA.TXT" FOR OUTPUT AS #1
330 PRINT #1, A$
340 CLOSE #1
350 GOTO 100

500 REM LETTURA FILE
510 PRINT
520 OPEN "PROVA.TXT" FOR INPUT AS #1
530 INPUT #1, B$
540 PRINT B$
550 CLOSE #1
560 GOTO 100
Analysis of the example program to write and read a file in Basic
The first three program lines, 10, 20 and 30, contain the instructions REM, to write the comments, which we have already seen in first episode of the video course on Basic language.
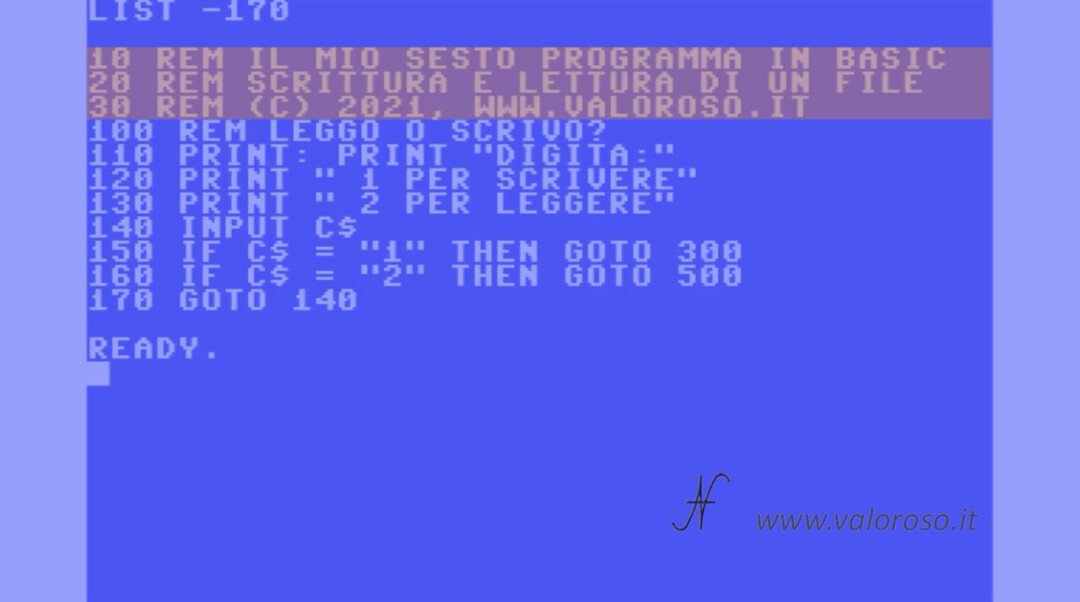
Lines 100 to 170 ask the user what operation he wants to carry out: the writing or reading of the file. Obviously, before reading it, the file must be created, so the user will have to type 1, initially.

The user response is inserted in the variable C$. I know C$ vale "1", inteso non come numero, ma come stringa, allora l’esecuzione del programma si sposta alla riga 300, dove il computer scrive il file. Invece, se C$ vale "2", l’esecuzione continua alla riga 500, dove il computer legge il file che abbiamo creato in precedenza.
We have seen conditional instruction IF… THEN in the second episode of the video course on Basic.
Well, we come to line 300, where the computer creates a file. The user must type the string to be written to the file. It can be a phrase or a name, for example, as long as it doesn't contain commas. Through education INPUT, present in line 310, the string to be written to file is stored in the variable A$.
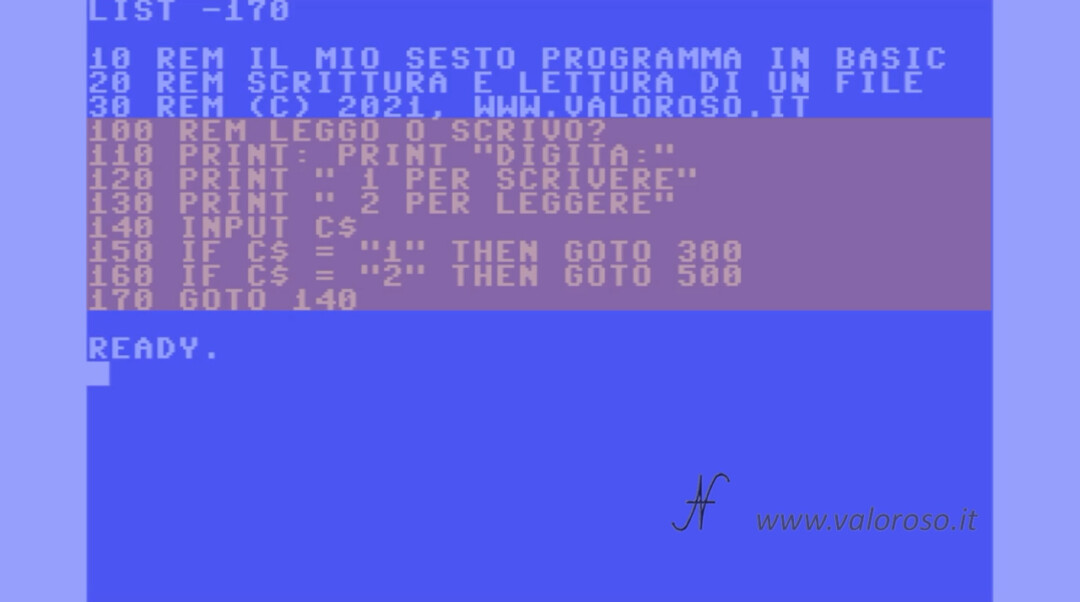
Open Education to open a Basic file
Education OPEN, present in line 320, is used to open a logical file: a communication channel with the peripheral, in this case the Commodore 1541 drive. The syntax is different between Commodore Basic and that for PCs.
Let's analyze it in detail.

320 OPEN 1,8,2,"@O:PROVA,SEQ,W"
In the Commodore, the first issue after OPEN represents the number of the logical file. It is an arbitrary number that can vary between 1 and 255. The second number, 8, represents the address of the device with which you want to communicate. In my case, the SD2IEC emulator of the Commodore 1541 drive is located at address 8.
The third number, in the case of the drive, represents the channel for the data. To write and read a file, you can use an arbitrary number between 2 and 14. To send commands to the drive, for example to format the disk or delete a file, this number must be 15.
In the quotation marks, we indicate the name of the file, preceded by @THE: to enable file overwriting. Without @THE:, the file would only be created the first time and would not delete itself to write a new string. SEQ represents the type of file to be created: a normal sequential access file. The computer writes and reads the data in sequence, one after the other. W it is used to enable the file writing mode.
Regarding the PC Basic, for example GwBasic, PC-BASIC or QuickBasic QB64, the syntax is different.

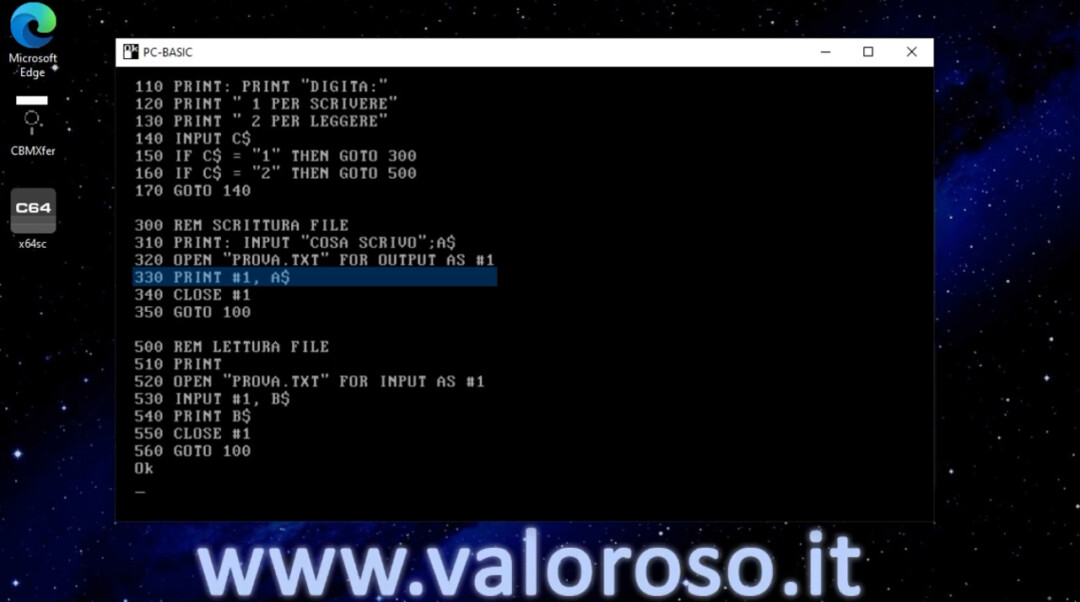
320 OPEN "PROVA.TXT" FOR OUTPUT AS #1
First, the name of the file is declared just after OPEN: nel programma di esempio, il file si chiama "PROVA.TXT". Poi, la modalità di lettura o scrittura si dichiara fuori dalle virgolette. In questo caso, FOR OUTPUT indicates that the file should be written and not read. The logical file number is indicated after AS #.
IBM PC Basic is also capable of concatenating data into a file, adding more data, instead of overwriting previously written data. To do this, you use FOR APPEND in the place of FOR OUTPUT. This FOR it should not be confused with the cycle FOR… NEXT. There are also other ways of accessing the file, not just sequential access, but this is not the subject of this video.
After education OPEN, se non ci sono stati errori (ad esempio il drive spento o il disco pieno), ci troviamo con il file logico 1 aperto. Il drive ha creato un file sequenziale chiamato "PROVA", nel quale possiamo scrivere dei dati.
In fact, on line 330, PRINT#1 write the string A$ (contenente i dati da scrivere, che il computer ha chiesto prima), sul file logico 1, che corrisponde al file "PROVA" sul drive.
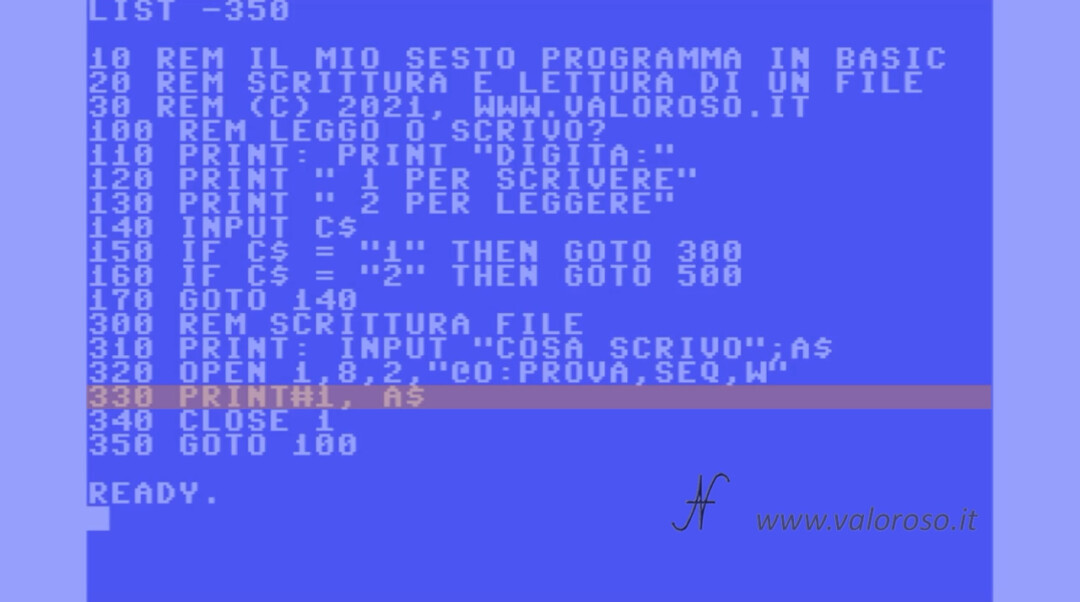
Here too, there is a small difference between Commodore and PCs: in PCs, between PRINT and the gate, it takes a space.
It is possible to write multiple lines of data on the same file, inserting other instructions PRINT#1 after line 330.
Once the string has been written, the logical file 1 is closed with the instruction CLOSE, present on line 340. IBM PCs use the hash, which is not needed in the Commodore. It is important to close the file after opening it.
With line 350 we return to the main menu, where, for example, we can choose to read the newly created file.
Deepening the command OPEN, it is not possible to open the same logical file number a second time without having previously closed it.
Reading a sequential access text file in Basic
We continue the course on how to write and read a file in Basic. From line 500 the file we have just written opens and reads. Obviously, you must create the file before reading it, otherwise the program does not return any data, or it returns errors.
In line 520 we still find the instruction OPEN.
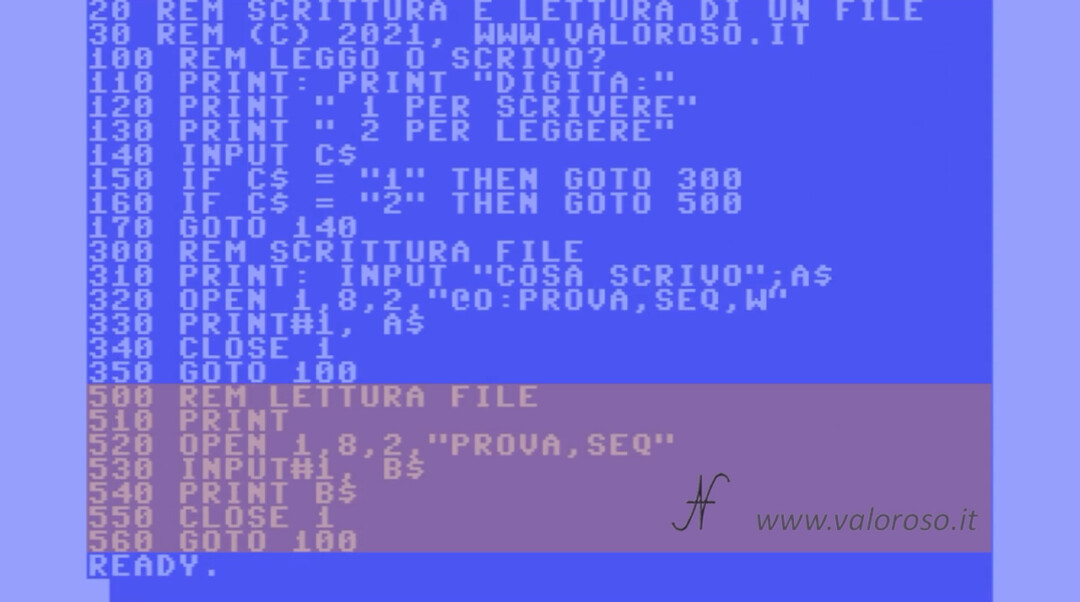
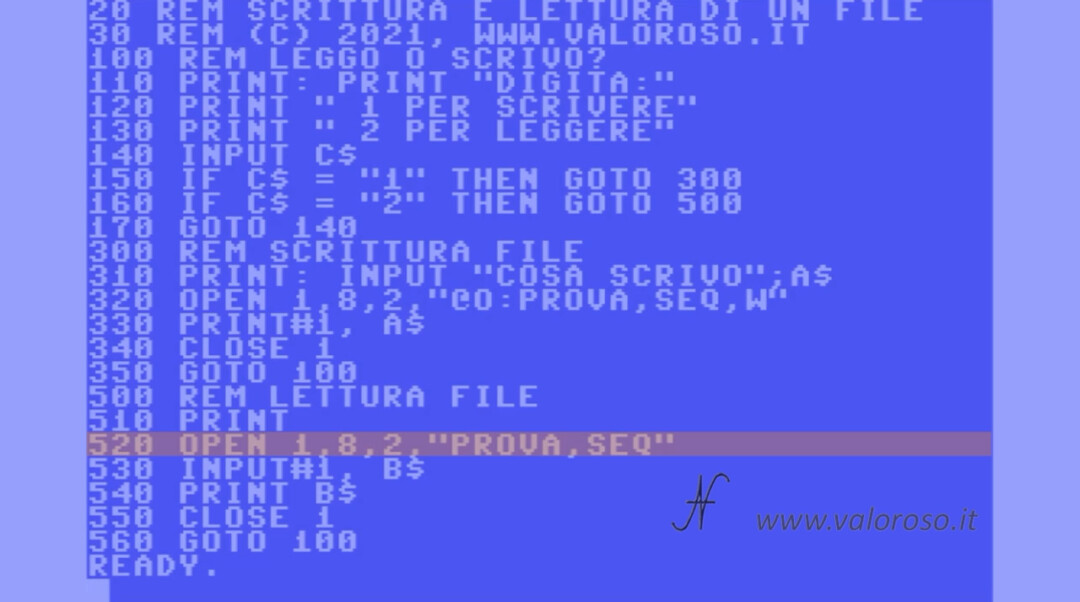
520 OPEN 1,8,2,"PROVA,SEQ"
Apriamo sempre il file logico 1 sul drive 8, canale 2. Il file da aprire è chiamato "PROVA", ed è lo stesso file sequenziale che abbiamo scritto in precedenza. L’assenza della "W", preceduta dalla virgola, rappresenta la modalità di lettura.
Here too, in the Basic of IBM PCs, for example GwBasic, PC-BASIC or QuickBasic QB64, the syntax of OPEN it's different.
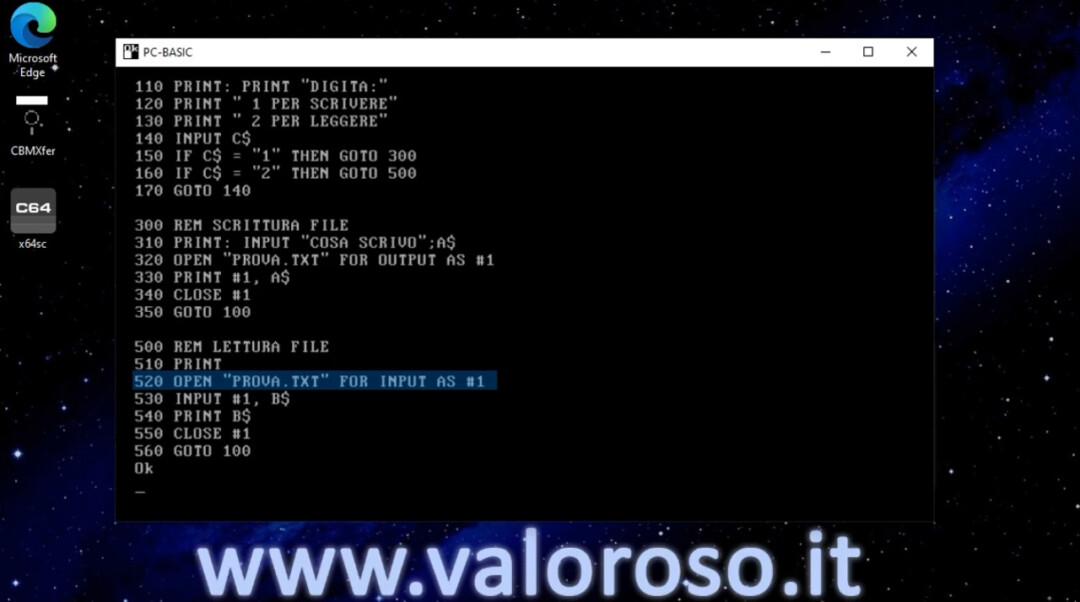
520 OPEN "PROVA.TXT" FOR INPUT AS #1
Compared to before, we use FOR INPUT in order to declare the read mode of the file.
After education OPEN, if there have been no errors, we find ourselves with the logical file 1 open, which corresponds to the reading of the “PROVA” file present on the disk.
On line 530, with INPUT#1, the computer reads the contents of the first line of data in the sequential file. This data is stored in the variable B$.
In the PC Basic, between INPUT and #1 it takes space.
With line 540, we write the data present in the variable to the monitor B$, then the contents of the first line of the file.
It is possible to read more lines of data from the file (which must not contain quotes), adding more instructions INPUT#1 after line 530. Obviously the file must contain multiple lines of data, otherwise the computer returns an error.
At line 550 we close the open file, while at line 560 we return to the main menu.
Test and run the sample program
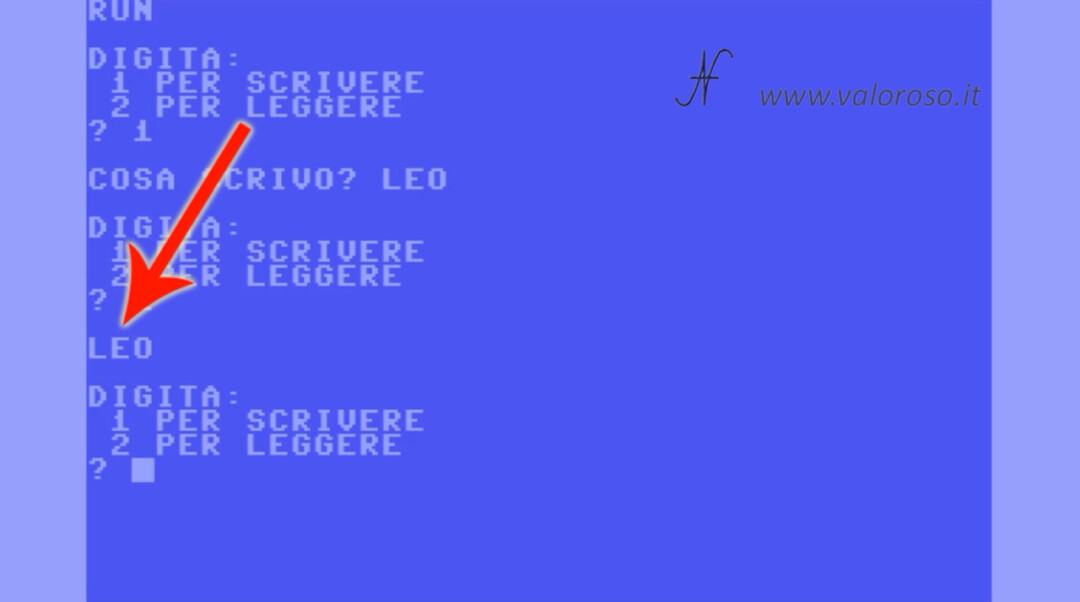
After loading and starting the example program, available at the bottom of this page, the first step is to write a file. We type 1, followed by RETURN.
If you use the emulator, remember to connect a virtual D64 disk to drive 8, otherwise the example program will not be able to write and read the file. If you use a real commodore, remember to connect the drive to address 8.
We type the string we want to write to file, for example your name.
When the program returns to the menu, we can go and read the file: we type 2 followed by RETURN.
Il computer legge il file "PROVA" che abbiamo creato, che contiene la stringa che abbiamo digitato prima.
On Commodore computers, we can actually verify that the file has been written to disk, with the commands:
LOAD "$",8
LIST
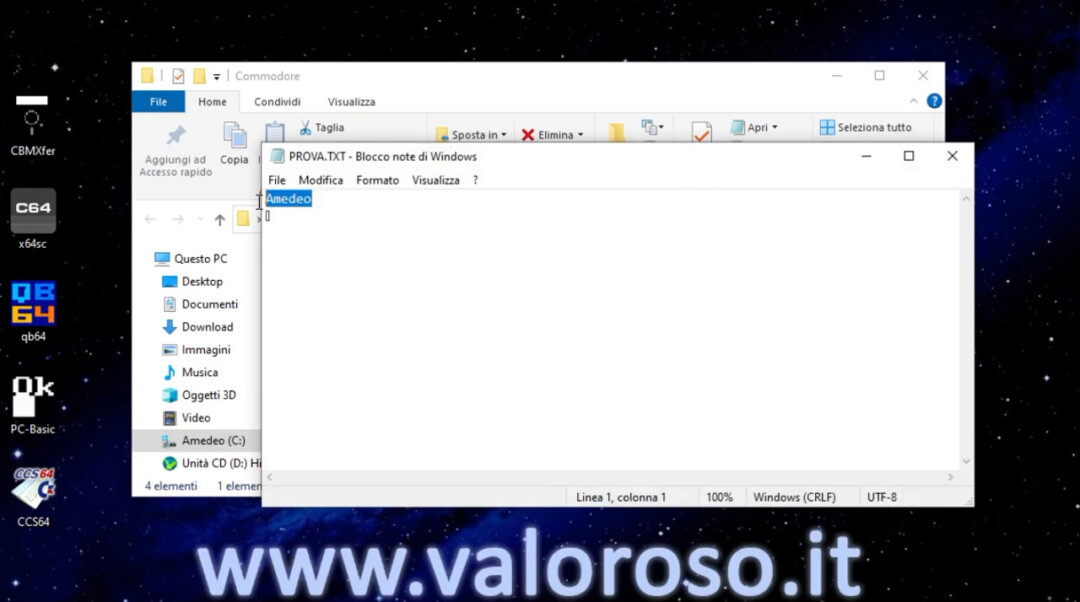
In IBM PCs we can use the command DIR (in the DOS) or use the Windows file explore.

List of the program to write and read a file in Basic
And here is the listing of the program of the sixth episode of the video course on how to program in Basic, with the Commodore and with the IBM PC.
- CORSO-BASIC-6. ZIP, ZIP compressed folder to unpack. It includes the program in PRG format, which can be loaded and booted from the Commodore 64, a virtual D64 disk containing the programs that can be loaded from the C16, Vic20, C64 and C128, as well as emulators (CCS64, VICE or others). It also contains an empty D64 file, for emulators. It also includes the program in BAS format for PC-Basic, QuickBasic QB64 and GwBasic for DOSBox and MSDOS.
The topics of the course are still many!
Credits: in the video course, SID music is Delta by Rob Hubbard.
To be notified when other tutorials, experiments and reviews related to retro computers and subsequent installments of the BASIC course will come out, I suggest you subscribe to the YouTube channel and activate the notification bell!