Today special topic! Begin the programming course in Basic, the Commodore language. Today's episode is about creating a very simple program.

Let's see how to type it, how to view its list, how to modify it, then start it and even stop it. We begin to learn how the computer thinks and we discover first commands.
The lines of instructions we analyze today are: REM, PRINT, INPUT and GOTO.
We also use special keys: RUN/STOP, SHIFT + CLR-HOME and SHIFT + INST-DEL.
The commands we analyze are: RUN, CONT and LIST.
In the next installments, we will also see how to save and load files, how to transfer them to the PC and vice versa and also how to create programs on the PC, using the notepad, and then transfer them to the Commodore and run them.
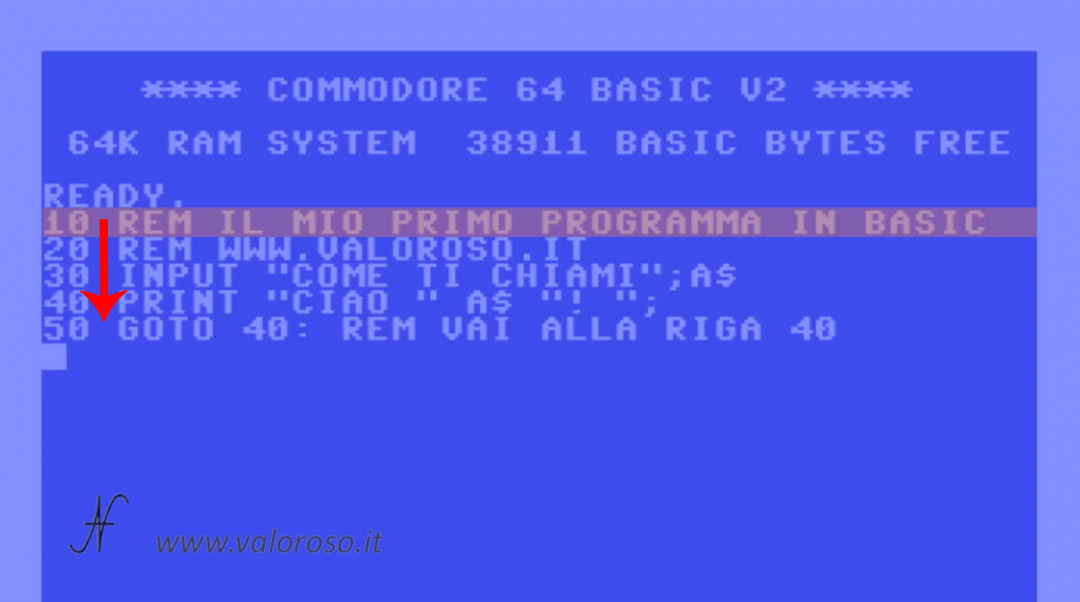
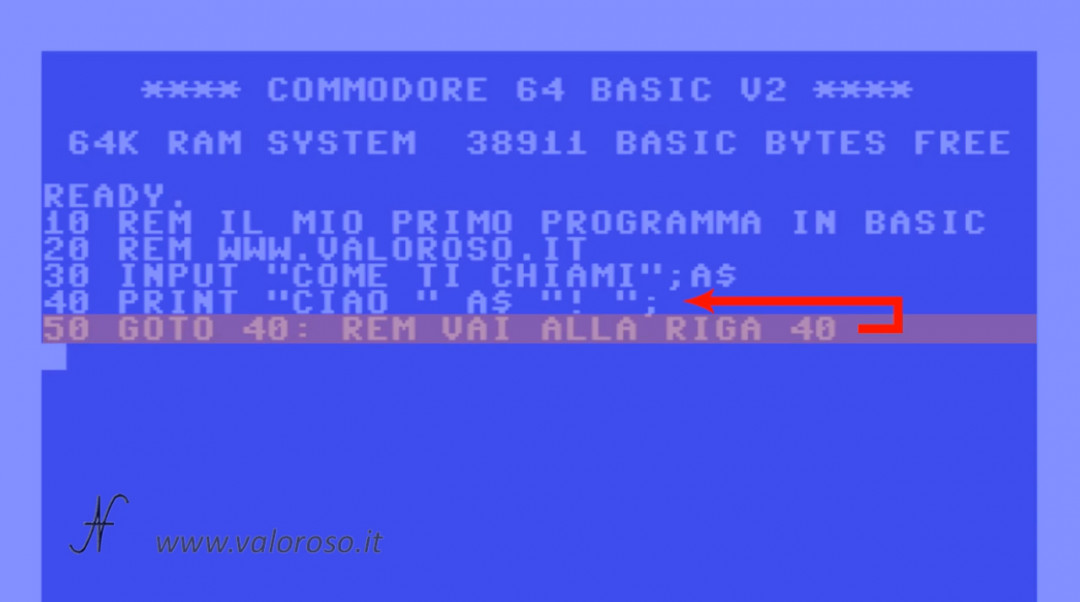
Here is the program to type!
And here is the example program of the first lesson of the Basic programming course. At the bottom of this page, you can already find it in TXT format (to view it on the screen), and in PRG format, to start it on the Commodore 64.

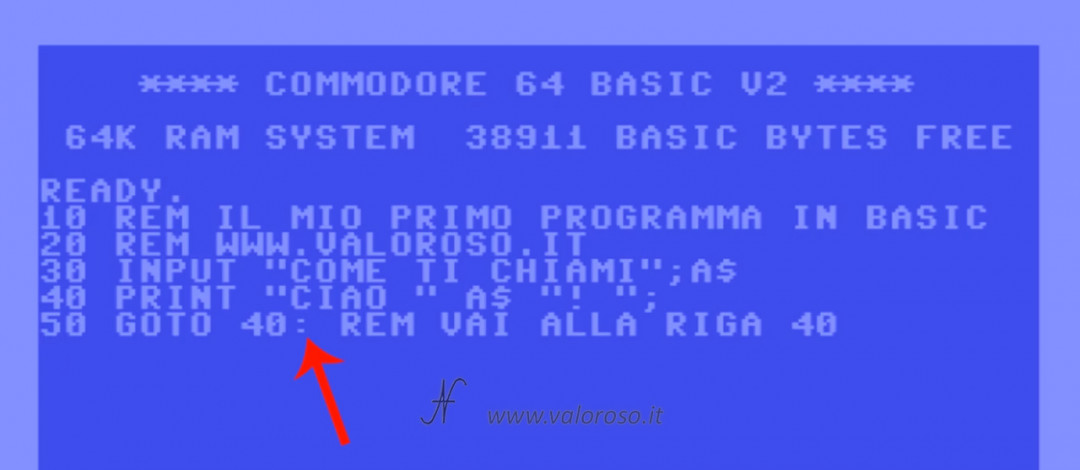
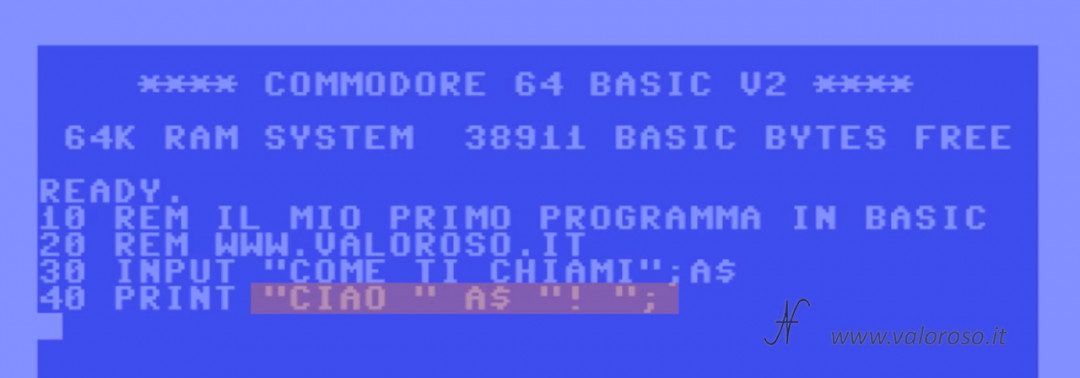
10 REM IL MIO PRIMO PROGRAMMA IN BASIC
20 REM WWW.VALOROSO.IT
30 INPUT "COME TI CHIAMI";A$
40 PRINT "CIAO " A$ "! ";
50 GOTO 40: REM VAI ALLA RIGA 40

Basic Programming Course, for which computers?
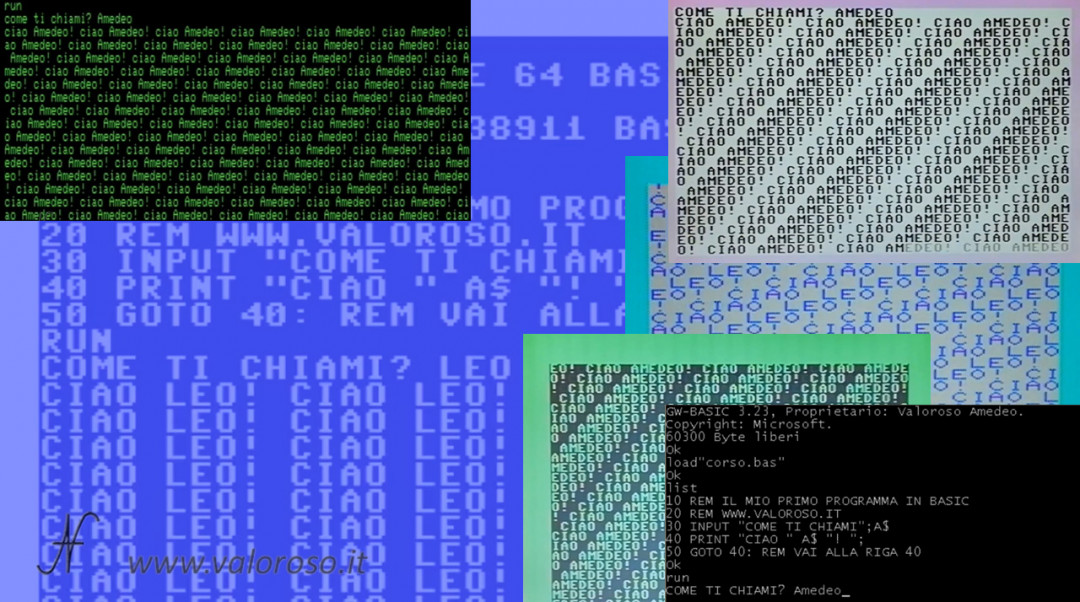
The simple program that we make in the tutorial can be run on many different Commodore: on the Commodore 16, on the Commodore Vic20, on the C64, on the C128, but also on the Commodore PET. It can also be run on emulators (e.g. emulators for Windows VICE and CCS64) and you can also run it on the old GWBASIC that was in the PC DOS.
If you are using the Commodore Pet, remember to type the all -tiny program.
If you are interested in the topic, I suggest you enroll in my YouTube channel and activate the notification bell, in this way you will be notified when I publish the other episodes of the course.
Execution of instructions in sequence
Let's start the Basic programming course with a question: Do you know how the instructions are executed in Basic?

The Commodore executes the instructions sequentially, from the lower line number to the upper one, unless you encounter instructions such as GOTO, GOSUB, functions or loops, which can jump from one point to another in the program.
Each line line starts with a number. It doesn't matter what number it is, the important thing is that each row has a different number.
If we write a line with the same number several times, only the most recent one remains in memory.
In addition, I recommend leaving some empty numbers between the various lines, also to be able to insert other features in the future.
To confirm and store the program line, after typing it, press RETURN (or ENTER if you are using a PC emulator, such as VICE or CCS64).
Remember that the instructions must be entered precisely and correctly, with all spaces and punctuation marks. Otherwise the program may not work!
If we want to type more instructions on the same line, in Basic these are divided with a colon ":". In line 50 of the program, there are two statements: GOTO and REM.
Basic Programming Course: REM instruction
The first instruction we see in the tutorial, REM, indicates a comment that we want to include in the program: it is useless in execution, but it is useful to remind us, in the future, what the program or part of it is for.
It is good to put many comments in the programs, to remind us not so much what the various instructions are for, for this there are the manuals, as to remind us of the operating logic of the software we have made. In the second line of comment, I suggest this website, where I publish my videos and articles!
INPUT? A cosa serve in Basic?
The third program line, the one indicated with 30, contains an education, INPUT, indicating a data entry. The computer asks us what we have indicated in the quotation marks, in this case “What's your name”. The question mark is automatically added by the Basic. Our response, which we type on the keyboard, is saved in a variable, which is a data container. In this case, I added a dollar $ after the variable name A$, to specify that it is a string, that is, I expect a sequence of characters and not, for example, a number on which to make accounts.
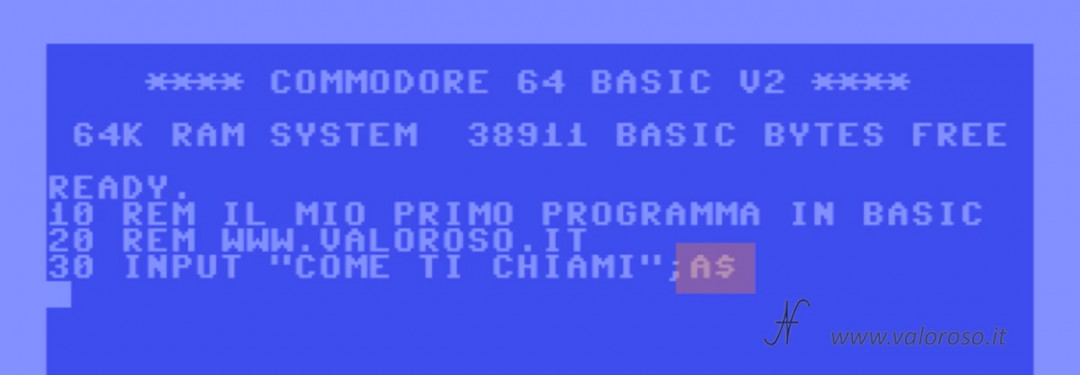
Deepening the discussion of variables, we must consider that the Commodore Basic considers only the first two letters of the variable name, so, for example, variables ABC$, AB $, but also ABD$ represent the same container.
PRINT statement
Print education, present in the fourth line of the example program for the Basic programming course, it is used to write on the screen. Nel nostro esempio, il computer scrive quello che è indicato nelle virgolette, ma anche la variabile, che abbiamo digitato prima, e il punto esclamativo. Viene concatenata la scritta "CIAO " con il nome contenuto nella variabile A$ nonché il punto esclamativo. The semicolon at the end of the line, it serves to indicate to the Basic of do not go to line, with the cursor, after having finished writing on the monitor.
Education PRINT it can also write to other destinations, such as a file or printer. This, however, we will see in other episodes of the course.
Basic Programming Course: GOTO instruction
Education GOTO It serves to move the sequence of execution of the program and is therefore useful for jumping to another line (in the case of the example of the basic programming course, line 40).
Launch the execution of a basic program
After typing all the programming tutorial program in Basic, we can start it by typing RUN and pressing RETURN on the keyboard (or RETURN on the emulator CCS64 O VICE for PC).
We see it on various computers: on the Commodore 64, on the C16, on the Commodore Vic20, on the emulator for the Commodore PET, on the C128. We also see this on the GWBASIC for DOS of an IBM computer. It is always the same program and works on all devices.
Manage the execution of the program
To interrupt the execution of the program, press the key RUN/STOP on the Commodore keyboard.
On emulators, the key RUN/STOP is replaced by ESC. So, both on VICE and on CCS64, to stop the execution of the program, we must press ESC.
On the Commodore PET VICE emulator, you have to press CTRL to stop the program. On the mulator of the Commodore Plus4 the key is END.
It is possible to restart the program from where it left off, typing the command CONT. If we had typed RUN in the place of CONT, the program would restart from the first line.
Display the listing of the program, LIST command
After typing the tutorial program, when it is not running, you can call up and view the typed listing.
First of all, to clean the monitor you have to press the keys simultaneously SHIFT and CLR-HOME. On Windows emulators, you have to press SHIFT + HOME (O Shift + start). The monitor is cleaned, but the program is not cleared.
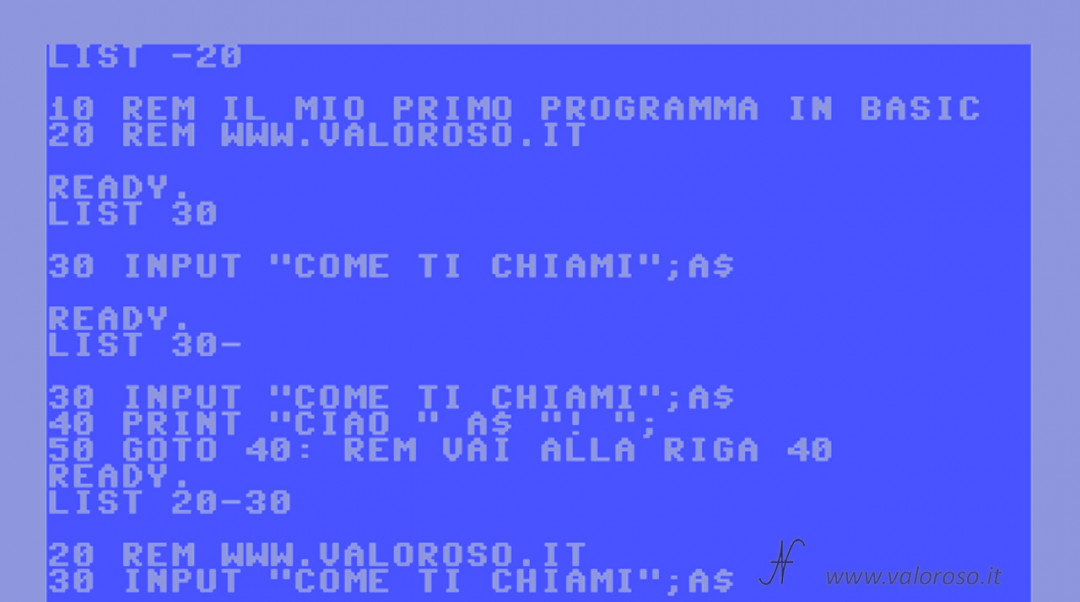
To view the listing of the program we typed earlier, we write the command LIST and we press RETURN. The example program of the Basic programming course is short and fits all in one screen.
If the program is much longer, it is possible to view only a certain line of lines, for example:
- LIST -20 displays up to line 20;
- LIST 30 displays only line 30;
- LIST 30 - shows the program from line 30 onwards;
- LIST 20-30 displays the listing from lines 20 to 30, inclusive.
Change the lines of the program to Basic
It is possible to change the program lines, simply by moving over with the cursor, changing the interested line. After making the changes, you have to confirm the insertion of the row by pressing RETURN.
It may be necessary to insert some empty spaces in the line, for example when the modified text is longer than the previous one. In this case, it is possible to insert the missing spaces by pressing SHIFT+INST-DEL On the Commodore keyboard. On emulators installed on Windows, the keys can be SHIFT + DEL (backspace) or, SHIFT + INS.
Basic program listing of the step-by-step tutorial
And here is the listing of the Basic program of the first installment of the Commodore's Basic programming course.
The program is available in two formats:
- COURSE-BASIC-1. TXT, in text format, to analyze it on a PC or to transcribe it on the various Commodore or on the DOS GwBasic;
- COURSE-BASIC-1. ZIP, ZIP tablet to be disappeared. It includes the program in PRG format, loadable and initiated by Commodore 64 and a D64 virtual disk with the program loaded by the C16, VIC20, C64 and C128 inside, as well as emulators (CCS64, deputy or others).
The topics of the course are still many!
Credits: in the video tutorial, SID music is Noisy Pillars by Jeroen Tel.