Welcome to the eighth episode of the Basic language course! In today's video, we learn how to write a simple program starting from an idea.

How to write a program: the flowchart
Suppose we want to write a very simple program to generate the various lines that make up a scoreboard. It is not always necessary to write a program flow diagram. For very simple programs, these operations can be done in mind. However, to make the idea clearer, we write a draft.
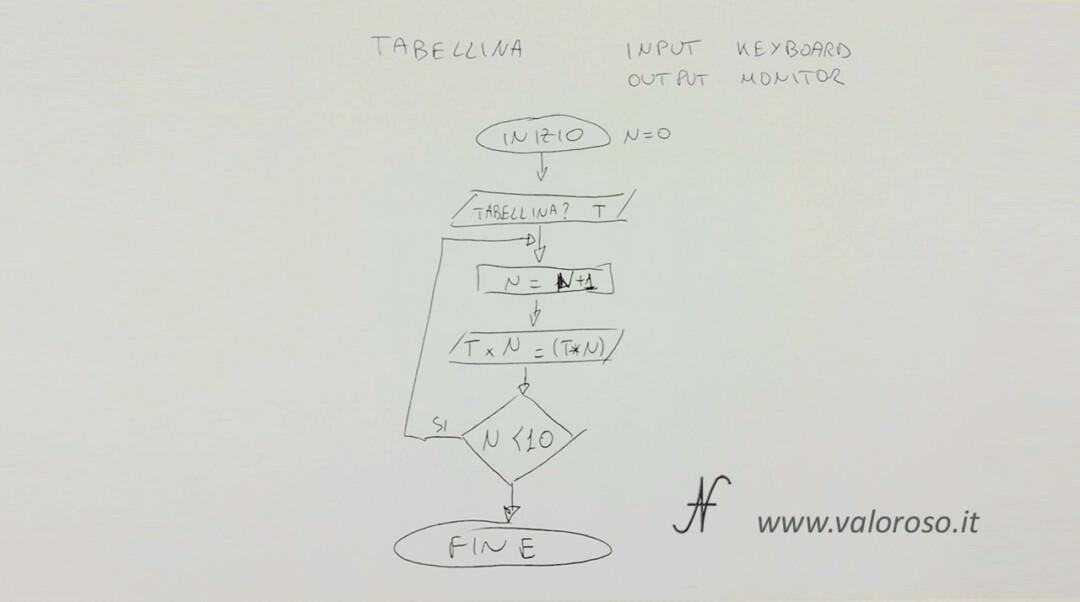
The diagram came very bad! It's bad! Anyway ... the ellipses identify the beginning and end of the program.
Parallelograms indicate the inputs and outputs. For example, the questions that the computer asks us and the strings that it returns to monitor.
Rectangles indicate operations. Finally, the rhombuses indicate the conditions.

Let's briefly analyze the flow digram of the program to generate a times table
In the first parallelogram, we immediately ask which tab to print and put the value in the variable T.
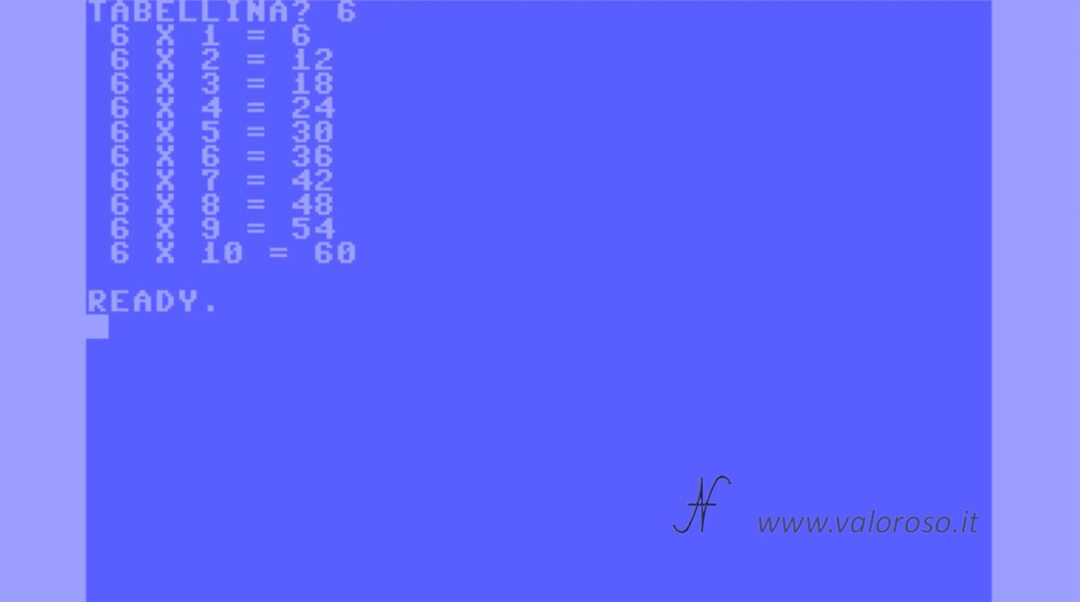
To print the value of this times table, the times table T (for example of the 5), what should the computer write to monitor?
5 x 1, 5 x 2, 5 x 3, etc. etc. up to 5 x 10.
Next, we set a counter and call it N. As soon as you start the computer, the memory is clean and N is equal to 0. In the first operation, we set N = N + 1, then, if N = 0, after the operation N = 1.

In the example of the 5 table, the first line that the computer must write is:
5 x 1 = 5
Therefore: "T x N = " (in the example "5 x 1 = ") and then (T*N), understood as the result of the operation.
After you print the value and then 5 x 1 = 5 the computer should consider whether to continue to the next cycle. With the rhombus we define a condition: N is it less than 10? If the condition is met, then, if N is less than 10 (in the first cycle is worth 1) we redo the program from where the arrow points, so as to get to a N equal to 2, then to a N equal to 3, etc ...
The computer repeats the cycle until N is not equal to 10. When I got to nine, N = 9, N + 1 = 10, the computer writes 5 x 10 = 50.
N is less than 10? No, because it is equal to 10 and then the computer exits the program. End!
Additional program specifications
In addition to defining the operating logic of the program, it is also good to define some specifications. Quite simply, we want to indicate:
- that the input and output of the program are in text format;
- That the program must be compatible with all the 8-bit commodores, the Basic of the Aries, the QB64, Quickbasic, Gwbasic and PC-Basic.
The second condition complicates us a little life, as we can only use the basic commands, common to all basic.
How to write a program: convert the flowchart to Basic
After having the idea and having defined the logic and specifications, we can write the program, coding it in Basic.
This is the first version of the program, adhering to the flowchart.
10 REM IL MIO OTTAVO PROGRAMMA IN BASIC
20 REM VISUALIZZAZIONE TABELLINA
30 REM (C) 2021, WWW.VALOROSO.IT
50 PRINT "TABELLINA";
60 INPUT T
100 N = N + 1
110 PRINT STR$(T); " X"; STR$(N); " ="; STR$(T * N)
120 IF N < 10 THEN GOTO 100
After the implementation of the program, in an attempt to improve it, a cycle was implemented FOR... NEXT instead of condition IF... THEN. So here is the second version of the program:
10 REM IL MIO OTTAVO PROGRAMMA IN BASIC
20 REM VISUALIZZAZIONE TABELLINA
30 REM (C) 2021, WWW.VALOROSO.IT
50 PRINT "TABELLINA";
60 INPUT T
100 FOR N = 1 TO 10
110 PRINT STR$(T); " X"; STR$(N); " ="; STR$(T * N)
120 NEXT N
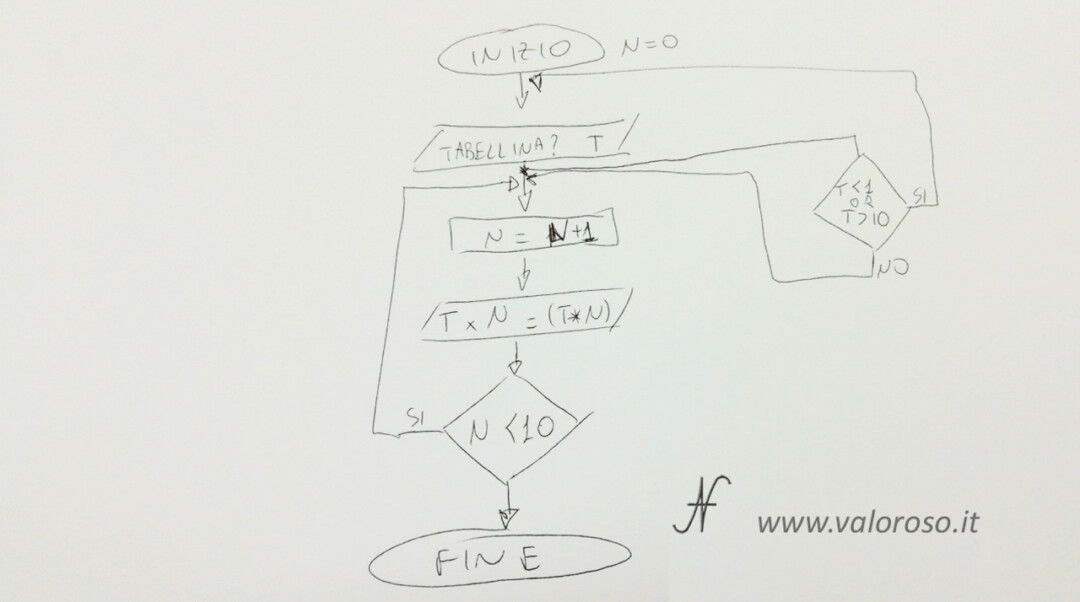
The third version of the program is improved, including a control of the number of the table to be generated. In fact, previous versions also generated non-existent boards, for example that of 20 and that of -3. In this latest version, the computer writes only boards 1 through 10.
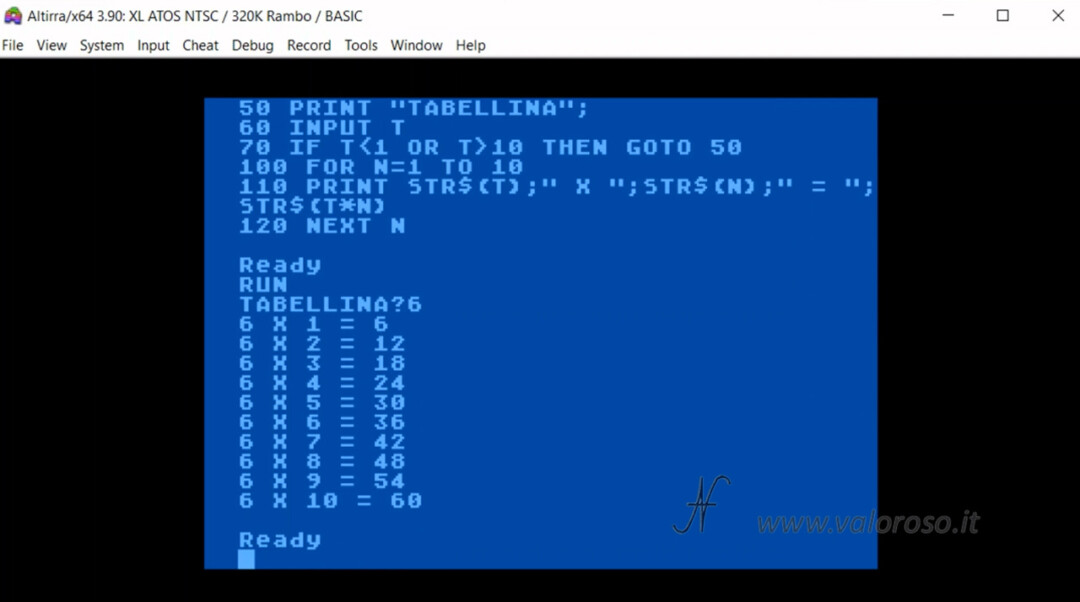
10 REM IL MIO OTTAVO PROGRAMMA IN BASIC
20 REM VISUALIZZAZIONE TABELLINA
30 REM (C) 2021, WWW.VALOROSO.IT
50 PRINT "TABELLINA";
60 INPUT T
70 IF T < 1 OR T > 10 THEN GOTO 50
100 FOR N = 1 TO 10
110 PRINT STR$(T); " X"; STR$(N); " ="; STR$(T * N)
120 NEXT N
With the third version of the program, we also need to revise the flowchart, which, from ugly, now becomes very ugly!
Analyzing the program in Basic to generate the boards
The first three lines of the program, 10, 20 and 30 contain comments. We saw the REM instruction, to include comments, in first episode of the course on Basic.
The computer asks what tab number to generate at lines 50 and 60. It doesn't matter how many numbers we jump between rows, but what matters is that the rows are all in a row. The computer, however, puts the rows in order autonomously.
The computer enters the number of tabs we want and print in the variable T. I split PRINT from INPUT to make the program also compatible with the Basic of ATARI. We have already studied these two instructions in the first episode of the course on Basic.
So, now, we find ourselves with the first step achieved: we have the value T of the table that we want to print. We also leave here some spaces, you never know that they come in handy afterwards.
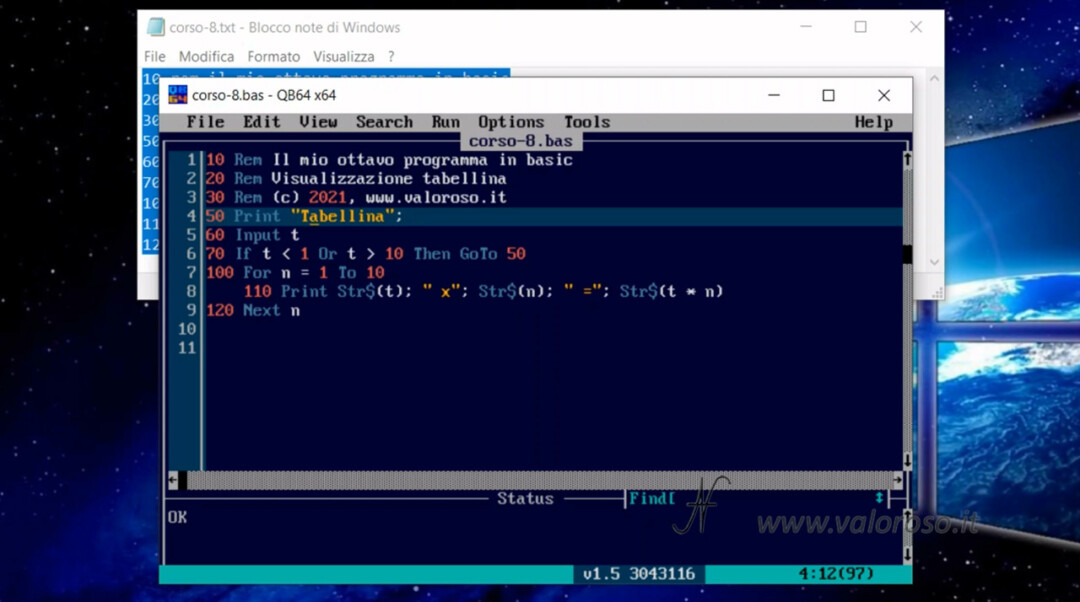
At line 70, the computer checks that the required tab is between 1 and 10. If this is not the case, it again requires the table to be generated.
At line 100 the loop begins FOR N... NEXT N, which closes at line 120. We have already talked about the cycle FOR in the third video of the course on Basic.
The times table line is printed at line 110.
Through PRINT, il computer scrive a monitor "T X N = (T*N)", ad esempio: 5 X 1 = 5.
To convert the number into a text, we use the STR$, which we talked about in the episode 2 of the course on Basic.
T is the times table number (e.g. 5). The computer writes 5, semicolon to concatenate strings, X (multiplication symbol), semicolon again N, and then the result of multiplication T*N. The result is also converted to a string with STR$(T*N).
The computer repeats the writing of the table line 10 times as indicated in the loop FOR.
Documentation
I have prepared a brief compendium with all the commands in Basic V2 of the Commodore 64. You can find it if you follow This link.
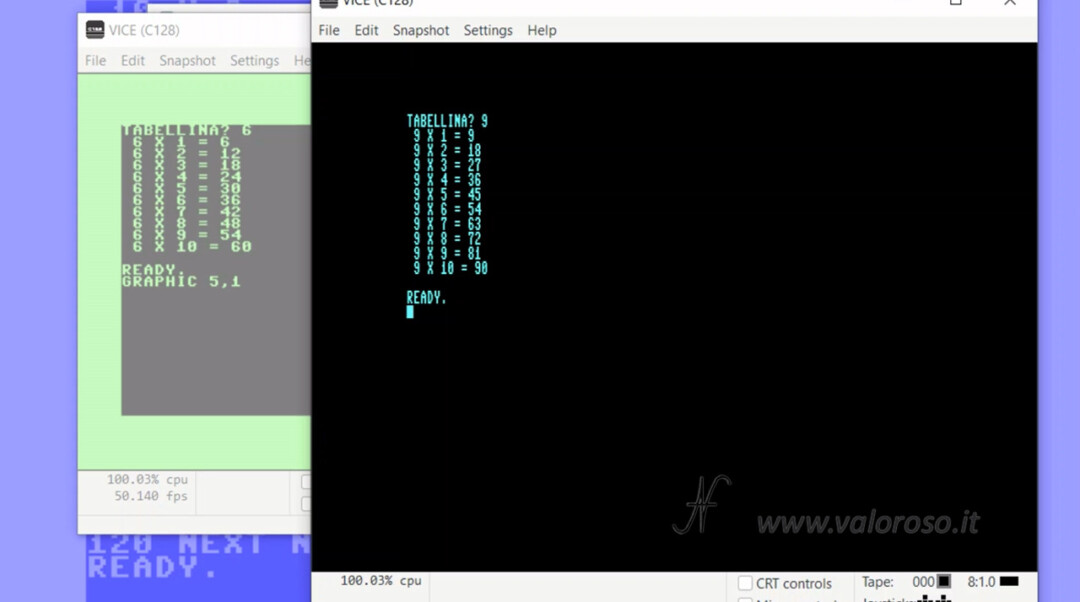
Here is the program, written in a lowercase, suitable for being copied and glued within the emulator deputy for Commodore 16, C64, C128, Commodore Pet, VIC20, as well as in the QB64 and high -altitude emulator for Atari.
10 rem il mio ottavo programma in basic
20 rem visualizzazione tabellina
30 rem (c) 2021, www.valoroso.it
50 print "tabellina";
60 input t
70 if t < 1 or t > 10 then goto 50
100 for n = 1 to 10
110 print str$(t); " x"; str$(n); " ="; str$(t * n)
120 next n
Credits: In the video tutorial, SID music is ACE II by Rob Hubbard.
To be notified when I publish other episodes of the course on the Basic language, or when I publish other videos, experiments and reviews related to retro computers and vintage electronics, I invite you to subscribe to the YouTube channel and activate the notification bell.
Great Amedeo as usual you can see us on facebook
Thank you! See you soon!