Welcome to the third appointment of the programming tutorial in Basic. The program in Basic that we make today is a timer for fitness training. To be notified when the fourth episode comes out, you can subscribe to the YouTube channel (and activate the notification bell) by clicking on this banner:

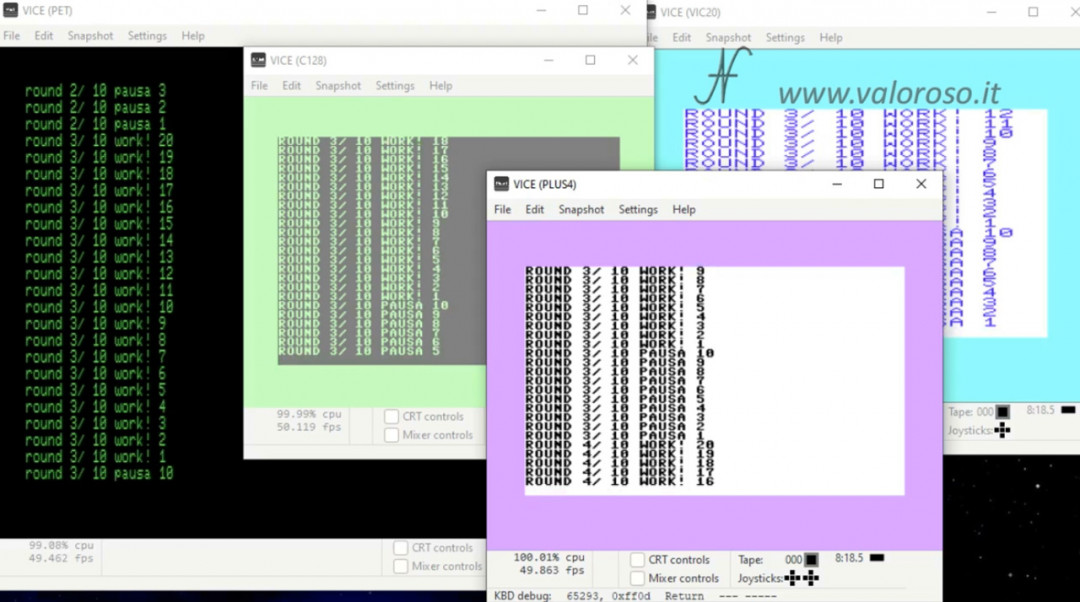
The fitness training timer, which we make in Basic, is compatible with:
- all the Commodore 8-bit: the Commodore 16, the Vic20, the Commodore 64, the 128, the Commodore PET (typing the program in lowercase);
- pc emulators (so the VICE and the CCS64);
- also with the QuickBasic QB64, which allows you to create executable files: for both Windows, linux and MEC, depending on the version of QB64 you install.
Basic programming tutorial: we make a timer for fitness training
Today's program is a fitness workout timer.
Sets the number of rounds that make up the circuit, the working time for each exercise (in seconds), and the duration of the break between series (in seconds).
The program is available for download at the bottom of this page. If you don't want to type it, you can load it on your Commodore with Sd2iec O Kung Fu Flash or other interfaces.

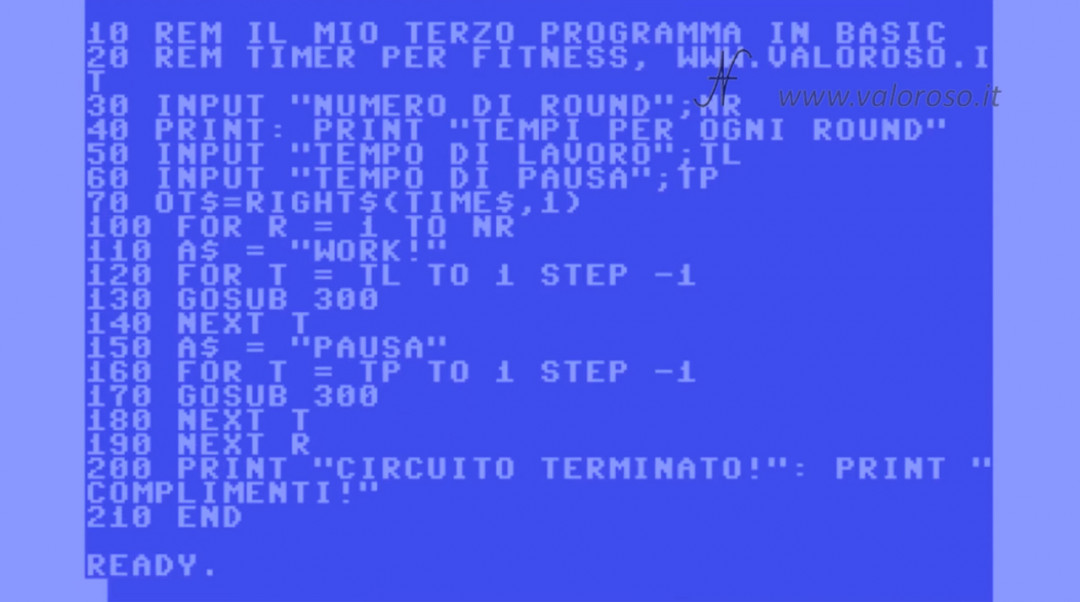
Here is the listing:
10 REM IL MIO TERZO PROGRAMMA IN BASIC
20 REM TIMER PER FITNESS, WWW.VALOROSO.IT
30 INPUT "NUMERO DI ROUND";NR
40 PRINT: PRINT "TEMPI PER OGNI ROUND"
50 INPUT "TEMPO DI LAVORO";TL
60 INPUT "TEMPO DI PAUSA";TP
70 OT$=RIGHT$(TIME$,1)
100 FOR R = 1 TO NR
110 A$ = "WORK!"
120 FOR T = TL TO 1 STEP -1
130 GOSUB 300
140 NEXT T
150 A$ = "PAUSA"
160 FOR T = TP TO 1 STEP -1
170 GOSUB 300
180 NEXT T
190 NEXT R
200 PRINT "CIRCUITO TERMINATO!": PRINT "COMPLIMENTI!"
210 END
300 REM ATTESA 1 SECONDO
310 PRINT "ROUND"; STR$(R); "/" ;STR$(NR); " "; A$; STR$(T)
320 IF OT$=RIGHT$(TIME$,1) THEN GOTO 320
330 OT$=RIGHT$(TIME$,1)
340 RETURN
Program analysis, the first REM, INPUT and PRINT statements
Let's start analyzing the sample program of the programming tutorial in Basic.
In the first two lines of the program (the 10 and the 20) we find the instruction REM, useful for including comments. We have already analyzed this instruction in the first episode of the course.
lines 30 50 and 60 contain the statement INPUT. We also talked about this instruction in the first two episodes of the course. The program asks the user for three data:

- the number of rounds that make up the training (saved in the numerical variable NO);
- the working time for each round (which is put in the variable TL);
- and the pause time for each round (which is placed in TP).
line 40 contains the statement PRINT, which we have already analysed.
The TIME $ system variable and the RIGHT $ function
Well, here's one of the novelties of this installment of the programming tutorial in Basic! We find it in line 70.
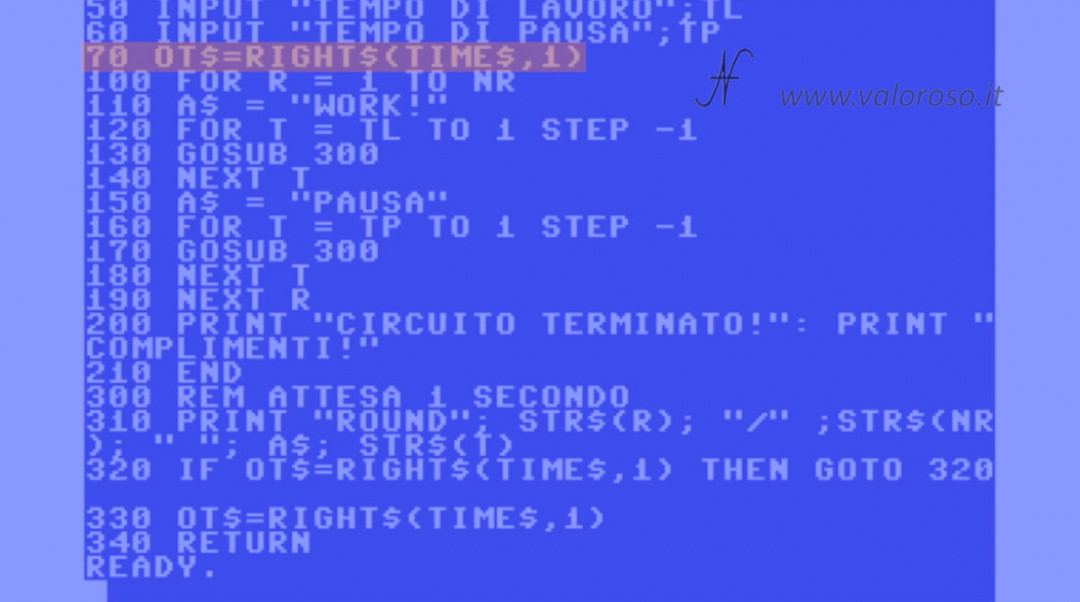
70 OT$=RIGHT$(TIME$,1)
The system variable TIME$ contains the time on the computer. The computer automatically updates it every second.
Nei Commodore, contiene ora minuti e secondi, senza i due punti di divisione, come in questo esempio: "201015" ad indicare le 20, 10 minuti e 15 secondi.
Nel QuickBasic 64, le ore, minuti e secondi sono divisi dai due punti, in questo modo: "20:10:15".
In the variable OT $, which is a string, the last character to the right of TIME$, quindi i secondi. Ad esempio, se l'ora attuale è "20:10:15", in OT $ viene salvato solo un carattere a destra, il "5". to retrieve the last character to the right of a string you use the RIGHT$.
You can choose how many characters to retrieve to the right of a string, using the number typed after the variable TIME$. In our case, we only need one.
As we will see later in the program, this variable will be part of a timer that serves to mark the flow of training seconds.
The for ... Next cycle
In line 100 we find another novelty! The cycle FOR! It's one of the fundamental cycles in programming languages.
100 FOR R = 1 TO NR
The computer carries out all instructions between FOR and NEXT (in this case FOR R and NEXT R) a certain number of times.
the variable r identifies the loop counter and its value is incremented with each loop when the statement is found NEXT R.
The cycle ends when the counter value reaches the value indicated after the TO.
in this case the loop repeats as many times as the variable NO (the number of training rounds) and the R counter takes on the various values, in succession, from 1 to NO.
Line 110 assigns to the variable A$ the string "WORK!". It will be necessary for the program later, when it will write to monitor if we have to work or take a break during training.
In this case we refer to the moment when, during training, we have to work. So, the next cycle (from line 120 to 140), is precisely the timer that counts the working time.
row 120 also contains a loop FOR! It is a second cycle (FOR T), nested within the previous one (FOR R).
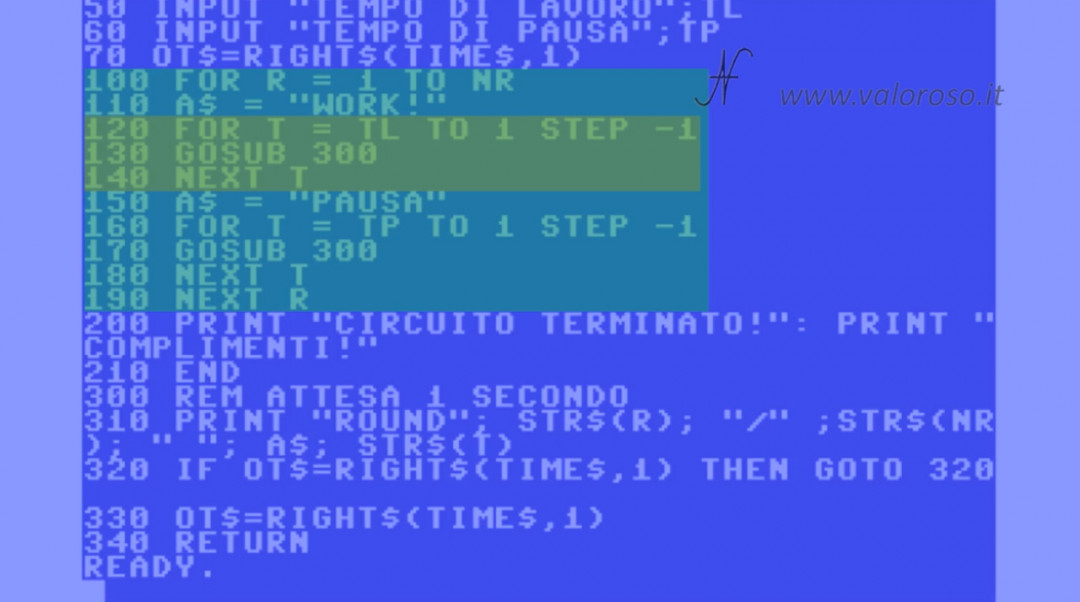
All instructions between FOR T and NEXT T are repeated a certain number of times (equal to the value of the variable TL).
Education STEP it gives the possibility to change the amount by which the variable of the cycle increases. In this case, through STEP -1, you have chosen that the value of the variable T must be decremented at each cycle, starting from TL (the working time during training) up to 1.
It's a countdown.
For now we skip line 130 and continue analyzing the program with line 140: NEXT T closes the loop we opened earlier with FOR T. Education reached NEXT, BASIC increments (or decrements, if STEP is negative), the value of the variable T. if the target value is reached the loop ends and the statement is executed after NEXT, in this case the 150. Otherwise, if T did not reach its goal, the cycle repeats, in this case from row 130.
The line 150 has the same function as the 110: it will serve in the program later, when it will write to monitor if we have to work or take a break during training. In this case it is a pause.
In fact, in the following lines (from 160 to 180), there is the timer that counts the pause time during training.
For rows 160, 170 and 180, what has already been seen for the previous cycle applies FOR T.
In this case, the value of the variable T varies from TP (the pause time) to 1, executing the instructions between FOR T and NEXT T a certain number of times.
This cycle too FOR T is nested within the cycle FOR R, as we have seen for the previous one.
Line 190, NEXT R, is the close of the first loop FOR R, the one that contains the other two nested cycles.
190 NEXT R
Basic programming tutorial: the GOSUB and RETURN statements
Here is another novelty of this episode, you can find it at line 130 and line 170: the instruction GOSUB!
170 GOSUB 300
Through GOSUB you can jump to another line of program, in this case to the 300.
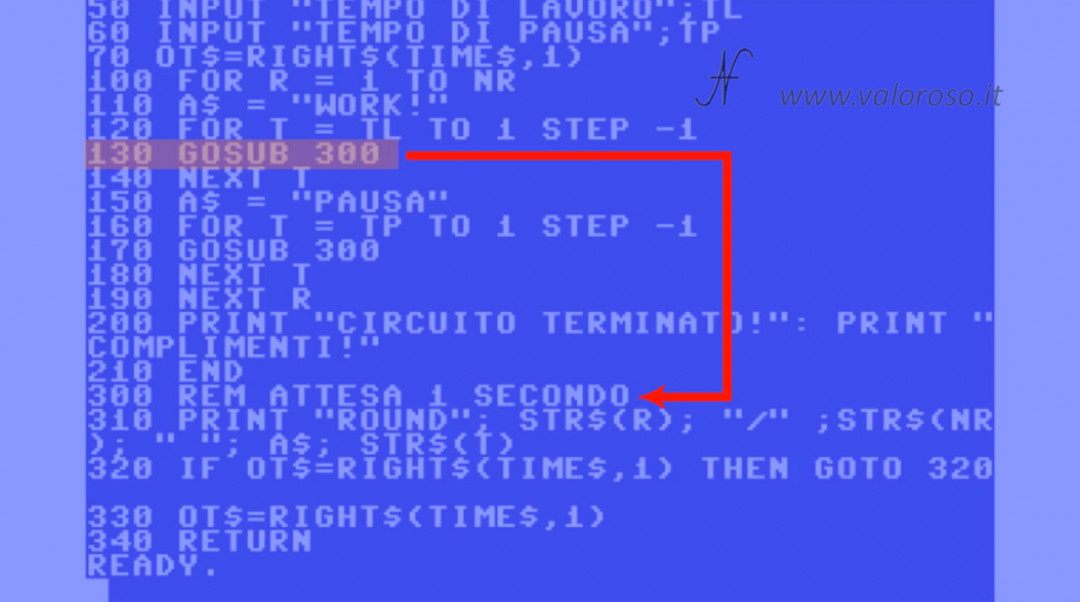
Unlike education GOTO, which we have already seen in previous episodes, GOSUB It memorizes in a stack - a memory area - the line from which the jump comes, in this case the 130.
running the program from line 130 skips to line 300 until the computer finds the instruction RETURN, which is on line 340. from line 340 the program execution returns to the line following the line of the statement GOSUB, in this case the 140.
340 RETURN
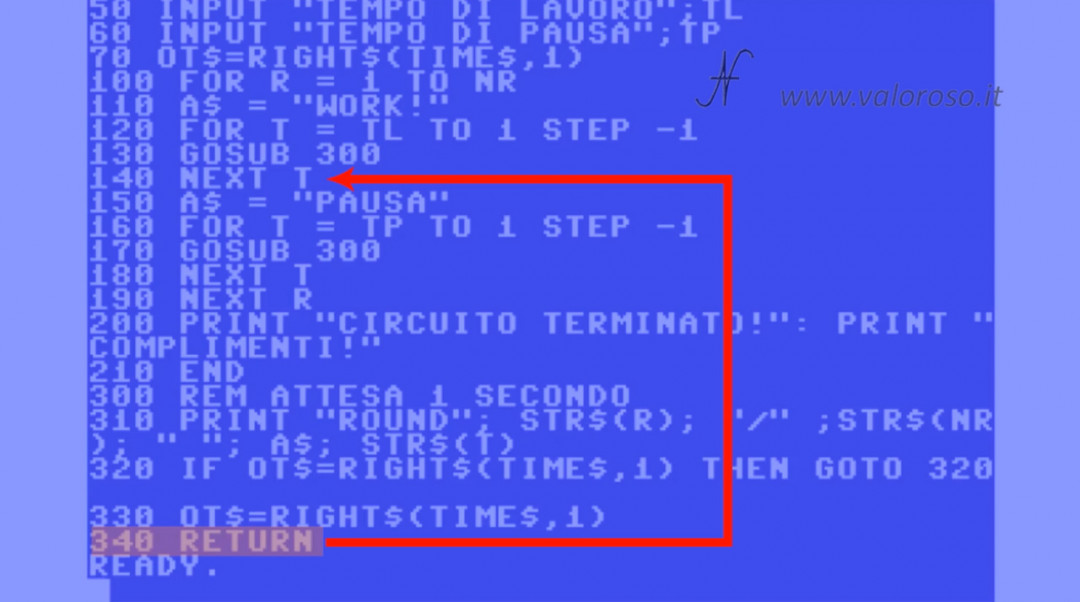
The same logic is followed at line 170, which jumps to 300 and then returns to 180.
Education GOSUB it is useful for invoking a certain sequence of instructions that can serve multiple times within a program.
END Education
We are therefore at line 200: our training is finally completed!

the program ends at line 210 with the END. Reached education END, the program terminates.
210 END
In this example, the program does not end with the last line of the program, but on an intermediate line.
The logic of the 1-second timer
the statements between lines 300 and 340 are not executed after the 210 but as we saw earlier they are invoked by the GOSUB.
Line 310 contains PRINT: we talked about it in previous episodes.
Education PRINT writes to monitor a series of information:
- la scritta "ROUND";
- the current round counter, which is contained in the variable R;
- the number of total rounds NO;
- the variable A$, which specifies whether we are working or pausing;
- the reverse timer, contained in the variable T.
ROUND 3/ 10 WORK! 15
I don't dwell on the function STR$, as we saw her in episode 2 of the course.
Lines 320 and 330 contain the actual timer.
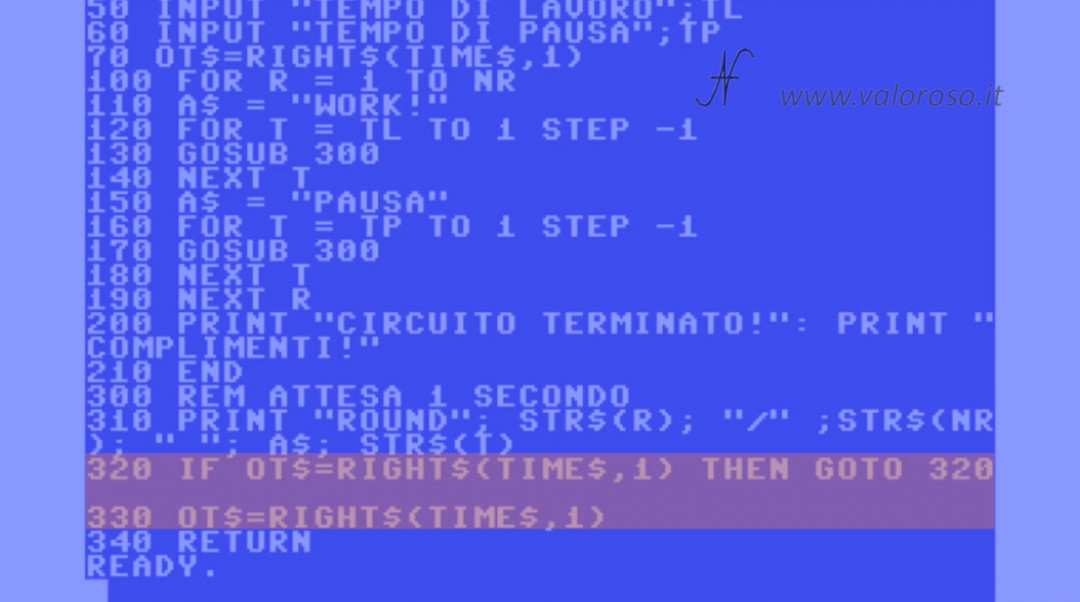
In particular, in line 320 there is the IF ... THEN, analyzed in episode 2 of the course.
320 IF OT$=RIGHT$(TIME$,1) THEN GOTO 320
When the value of the variable OT $ (which represents the previous seconds value of the system variable TIME$) is still equal to the current number of system seconds, execution remains on line 320, waiting for one second to pass.
When, on the other hand, time passes and the number of seconds in TIME$ changes from the previous one (stored in OT $), program execution continues at line 330 which saves the system variable's new seconds value TIME$.
330 OT$=RIGHT$(TIME$,1)
The execution of the program is then reported in the previous lines through RETURN.
Programming tutorial in Basic #3, the listing
For the test of the fitness program of the tutorial, I refer you to the video!
And here is the listing, the program is available in two formats:
- CORSO-BASIC-3. TXT, in text format, to analyze it on a PC or to transcribe it on the various Commodore, on the DOS GwBasic and on the QB64;
- CORSO-BASIC-3. ZIP, ZIP compressed folder to unpack. It includes the program in PRG format, loadable and bootable from the Commodore 64 and a virtual disk D64 containing the program loadable from the C16, Vic20, C64 and C128, as well as emulators (CCS64, VICE or others).
The topics of the course are still many!
Credits: in the video tutorial, SID music is Turrican 3 (1993) level 1-1 theme by Chris Hülsbeck.