Welcome to the seventh installment of the Basic language course. It is a very practical episode! Let's see how create a sprite for the Commodore 64, with SpriteMate, in a really simple and fast way. Using an example program in Basic, we move the sprite on the monitor, with the keyboard and with the joystick.

What is a sprite?
A sprite is a graphic object. It is a matrix of dots, which is defined in appropriate memory areas of the Commodore 64. The sprite can be drawn and moved on the monitor, independently from the screen below.
Draw a sprite with the SpriteMate sprite editor
We use SpriteMate to create a sprite for our Commodore 64. To use SpriteMate and create a sprite you don't need the Commodore 64! A PC with internet access is required! Let's go to www.spritemate.com.
A panel opens with many interesting functions. First let's define what kind of sprite we want to draw for our Commodore 64! From the menu Sprite, Toggle color mode, we can decide whether to leave the sprite with only 1 color, or whether to choose the multicolor sprite. Regarding the size of the sprites:
- Those with a single color are 24x21 pixels;
- The multicolor are 12x21 pixels.
In the video tutorial, we choose the multicolor sprite. In addition to the transparent background, it is possible to define 3 colors to draw the image.

Commands for drawing a sprite in SpriteMate
Let's proceed to draw the sprite for the Commodore 64 with SpriteMate. We choose the colors:
- As a standard color (shown as individual), we choose, for example, yellow;
- We click on multicolor 1 and we select the dark green;
- We click on multicolor 2 and select light green.
I do not use blue, since the program in Basic to move the sprite, which we will see later, does not change the background color of the Commodore 64 and therefore would get confused.
Let's draw the sprite using all the available height and width, since the example program in Basic is calibrated for the full size.
To draw the points that make up the sprite, we select the first color (individual) and let's start drawing, using the tool draw, the pencil.

If we get it wrong, you can use the tool erase, the eraser, to erase incorrect points.
To select the three available colors, we no longer have to use all the available colors, but only those we have selected on individual, multicolor 1 and multicolor 2.
During construction, we can also change the definition of the colors. For example, if we want to replace the color yellow individual with black, we click on individual and we redefine color. The same procedure applies to multicolor.
Double height and double width sprites
To make the program more pleasant, we select double width and double height. The Commodore 64, in fact, allows you to double the size of the sprites. The example program in Basic, to move the sprite, is calibrated on the double dimension.
From the panel Preview, click on the icons <X> and <Y>.
SpriteMate also supports the definition of more than one sprite, but today we are analyzing the animation of a single sprite.
Save the sprite and convert it to Basic with SpriteMate
We can save the sprite we just drew. We use the diskette icon: save. To keep the file in a format that we can upload again with SpriteMate, we type the file name and select the first option: save an SPM file.
We can also convert the sprite we drew to Basic. Always through the command save, we can type the file name. Then, we select Save as BASIC 2.0. The computer saves a ready-made Basic program, with all the definitions of the sprite we have just drawn!
To delete the sprite just drawn, from the menu File, we click on New file. Remember to save the file before deleting the sprite!
To load a sprite previously saved in SPM format, we use the icon load.
Proof of the sprites designed with sprites on the emulator deputy
Let's try the program we downloaded from SpriteMate! Both the Basic program and the sprite SPM file are located in the download folder of our PC.
Let's open the program in Basic. To open it with notepad, there are two possibilities:
- with the right mouse button click on Open with, and we look for the notepad;
- or, again with the right mouse button, click on Rename and change the extension to .TXT; then we open it with the notepad.
The first thing we notice is that everything is written in lowercase. That's fine! It is used on purpose to be able to copy and paste it into the VICE emulator. If it were capitalized, it would not paste correctly.
In the Basic program generated by SpriteMate, we can see all the instructions relating to the definition of the sprite. We will analyze them later in this article.
10 print chr$(147)
20 print "generated with spritemate"
30 print "1 of 1 sprites displayed."
40 poke 53285,5: rem multicolor 1
50 poke 53286,13: rem multicolor 2
60 poke 53269,255 : rem set all 8 sprites visible
70 for x=12800 to 12800+63: read y: poke x,y: next x: rem sprite generation
80 :: rem sprite_0
90 poke 53287,7: rem color = 7
100 poke 2040,200: rem pointer
110 poke 53248, 44: rem x pos
120 poke 53249, 120: rem y pos
130 poke 53276, 1: rem multicolor
140 poke 53277, 1: rem width
150 poke 53271, 1: rem height
1000 :: rem sprite_0 / multicolor / color: 7
1010 data 0,40,0,0,40,0,0,40,0,0,40,0,0,235,0,0
1020 data 235,0,1,235,64,1,235,64,5,235,80,21,235,84,85,235
1030 data 85,85,235,85,85,235,85,85,235,85,85,170,85,85,170,85
1040 data 85,170,85,0,170,0,0,170,0,0,130,0,0,130,0,135
We copy and paste the sprite program in Basic into the Commodore 64 VICE emulator. Just select all the Basic program and copy it. Let's start the emulator. In the VICE emulator, use the menu Edit and then click on Paste. As if by magic ... our program enters the Commodore 64 emulator, without having to type it!
Make sure that the last line of the program has also been inserted, otherwise press ENTER.
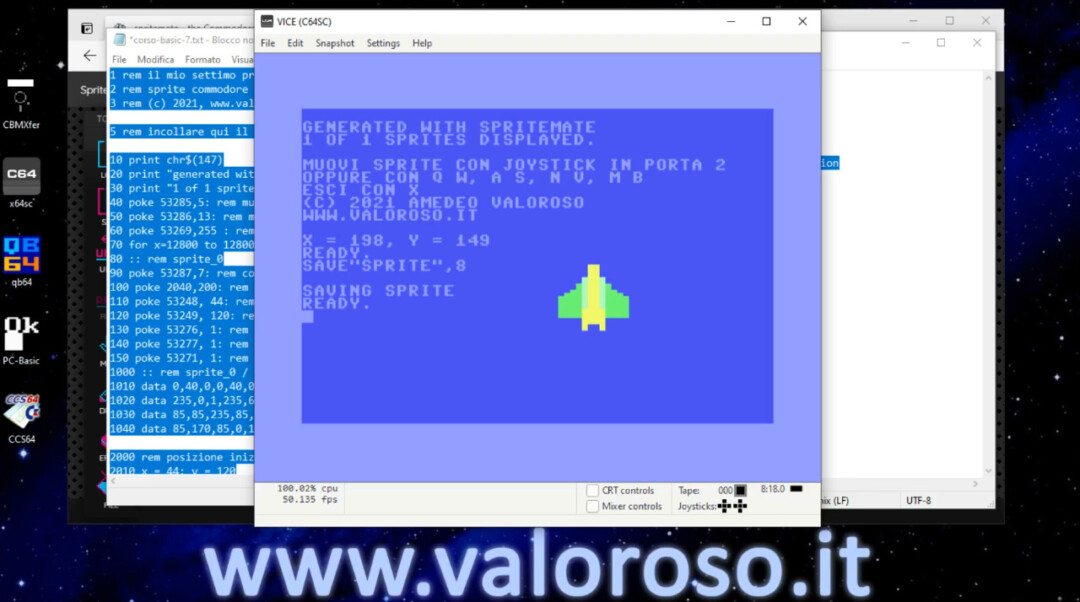
We start the program with the command RUN.
And here is our sprite drawn in double dimension. We have completed the first step.
How to move a sprit on the Commodore 64 monitor, a little theory
Could we have stopped here, with a still sprite? I would say no! Next, we make the sprite move, using the Commodore 64 keyboard and joystick.
The commands to move the sprite are:
POKE 53248, X
POKE 53249, Y
X and Y are the coordinates on the screen and can be between 0 and 255.
Let's try the X position. Even with the maximum value 255, the sprite does not position itself completely to the right of the monitor. This happens because the number of horizontal pixels of the monitor is greater than 255. For this there is a second register, which contains the ninth bit of the horizontal position.
For example, suppose we want to move the sprite to coordinate X = 299. We can help with the Windows 10 calculator, in programmer mode. The ninth bit is equal to 1. The other 8 bits that remain correspond to number 43.
We could get the same result by subtracting 256 from 299, which corresponds to removing the ninth bit from a binary number.
Then, we insert the first 8 bits of the horizontal coordinate with:
POKE 53248, 43
The ninth bit of the horizontal coordinate must be entered with:
POKE 53264, 1
Here our sprite has moved to position X = 299!
The situation would get complicated if we had more than one sprite. In fact, all the ninth bits of the horizontal positions are enclosed in the same memory box accessible with POKE 53264. But that's not the subject of this video.
Regarding the vertical position, the coordinate never exceeds 255 pixels, therefore only the command is used:
POKE 53249, Y
Basic program to move a sprite with the keyboard and the joystick
At the bottom of this page, you can download the program to animate the Commodore 64 sprite. You can open the program with the Windows 10 notepad. Inside the program, you can then paste the Basic program that you downloaded from SpriteMate.
You paste it after line 5 and before line 2000.
In the little program you download, I have already pasted the sprite of the airplane I drew earlier, but you can paste the drawing of your sprite. Just delete the lines between 5 and 2000 excluded and paste the program, in Basic version 2.0, which you download from the SpriteMate sprite editor.
You must pay attention that the lines are always with an increasing number.
After composing the program in Basic, starting from the example program and the program generated by SpriteMate, we paste the entire program into the VICE emulator. Remember to reset the emulator before pasting the program (File, Reset, Soft Reset).
Via the menu Edit, Paste, we paste the whole program, which contains both the definition of the SpriteMate sprite, and the program to move it. Also check now that the last line has been entered correctly.
We start it with the RUN command.
You can now move the sprite. If you use the keyboard, the keys Q, A, N, M move the sprite by 5 pixels. The keys W, S, V, B move it by only 1 pixel.
The computer also displays the sprite's current coordinates, X and Y.
The program is calibrated for a sprite designed with the whole area available, in which the X and Y dimensions have been doubled. We had seen it before in SpriteMate.
You can also use the joystick to move the sprite.
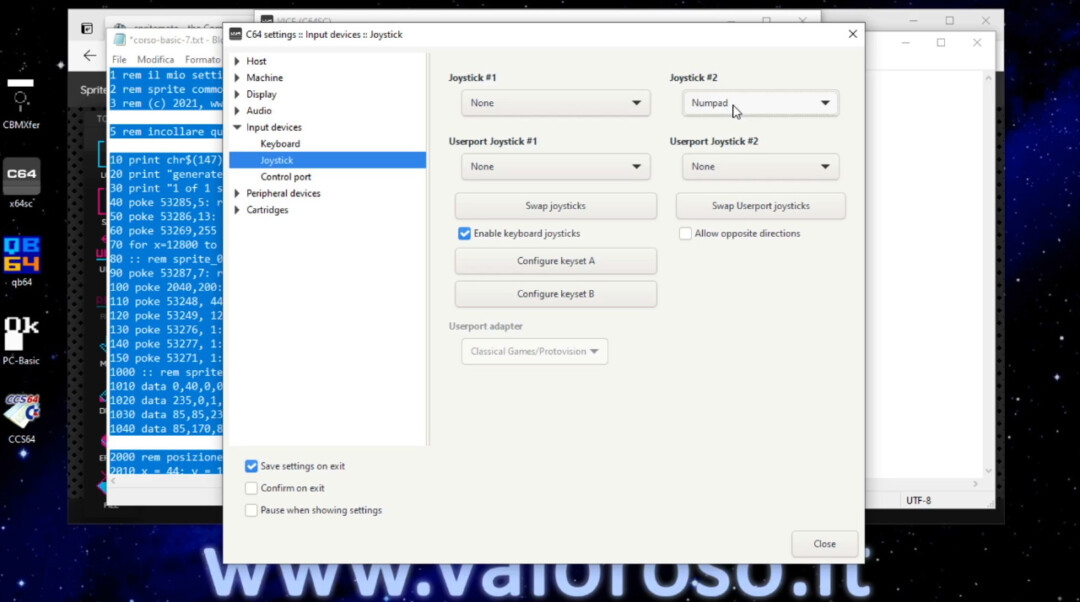
In VICE the joystick is emulated by the numeric keypad. The settings can be found in the menu Settings, yet Settings, Input devices, Joystick. Set the Joystick 2 come Numpad.
To exit the Basic program that moves the sprite, press X.
Try the program on the real Commodore 64
We can save the program on a virtual D64 disk, and then load it on the real Commodore 64 with SD2IEC or with Kung Fu Flash.
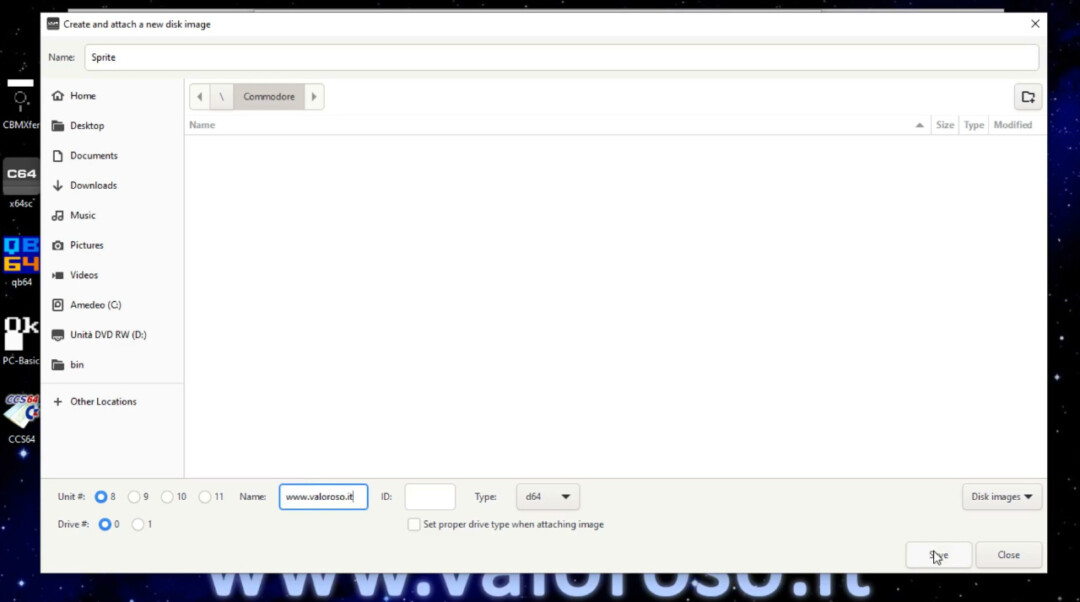
In the VICE emulator, Through the menu File, Create and attach an empty disk image, first create a blank image of a disc. Then, save the program, which we just pasted, with the command SAVE:
SAVE "SPRITE", 8
After closing the VICE emulator, to allow you to close all files, we can copy the D64 image on a MicroSD memory and insert it into the Kung Fu Flash.
With the Commodore 64 off, connect the Kung Fu Flash to the expansion port of the computer and also the joystick to port 2. Load, selecting it from the Kung Fu Flash menu, the program we have just created.
Basic program analysis to move sprites with the Commodore 64
You can download the list of the program at the bottom of this page. The first lines contain comments. We talked about REM education in the first episode of the video course on Basic language.
1 rem il mio settimo programma in basic
2 rem sprite commodore 64
3 rem (c) 2021, www.valoroso.it
5 rem incollare qui il programma generato da spritemate
The lines between 10 and 1040 contain the sprite generated, first, by the sprite editor SpriteMate.
10 print chr$(147)
20 print "generated with spritemate"
30 print "1 of 1 sprites displayed."
40 poke 53285,5: rem multicolor 1
50 poke 53286,13: rem multicolor 2
60 poke 53269,255 : rem set all 8 sprites visible
70 for x=12800 to 12800+63: read y: poke x,y: next x: rem sprite generation
80 :: rem sprite_0
90 poke 53287,7: rem color = 7
100 poke 2040,200: rem pointer
110 poke 53248, 44: rem x pos
120 poke 53249, 120: rem y pos
130 poke 53276, 1: rem multicolor
140 poke 53277, 1: rem width
150 poke 53271, 1: rem height
1000 :: rem sprite_0 / multicolor / color: 7
1010 data 0,40,0,0,40,0,0,40,0,0,40,0,0,235,0,0
1020 data 235,0,1,235,64,1,235,64,5,235,80,21,235,84,85,235
1030 data 85,85,235,85,85,235,85,85,235,85,85,170,85,85,170,85
1040 data 85,170,85,0,170,0,0,170,0,0,130,0,0,130,0,135
Define the colors of the multicolor sprite (on lines 40 and 50), set the sprite as visible (on line 60) and load the bytes that contain the various pixels of the drawing (on line 70).
The sprite data is listed with instructions DATA (present in lines 1010-1040) and are read sequentially through the instruction READ. Then, through POKE, are sent to suitable RAM memory locations.
The following definitions of the sprite continue:
- in line 100, the definition of the memory block that contains the sprite data;
- the initial position, which we saw earlier, on lines 110 and 120;
- in line 130, the definition of the multicolored rather than monochromatic sprite;
- the double horizontal and vertical dimension on lines 140 and 150.
From line 2000 onwards, there is the Basic program to move the sprite, from the keyboard and from the joystick connected to port 2.
From lines 2000 to 2070, the computer displays the legend of the available commands on the monitor.
2000 rem posizione iniziale
2010 x = 150: y = 130
2020 print: print "muovi sprite con joystick in porta 2"
2030 print "oppure con q w, a s, n v, m b"
2040 print "esci con x"
2050 print "(c) 2021 amedeo valoroso"
2060 print "www.valoroso.it"
2070 print
The sprite is positioned at the X and Y coordinates through the lines ranging from 2100 to 2210.
2100 rem posizione sprite
2110 if ox = x and oy = y then goto 2500
2120 if x < 24 then x = 24 2130 if x > 296 then x = 296
2140 if y < 50 then y = 50 2150 if y > 208 then y = 208
2160 if x > 255 then poke 53264, peek(53264) or 1: rem posizione x (high)
2170 if x <= 255 then poke 53264, peek(53264) and 254: rem posizione x (high)
2180 poke 53248, x and 255: rem posizione x (low)
2190 poke 53249, y: rem posizione y
2200 print "x ="; str$(x); ", y ="; str$(y); " "; chr$(145)
2210 ox = x: oy = y
If the coordinates have changed, compared to the current position, check on the new coordinates is carried out. In this example program, Spritite must not leave the visible area. To break up these checks, the IF ... then, already seen in the second episode of the course on basic language.
From line 2160 to line 2190, the X and Y coordinates are imposed on the sprite, also taking into account that the X coordinate can be greater than 255, as we saw earlier in the explanation!
On line 2200, the computer writes the current coordinates, X and Y, of the sprite to the monitor.
Then, the position of the sprite is saved, to evaluate its displacement to the next cycle.
From lines 2500 to 2600 inclusive, the Commodore 64 reads the keyboard and inserts the key we pressed into the variable C$. Depending on the command, move the sprite, forward, backward, left and right. It is possible to choose to move it by 1 or 5 pixels.
2500 rem ciclo principale e comandi da tastiera
2510 get c$
2520 if c$ = "q" then y = y - 5: rem avanti
2530 if c$ = "w" then y = y - 1: rem avanti
2540 if c$ = "a" then y = y + 5: rem indietro
2550 if c$ = "s" then y = y + 1: rem indietro
2560 if c$ = "n" then x = x - 5: rem sinistra
2570 if c$ = "v" then x = x - 1: rem sinistra
2580 if c$ = "m" then x = x + 5: rem destra
2590 if c$ = "b" then x = x + 1: rem destra
2600 if c$ = "x" then end
With regard to the Joystick commands, they are present from the 2700 to 2790 line. We had seen how to use the joystick with the Commodore 64 in the experiment of the remote controlled toy car from the Commodore 64.
2700 rem comandi da joystick, porta 2
2710 a = peek(56320) or 16
2720 if a = 126 then y = y - 5: rem avanti
2730 if a = 122 then y = y - 3: x = x - 3: rem avanti sinistra
2740 if a = 118 then y = y - 3: x = x + 3: rem avanti destra
2750 if a = 123 then x = x - 5: rem sinistra
2760 if a = 119 then x = x + 5: rem destra
2770 if a = 125 then y = y + 5: rem indietro
2780 if a = 121 then y = y + 3: x = x - 3: rem indietro sinistra
2790 if a = 117 then y = y + 3: x = x + 3: rem indietro destra
The Commodore 64 reads the joystick position on line 2710 and places it in the variable A.“or 16” it is used to ignore the fire button, considering only the 8 positions of the joystick lever.
Based on the position, the sprite moves on the monitor.
Unlike keyboard commands, which allow you to move the sprite one step at a time, with the joystick the movement is continuous and also includes the four diagonals.
With line 2800 the main cycle repeats itself.
2800 goto 2100
To exit the program, you must press X.
List of the program for drawing and moving a sprite in Basic
And here is the listing of the program of the seventh episode of the video course on how to program in Basic, to draw and move a sprite in Basic with the Commodore 64.
- CORSO-BASIC-7. TXT, in text format, to analyze it on PC or to glue it in the emulator of the Commodore 64;
- CORSO-BASIC-7. ZIP, ZIP compressed folder to unpack. It includes the program in PRG format, which can be loaded and started from the Commodore 64. It also includes the program in TXT text format, where you can paste your own sprite drawn with the SpriteMate sprite editor, and an example sprite.
The topics of the course are still many!
Credits: in the video tutorial, SID music is David Whittaker's Glider Rider.
To be notified when other tutorials, experiments and reviews related to retro computers and subsequent installments of the BASIC course will come out, I suggest you subscribe to the YouTube channel and activate the notification bell!
Hello really very interesting.
non puoi "completare" questa lezione di movimento sprite in un giochino?
that is, insert a very simple scrolling screen (type of stars)
e aggiungendo qualche "ostacolo" (tipo un asteroide) da "scansare" altrimenti perdi!
Thank you
Ciao! Il suggerimento è molto interessante. In futuro, sicuramente potrò integrare il programma con qualcosa di più evoluto. C'è da dire che, per una lezione "base" sulle "basi" del "basic", già molti potrebbero avere delle difficoltà. Per questo non parto con programmi di centinaia di linee di codice!
I love your blog... nice colors and theme. Did you
create this website yourself or did you hife someone to do it for you?
many thanks
Thank you very much, I created the blog by myself.
thank you very much
very good
Welcome!
Thank you!