Many have contacted me and you asked me how to rekindle the Commodore, after so many years of inactivity, without doing damage. Let's see what to do to turn on (rekindle) an old computer (a Commodore 64, a commodore 16, a VIC20, a C128 or an Amiga), after so many years of inactivity, because you have recovered it from the cellar or you have just bought it.

Obviously it would be advisable to send the computer to some good technician for checking. However, assuming you don't feel like doing it, or the vendor has assured you that your computer is working perfectly, you can take a few steps to reduce the risk of damaging it.
In addition to the procedure to turn on an old computer after so many years of inactivity, in this video we also see how to test the Commodore 64 with the appropriate diagnostic kit 586220, both with closed computer and with open computer.
Check the voltages of the power supply
Being careful, you can connect the plug of the computer power supply to the electrical network, but without connecting the other connector to the computer.
After leaving the power supply on for a few moments, to check that it does not heat up and that it does not emit smoke or strange smells, you can turn it off to connect the test leads to the connector on the computer side.

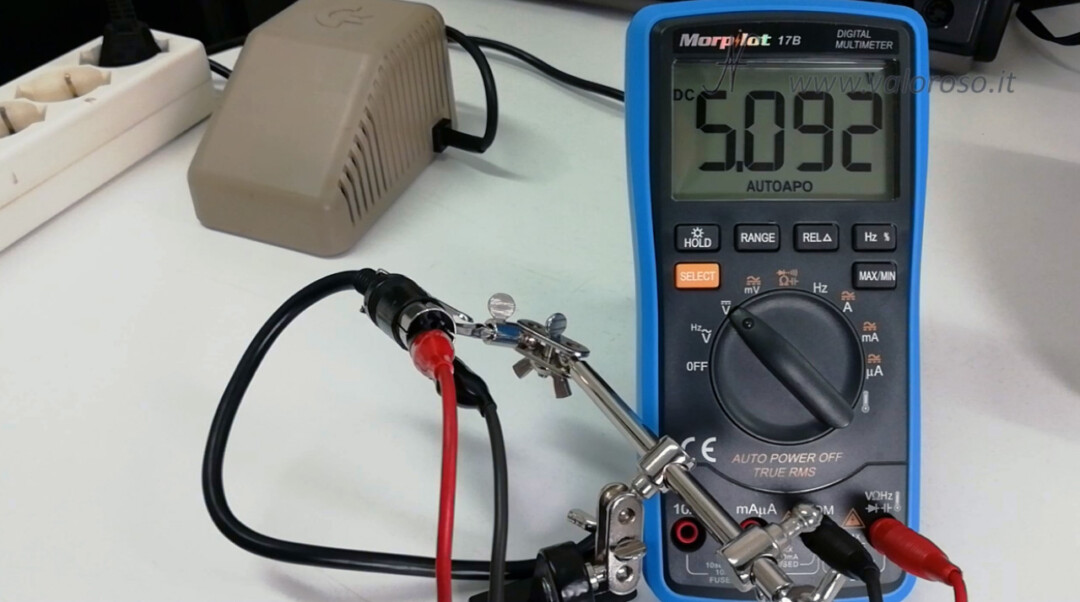
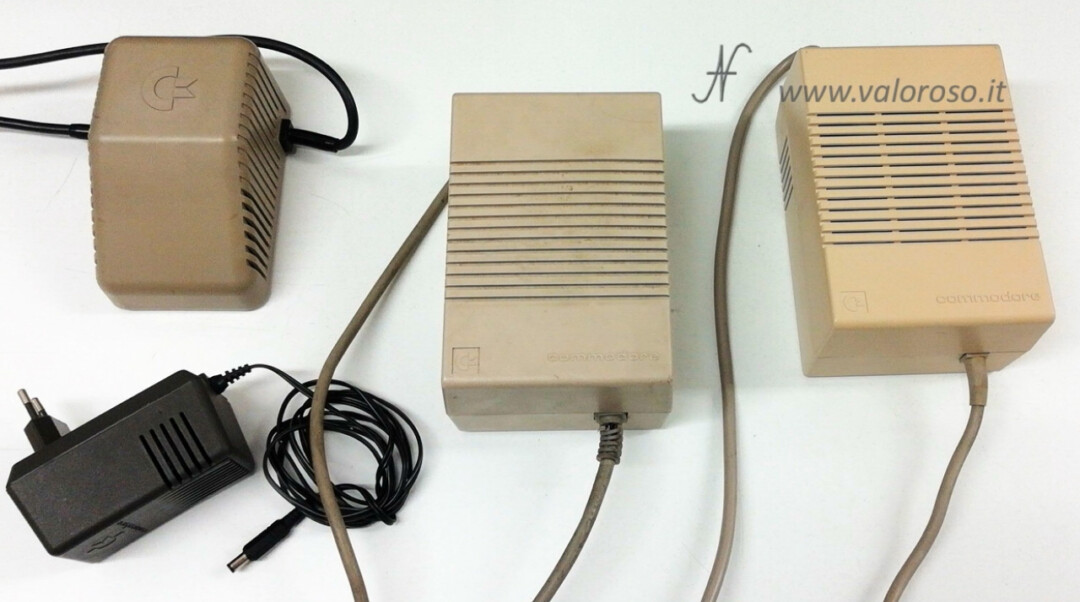
The measures are different for the various power supply models. Here are the slides with the Pinouts, taking into account that the images are seen by the power connector, with the pins facing the observer.
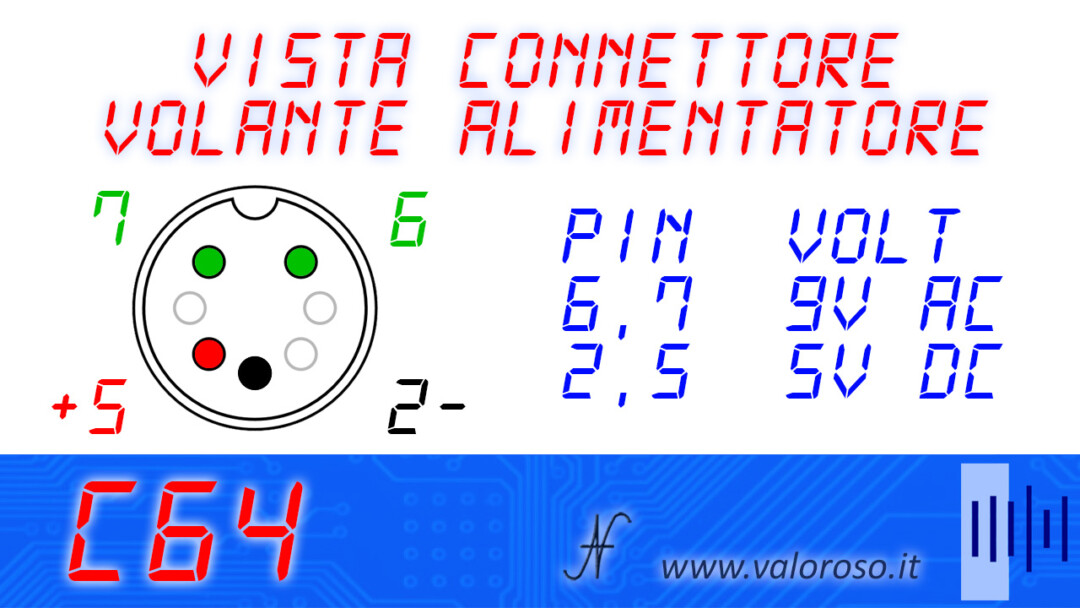
For the Commodore 64 and Commodore Vic20, the 5V DC supply voltage is located between pins 2 (GND) and 5 (+5V). The Commodore 64C power supply does not have the positive on pin 5, but on pin 4, so it is in a different position. The power supplies are however compatible, as pins 4 and 5 of the power connector are connected to each other, internally to the computer.
On the power supply of the Commodore Vic20, 64 and 128 it is necessary to carry out two measurements: one in alternating voltage (9Vac) and one in direct voltage (5Vdc). The tolerance on direct voltage is very small: voltages between 4.9V and 5.1V are allowed.
Under load, for example at 1A, the continuous supply voltage can even drop to 4.8V.

On alternating voltage there can be much more tolerance.
The power supply of the Commodore Vic20 is the same as the Commodore 64, on most models.
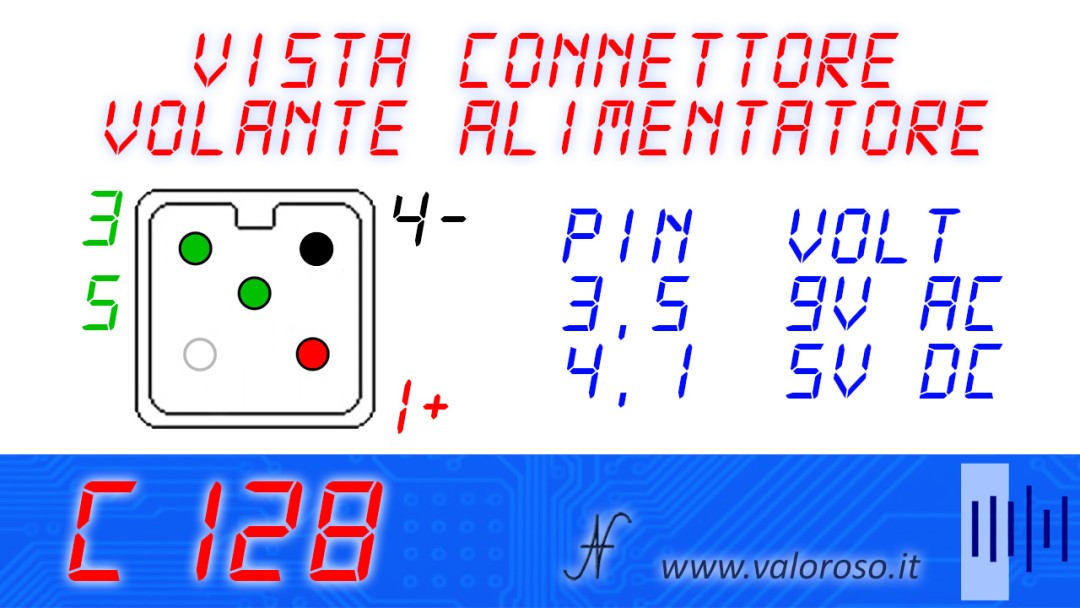
The Commodore 128 has the same voltages as the Commodore 64, but the connector is different: it is square. Many people wonder if it is possible to change the connector on the Commodore 64 power supply to power a Commodore 128, or use an adapter. The answer is no: it is not recommended! The voltages are the same, but the current required by the Commodore 128 is higher, so its power supply is more powerful.
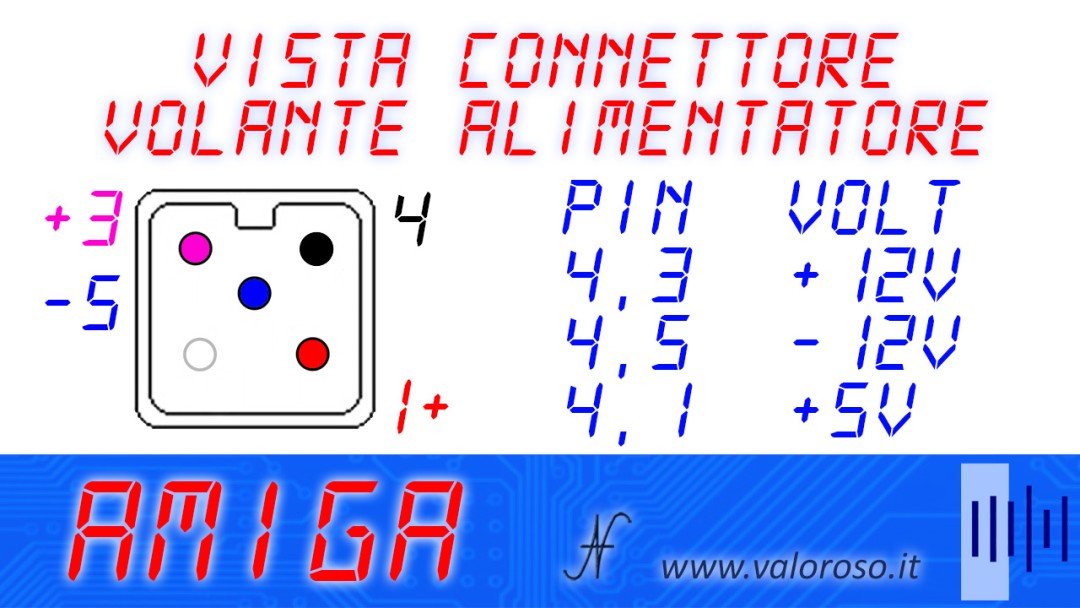
For the amiga power supply, three continuous voltages must be measured, all compared to Pin 2 (GND). Voltages are 5Vdc and 12Vdc, with little tolerance.
The power supply connector of the Amiga is the same as the Commodore 128, but the power supplies cannot be interchanged. The voltages are different!

The Commodore 16 power supply provides only one 9Vdc voltage, with wide tolerance, taking into account that the positive is the external terminal.
Finding incorrect voltages, I recommend not to use the power supply. Furthermore, you must also check that the polarity is correct (If you find negative voltages where they should be positive, there is probably some incorrect connection in the power connector).
When you turn off the power supply, the DC voltage is still present for a few moments, to testify that the electrolytic capacitors are working.
I recommend repeating the same measurements even after a few minutes of switching on the power supply.
There are those who recommend replacing the old power supply with a modern one. Of course, it is a good solution, but you have to choose a good power supply, with the appropriate protections and safety devices, built by a reliable technician.
How to turn the Commodore back on after so many years? Let's check the computer!
We continue the steps on how to rekindle the Commodore after so many years that was turned off. It's time to check the old computer.
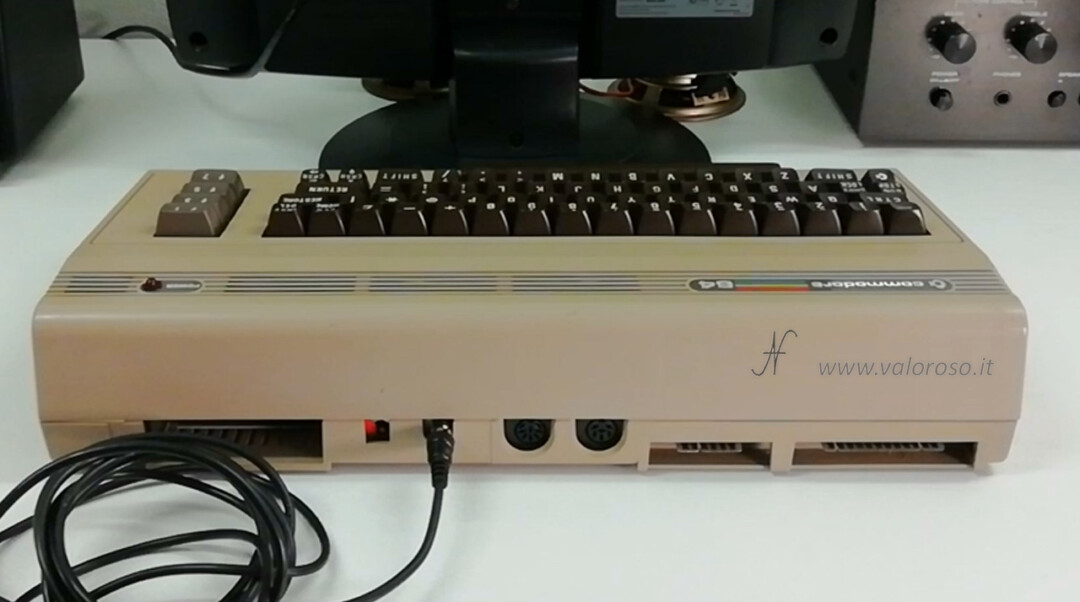
Take a first look at all the connectors, which must appear as you see them in the picture, without oxide, without breakage or damage.
Inside you should not feel detached parts. If you hear something moving, it could be a screw (or other metal object) which, moving, could cause short circuits.
If you want to inspect the vintage computer internally, in the video I show you how to open it.
After connecting the Commodore to the TV, as we see in the next paragraph, you can cross your fingers and… turn on the computer!
Don't leave your old computer on for a long time. Just enough time to set up the TV and check if you see the picture.
If everything is in order, congratulations, the first part of the test went well!
You can power up the computer again, manually try the various keys on the keyboard and, perhaps, play some games with the joystick, also verifying that audio is heard. On my Youtube channel and on this site, I have already published several videos on how to load programs and games using the datassette, the floppy disk drive 1541, the emulator Sd2iec and other interfaces.
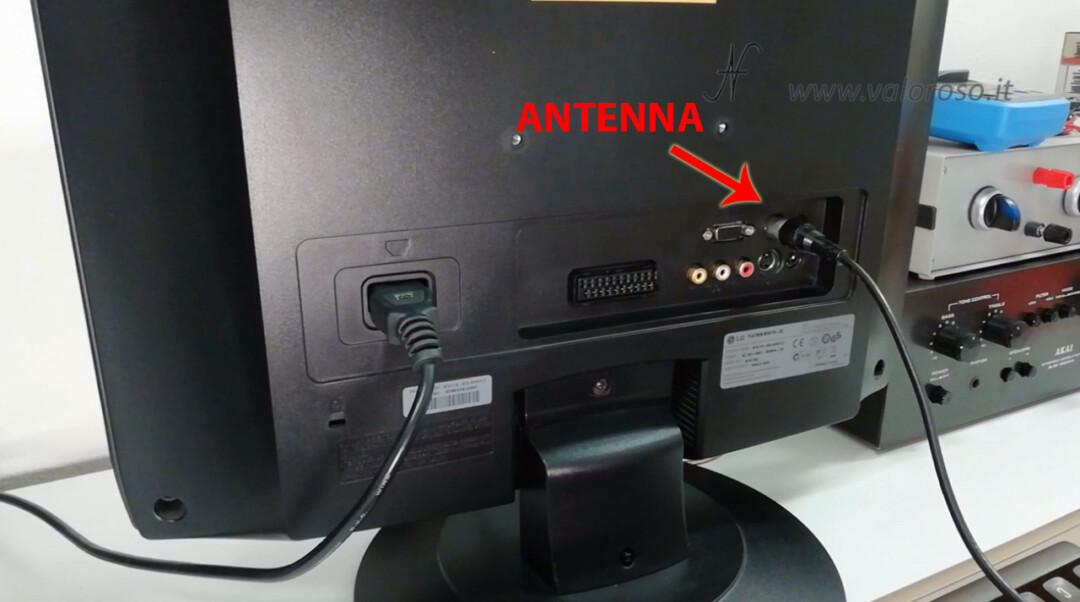
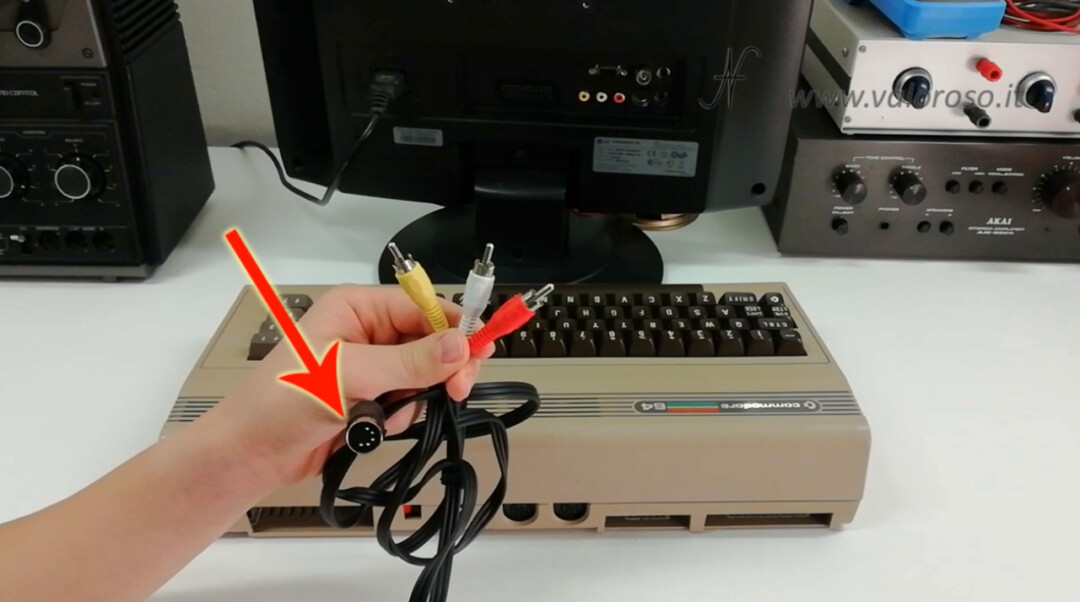
Connect the Commodore to the TV (TV)
To connect the Commodore to the TV, you can use an antenna cable or a composite audio / video cable.
Both of these solutions work with different Commodore models that we analyze in this article on how to turn the Commodore back on after so many years of inactivity.
Regarding the antenna cable, also called RF cable, on one side it is provided with the RCA connector to connect to the computer. On the other hand, it must have the connector suitable for inserting into the antenna socket of the TV.
The TV must have an analog tuner and be able to tune to channel 36.
Regarding the audio / video cable, on the Commodore side, the cable is equipped with a 5 or 8-pole DIN connector (depending on the model), on the TV side, the three RCA connectors must be connected to the audio (white and red) and video inputs composite (yellow).
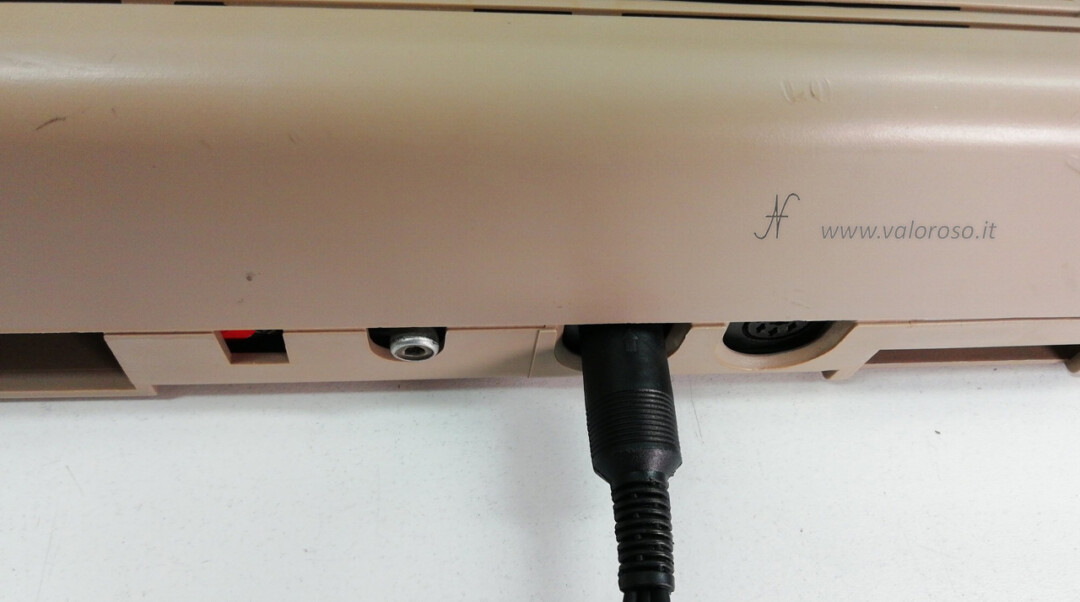
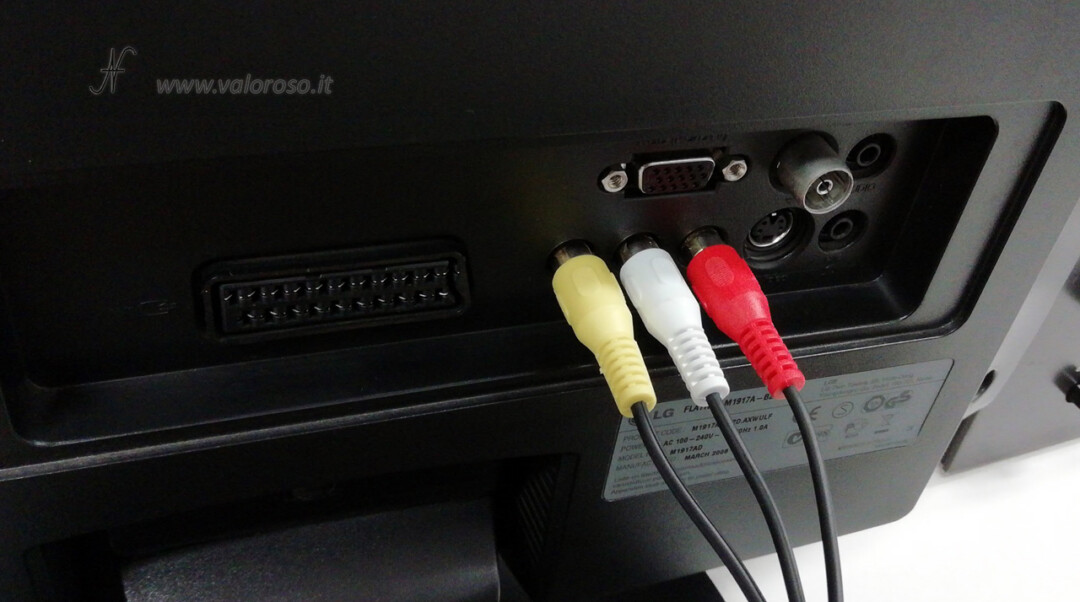
If you buy a cable with a 5-pole DIN connector, you can use it on all the Commodores that we have seen in this video, as it is compatible with both 5-pole and 8-pole connectors. When you turn on the TV, you need to set the A / V input.
Obviously, if you have other needs, such as using the S-Video signal, you will have to use pre-arranged cables. If your TV does not have audio / video or S-Video inputs and the antenna is digital only, you will need an RCA to HDMI converter.
Diagnostics 586220 for Commodore 64 - How to rekindle the Commodore after so many years
Even if you were lucky and your old Commodore 64 turned on, I recommend continuing to read this article on how to rekindle the commodore after so many years from the last ignition. In fact, in the video, we see the diagnostic test 586220 for the Commodore 64.
It is possible to use only the interface to connect to the Commodore 64 expansion port. Connect the interface only when the computer is turned off. The complete test also consists of a series of connectors to be connected to the various ports of the Commodore 64.
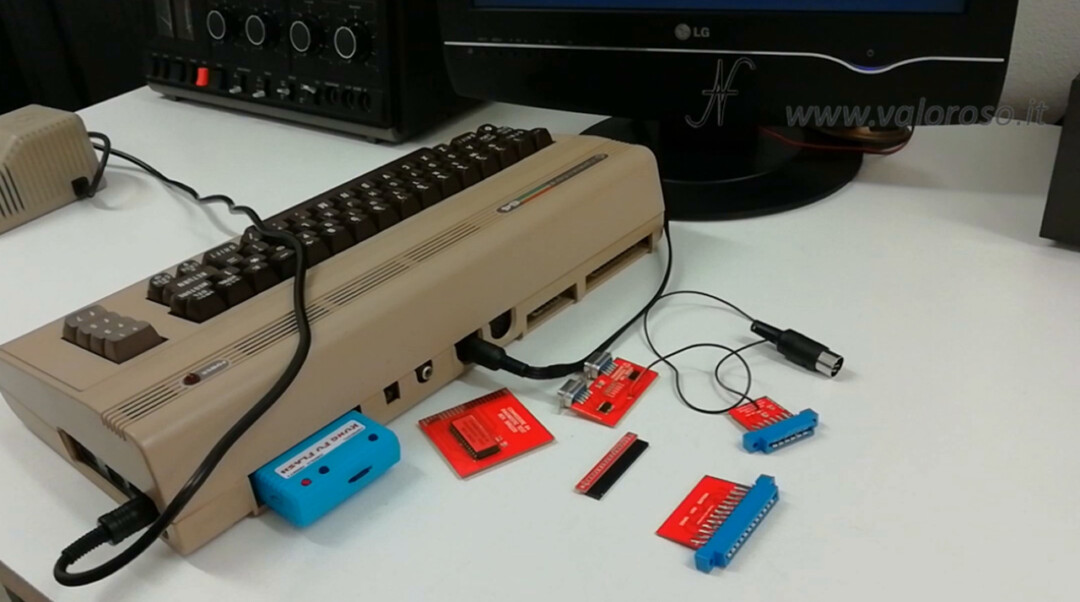
Instead of the diagnostic interface, you can use the Kung Fu Flash, obviously by loading the CRT file of the diagnostic test. Find this file at the bottom of this page.
Here are the three possibilities for starting the diagnostic test.
586220 diagnostic test without harness (also with Kung Fu Flash)
Without connecting the remaining connectors of the diagnostic test, the tests we can perform are limited and errors are still returned even if the computer is working.
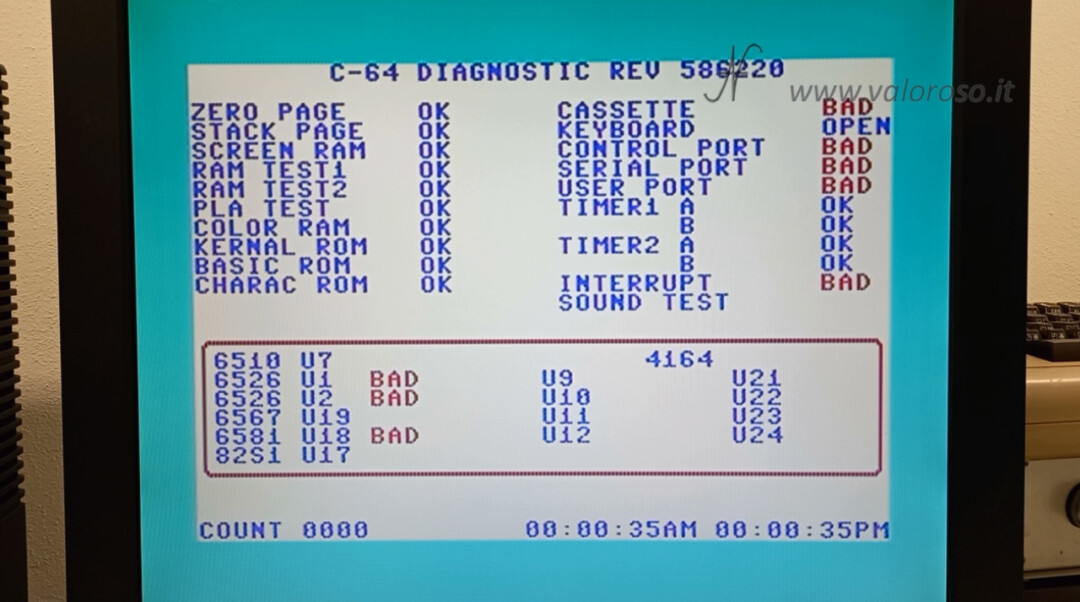
The test screen of a Commodore 64 (also working) is this, if we have not connected the various connectors of the diagnostic kit.
586220 diagnostic test with harness (also with Kung Fu Flash) and closed computer
Without disassembling the computer, you can try to connect almost any diagnostic test accessory, if you have them. When connecting them, care must be taken to insert the connectors in the right direction, with the computer off.
Also in this case it is possible to use the Kung Fu Flash instead of the interface to be connected to the expansion port.
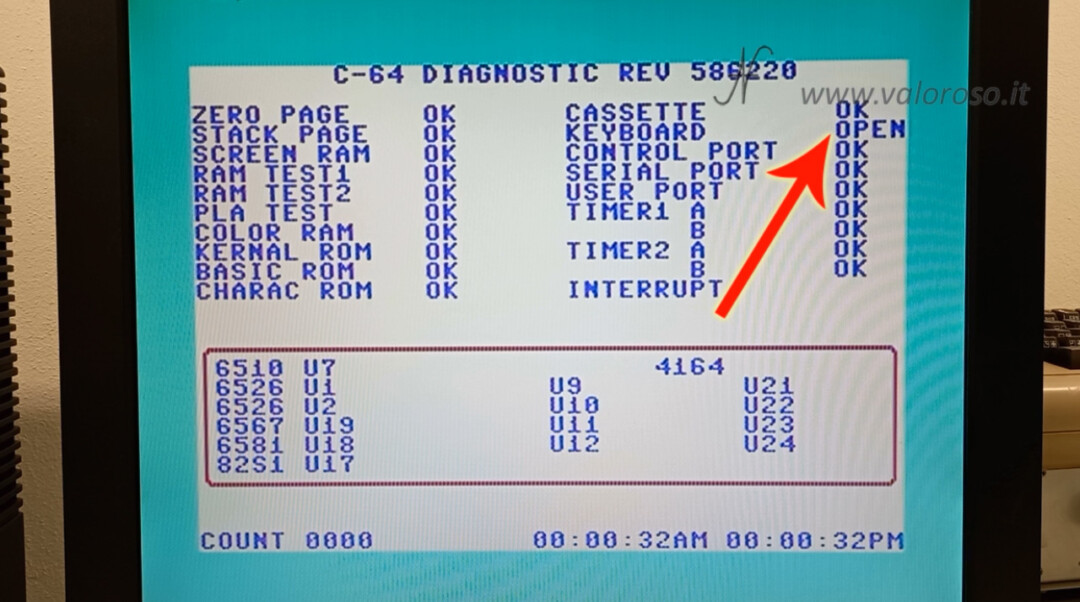
After turning on the computer, the test is launched: the next image shows the result of a working computer. There is still the keyboard error, because we did not open the computer and connected the latter connector.
In fact, even without opening the Commodore 64, you can test it properly.
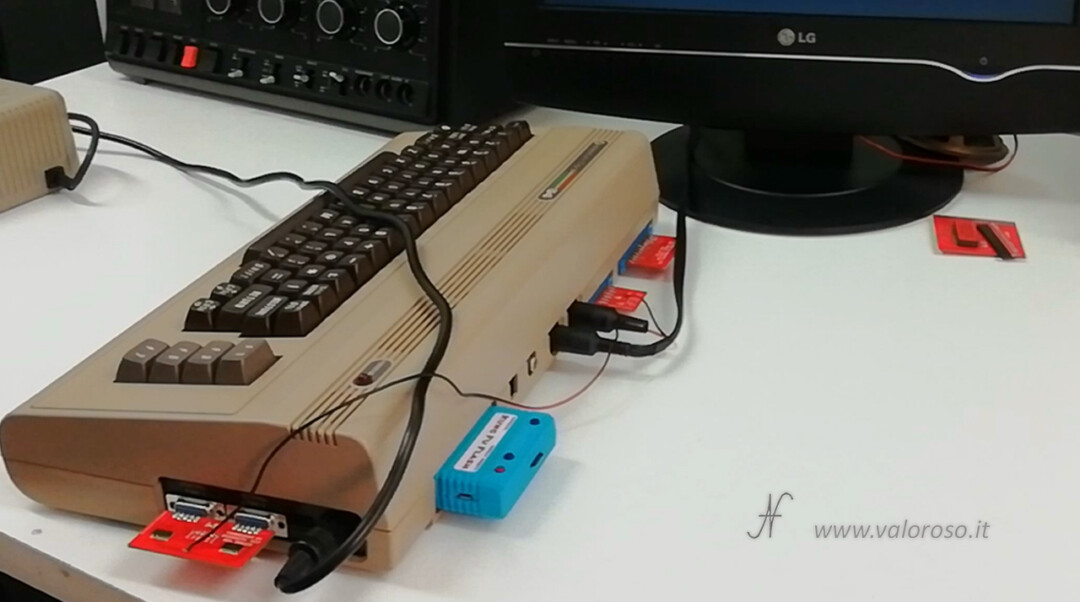
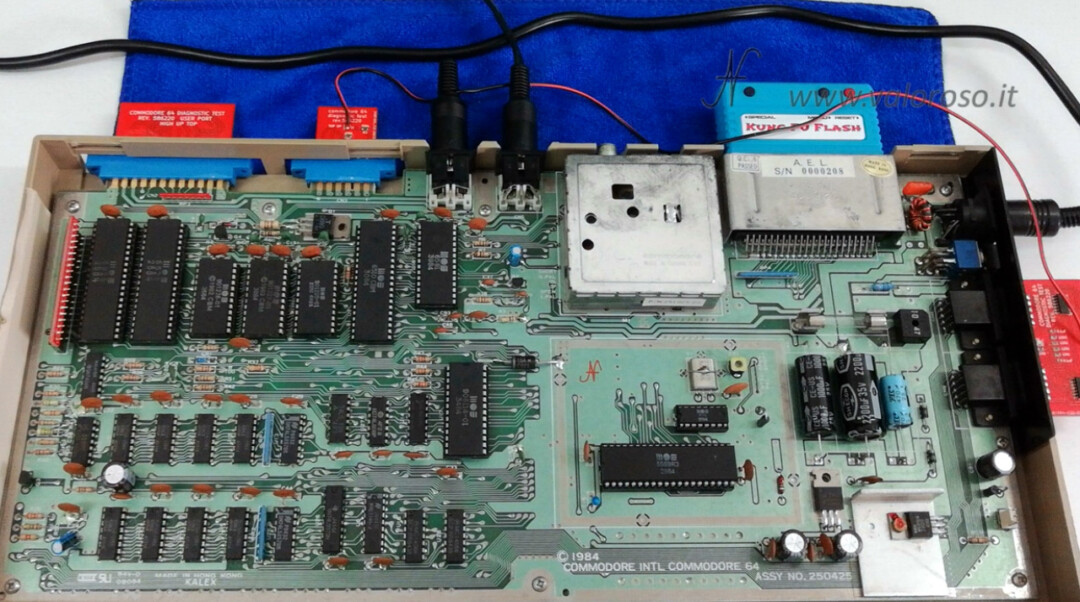
586220 diagnostic test with harness (also with Kung Fu Flash) and open computer
The video on how to turn the Commodore back on after many years of inactivity is full of information. It also shows how to open the Commodore 64 to inspect the interior. While the computer is open, you can check the state of the electrolytic capacitors. They must not be swollen and leak.
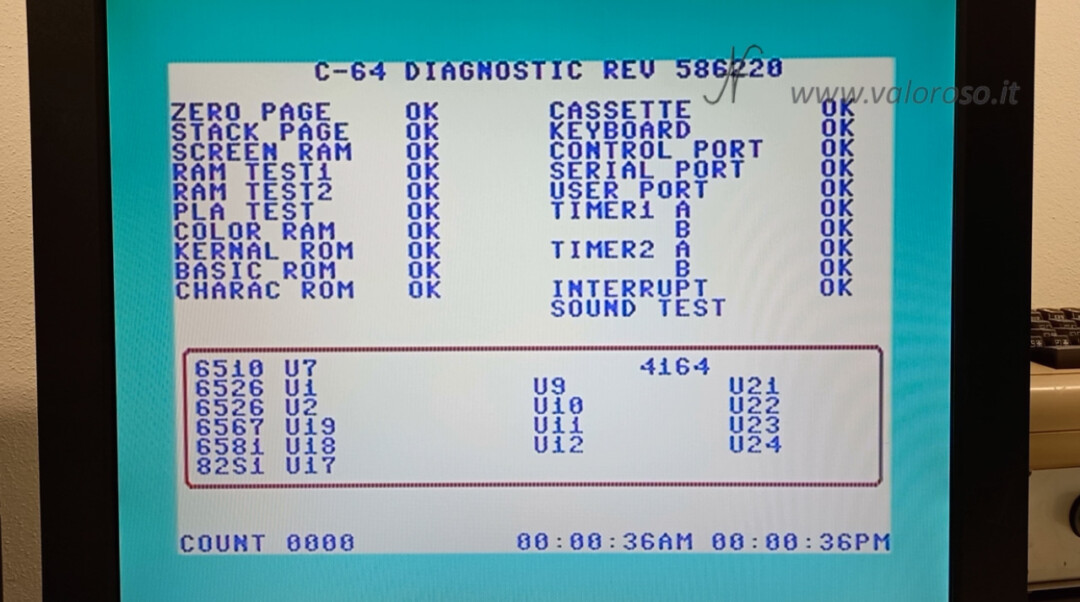
With all connectors connected from the 586220 Diagnostic Kit, the test should not return any errors.
Rev. Diagnostic interface 586220 - How to rekindle the Commodore after so many years of inactivity
As promised, here is the CRT file to be loaded with the Kung Fu Flash to emulate the diagnostic interface rev. 586220.
The file is in ZIP format. It must be unpacked and copied inside the Kung Fu Flash MicroSD.
Commodore 64 diagnostic interface 586220 CRT
I hope that this video, on how to turn on an old vintage computer after so many years of inactivity, has been useful to you! To be notified when more tutorials, other experiments and reviews related to retro computers and vintage electronics will come out, I invite you to subscribe to the YouTube channel and activate the notification bell!
Hi excellent video and explanations on the page. I have some questions to ask, leaving aside the already excellent Kung Fu Flash, I am more interested in the diagnostic kit with the cables to be included in the doors of the C64 and the attached cartridge. Who is provided to him?
Greetings! Thank you so much for the compliments. I bought the diagnostic kit on eBay. It is sufficient to search for the 586220 kit complete with Harness. In particular, there are kits to be mounted at an interesting price.
Congratulations on the video. I have a couple of questions could you help me?
Ho fatto il tuo test è l'alimentatore a "scarpetta", del c64 ha per le tensioni a continua 5,42 vdc mentre tu hai 5,093 vdc.
While alternating I have 10.95 VAc against your 10.67 VAc. okay the same is correct?
Altro quesito, con alimentatore a forma rettangolare, che ha per intenderci la "C" di commodore in rilievo sul lato superiore, ho dei dubbi, nonostante sia stato fermo solo tre anni, allora alla misurazione della tensione alternata, rilevo 10,44/10,45/10,46, nel momento in cui si trova collegato alla sola presa di corrente, per poi attestarsi sui 10,45 VAc, i dubbi atroci mi vengono con le tensioni in continua, stando al tuo disegno dei pinout, su 2,5 dovrei trovare la 5VDc, ma con sorpresa, leggo sul tester 0.00VDc, com'è possibile tutto questo? Non è che i pin sono errati per questo alimentatore? Siccome nel tipo a "scarpetta", il connettore ha solo 4 pin esistenti cioè i pin 7,6 - 5,2, mentre in quello rettangolare, ci sono ben sette pin. !!
Both are original commodore brand, can you help me??
Another question but the current test can also be done with the power supply of 1541 II?
Regards.
Hello. I try to answer point by point.
When tensions (continuous and stabilized, like 5v) begin to deviate from the correct value, it is always better to deepen the speech. 5.5 Volt do not create a problem with the C64 electronics, but you should try to understand why your power supply begins to deviate tension. Because, in the future, it could continue and raise the tension to dangerous values.
The alternating voltage is not regulated, so you can not intervene on the value. When you put the load, it lowers.
It is possible to test the power supply with the load. I show it in this video of an Atari: https://youtu.be/rcLX8-e4ni0.
If a power supply gives you 0V, it definitely does not work, of course if you have measured the voltage on the right pins. It does nothing if the power supply (of the C64) has more pins, the ones used are always the usual. Maybe they are poorly connected in the connector, or the power supply does not work.
Regarding the 1541 II power supply, of course, you can test it (indeed, you have to test it!). You need to check the 5V and 12V. They are both stabilized, so they must be accurate.