Today we talk about the 1541 Diagnostic Cartridge by Jani. This interface contains a number of utilities to test your Commodore 1541 floppy disk drive (head alignment, rotation speed, ecc...).

We analyze both the hardware and the functionality of the 1541 Diagnostic Cartridge.
Hardware of the 1541 Diagnostic Cartridge by Jani
On PCBWay, you can buy the printed circuit board of the interface. The various components are easily available. The mandatory ones are only the EPROM and the 100nF capacitor. The two LED diodes, the two resistors and the reset button are optional.
The EPROM must be programmed. To program the EPROMs, special programmers and programming software are used. If you do not have one, you will necessarily have to request a pre-programmed EPROM. Regarding the binary file to be programmed in the EPROM, it is available on PCBWay, on Jani's website and I also put a copy of it at the bottom of this page.
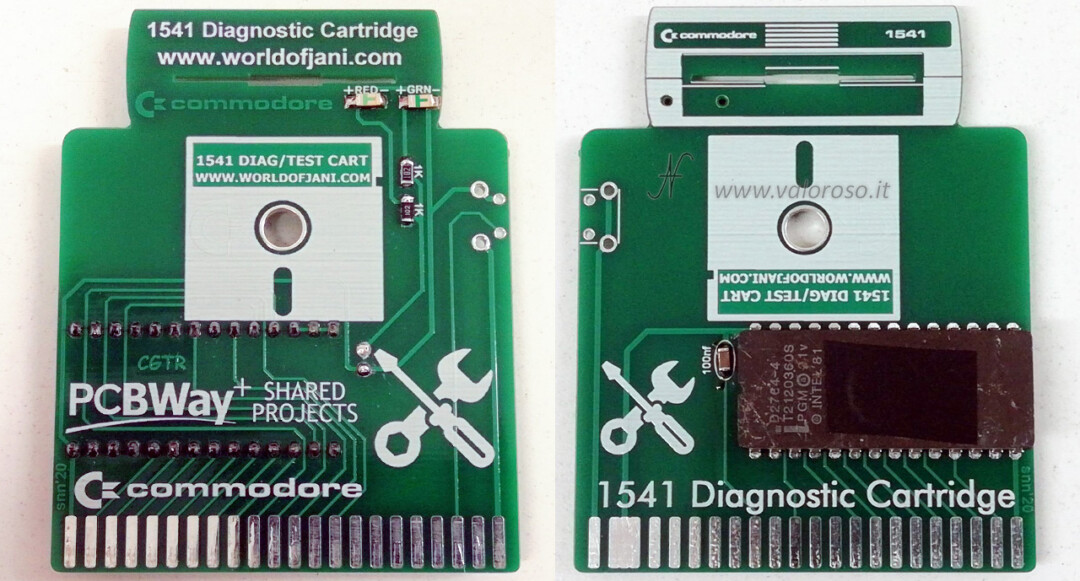
I used a 100nF SMD capacitor, instead of the traditional one, to make the board more compact. Although they are optional, I still decided to mount the two LEDs, green and red, as well as the two current limiting resistors. For mounting details, to find the polarity of the SMD LED diodes and to see how to mount them upside down, I recommend watching the video at the top of this page.

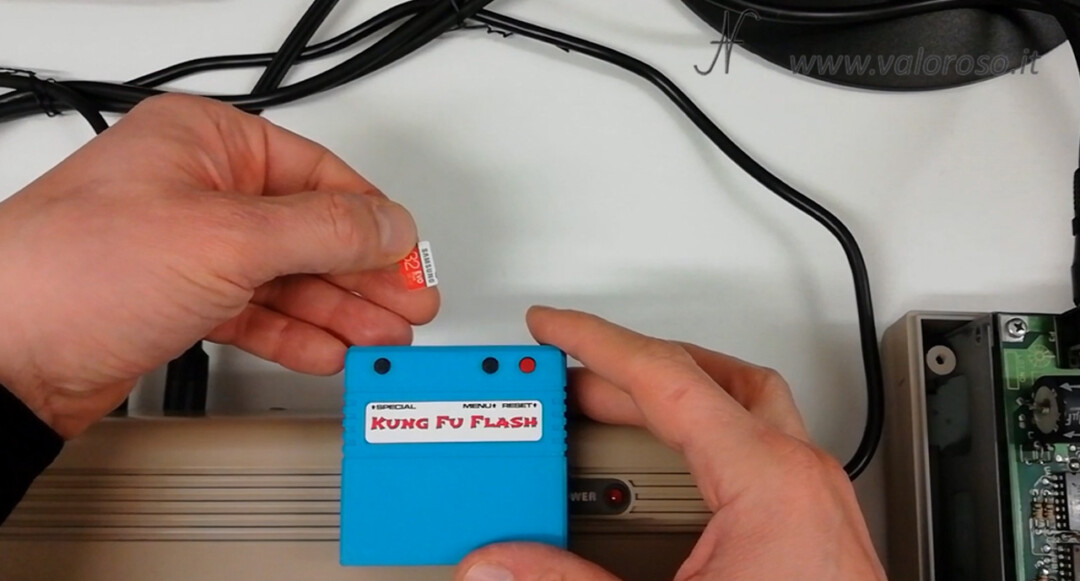
1541 Diagnostic Cartridge by Jani emulated by Kung Fu Flash
Anyone with Kung Fu Flash can still use Jani's utilities without purchasing the interface. Just copy the appropriate CRT file into the MicroSD and start it. The file is available at the bottom of this page.
The main menu
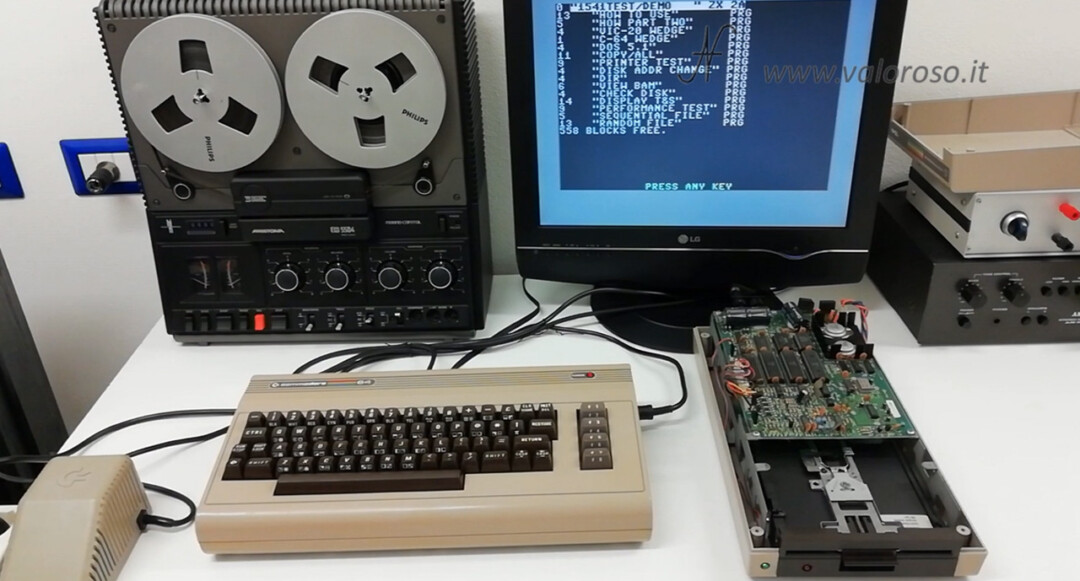
After connecting the interface 1541 Diagnostic Cartridge by Jani to the expansion door of the Commodore 64 (on the computer off), it is possible to turn on the computer and the drive. Lightening the Commodore 64, the interface menu immediately starts, with the various utilities available.
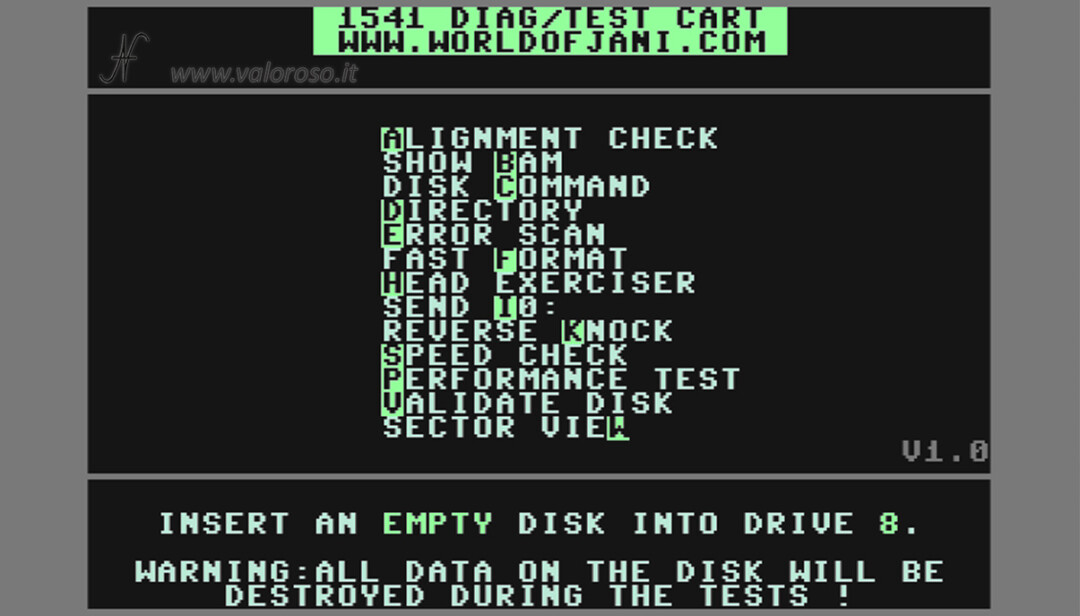
Warning! Some utilities erase and format the floppy disks you insert into the drive! Do not insert discs containing important data!
A - Alignment Check to verify the alignment of the Drive head
Pressing A on the Commodore 64 keyboard, it is possible to check the alignment of the head of the Commodore 1541 drive. The head must in fact position itself correctly on the various tracks of the disk. Each formatted disk is in fact divided into tracks and sectors. The drive head must be positioned correctly on the track to be able to read it.

To check the alignment, you must use a good quality disk, formatted by an already aligned drive. I used an old original Commodore drive, the one that came with the Commodore 1541 drive.
To start the alignment check, you must press Space on the Commodore 64 keyboard. This does not erase the disk.
It would not make sense to check the alignment of the drive with a disk formatted from the same drive. A misaligned drive may still format, write and read discs well, but would have problems with original discs or discs written by other drives.
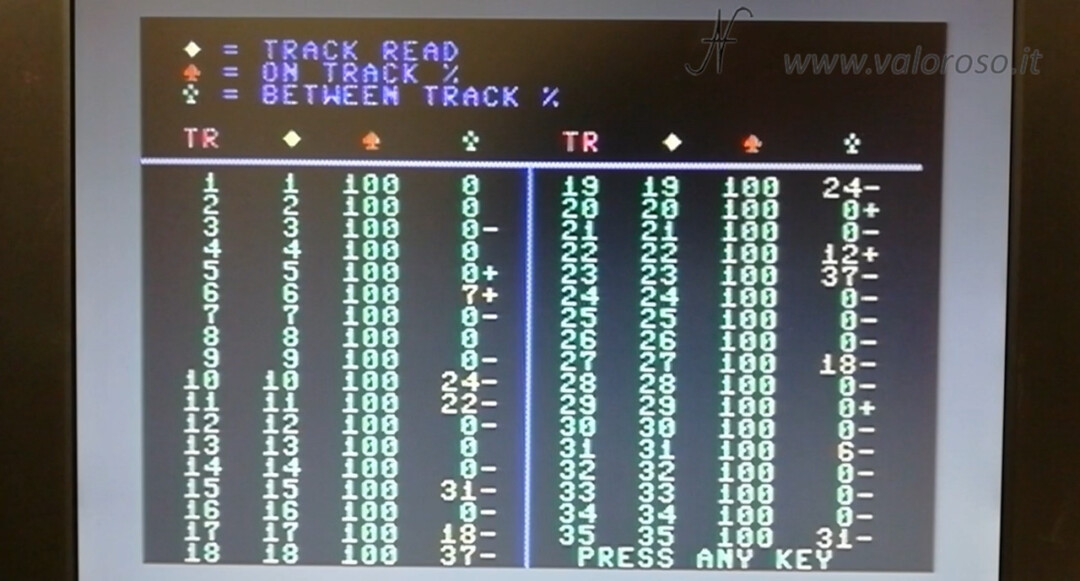
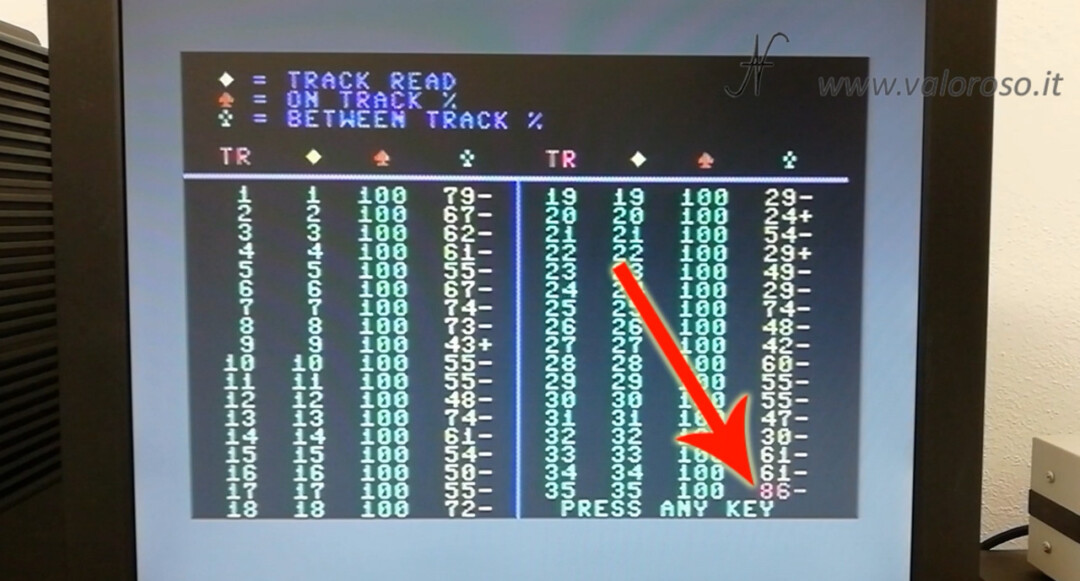
The first column on the left (TR) represents the track that the drive must read. The second (track read), the one with the yellow square symbol, indicates the track actually read by the drive. The numbers in the second column must be colored green and must be identical to the numbers in the first column.
The third column (on track %), with the red spade symbol, represents the legibility of the trace. The numbers must all be 100 (or at least tend to be 100) and be green.
Finally, the fourth column (between track %), the one with the green flower symbol, indicates the presence of data between two consecutive tracks of the disc.
In fact, the drive head is controlled by a stepper motor, which moves two steps to move from one track to another. If you command the drive to move only one step, the head is positioned in the intermediate space between two tracks, where you expect to find little or no data.
The last column is unlikely to be always green, with data all at 0. You can be content with having some yellow data as well. The important thing is that there are no numbers higher than 80, which are colored red.
If you find red numbers, don't blame the drive right away! The test disc may also be damaged. Also try cleaning the drive head with a cotton swab and alcohol. In the video, I explain how to do it.
If you continually encounter anomalies, even with other dual-density disks working, the drive obviously needs alignment. Warning! The alignment operation that we will see shortly is not recommended for those with no technical experience!
On Jani Tahvanainen's website (worldofjani.com) it is written that if the drive is not aligned, it should be professionally realigned, using an analog alignment disk and an oscilloscope. It is also true that it is very difficult to find an analog disk nowadays, so many repairers align the drive using a normal double density disk (as we said before, produced from an aligned drive), and using this alignment program.
In the video, I made the alignment of my drive using the utility Alignment Check. It is a manifest operation, which I do not recommend to carry out to those who have no adequate technical experience.
To align the head, you need to rotate the stepper motor slightly, clockwise or counterclockwise, until you find the position where the test returns the best results. It is necessary to loosen the two screws that secure the stepper motor, which are also blocked by a drop of enamel. To reach the stepper motor, it is necessary to open the drive and free the mechanics. In this article, I had explained how to do it.
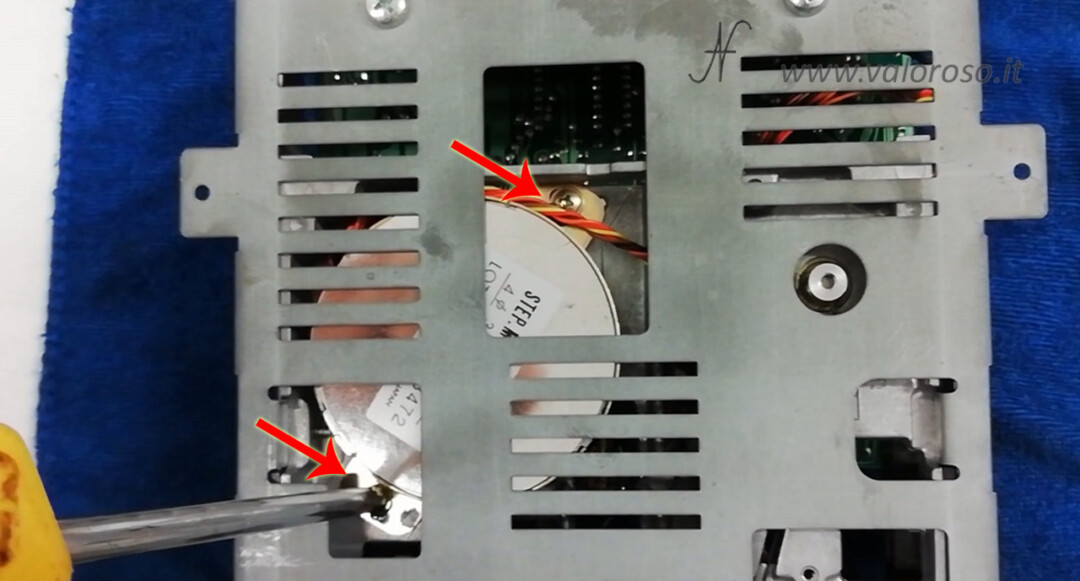
After locking the screws, you can lightly rotate the engine in one sense, tighten the screws and restart the test. If the alignment worsens, you have to unscrew the screws again and rotate the engine step by step in the opposite. And so on, until the correct alignment is found.
B - Show Bam, to view the distribution of files in the floppy disk
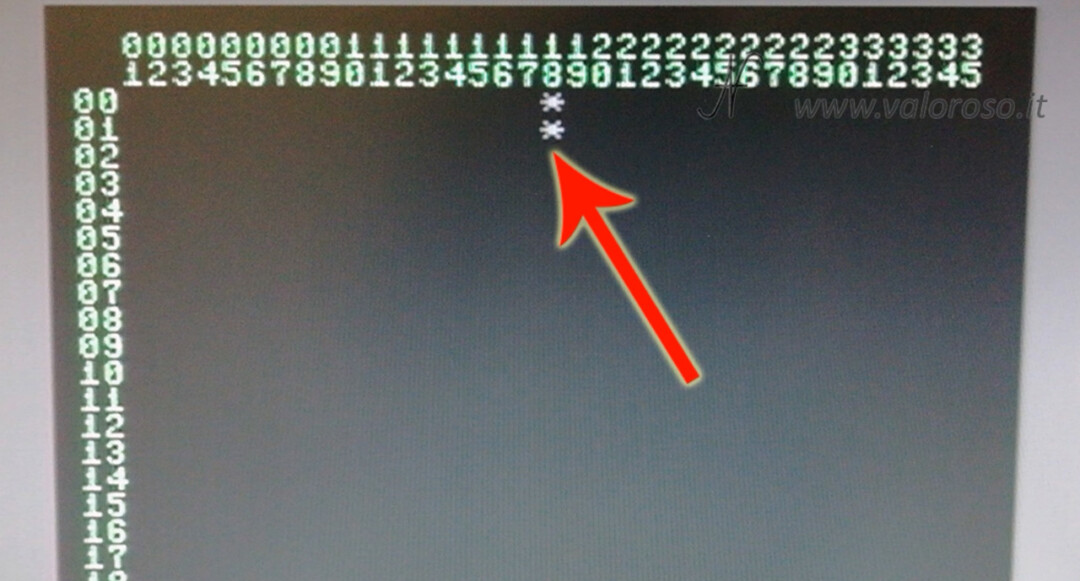
By pressing the key B, you can view the BAM of the disc. In practice, you can see the blocks used by the files and the free ones to write new data to the disk. This is the BAM of a newly formatted disk which, of course, has all the blocks free, with the exception of track 18, which is more or less in the middle of the disk, and which contains the list of files.
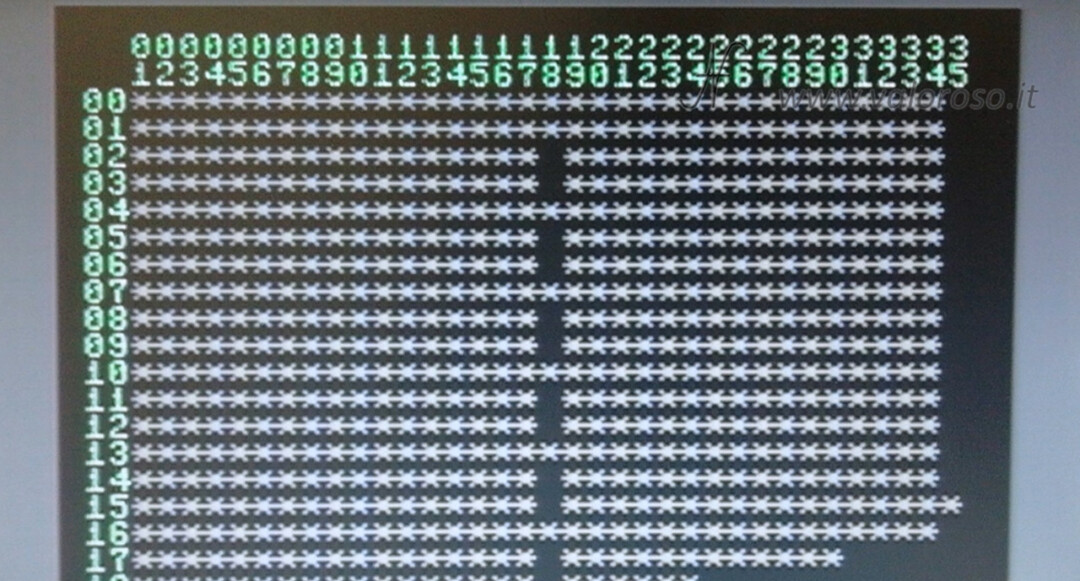
This is the BAM of a nearly full disk.
C - Disk Command to send a DOS command to the drive
Returning to the main menu, we can press C on the keyboard to send commands to the drive. For example, we can enter the command:
- I0, which initializes the drive;
- N0:name,id to format the disk;
- S0: name_of_file to delete a file.
D - View the directory of a disk comfortably
By pressing the key D, from the main menu, you can quickly and easily consult the list of files on the disk.
To return to the main menu, you can always press the key Restore. However, I do not recommend using it, especially if the drive is engaged in some operation. Several times, my computer and drive crashed and I had to restart them.
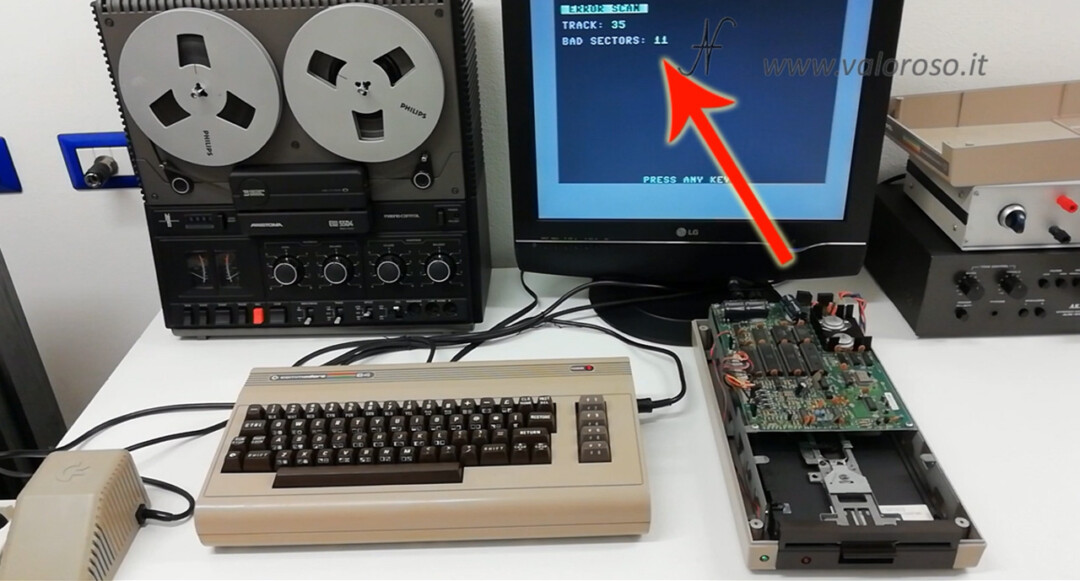
E - Error scan to check if the disk is damaged.
Via the key E, you can identify if there are any read errors on the disk. The Commodore 1541 drive scans the various tracks in sequence. Bad sectors are counted on the monitor. If the disk is good, there should be no bad sectors.
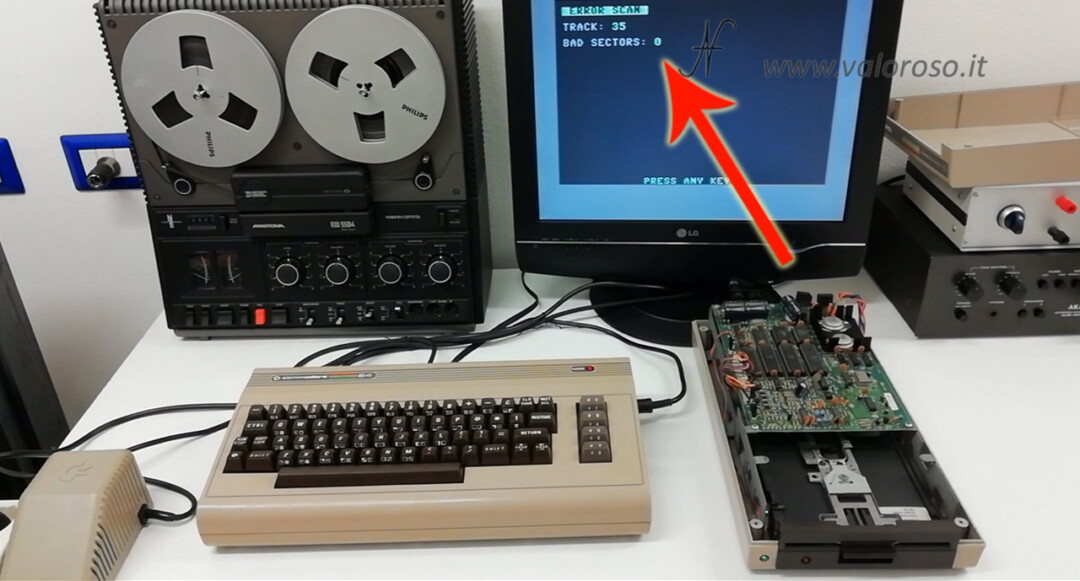
If the disk is damaged (even partially), the bad sector count is greater than 0. Again, the drive may be reading bad sectors because it has a dirty head.
F - Fast format to quickly format a disk
From the main menu of the 1541 Diagnostic Cartridge by Jani, by pressing F, you can quickly format a diskette. Warning! All data on the disc is erased!
Type the disk name and ID. The disk ID is used by DOS (the internal program that controls the disk drive) to identify the disk. It should be different, between disk and disk, even if, very often, I don't enter any values myself, or I enter a value at random!
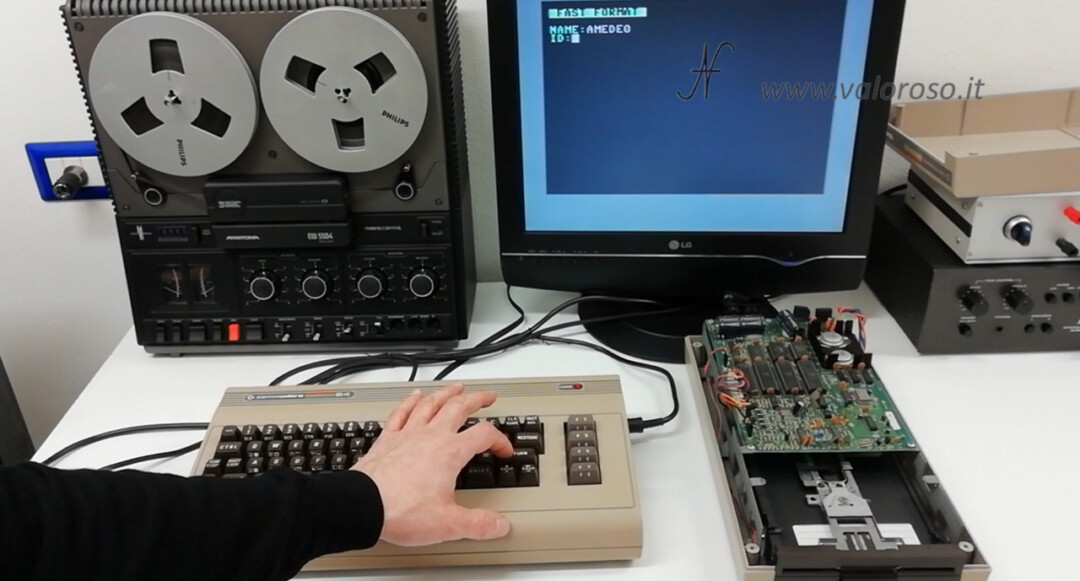
At the end of the formatting, which is very fast, the computer shows the list of disk files, which must obviously be empty.
H - Head Exerciser to move the drive head
Another useful command is H (head exerciser), which is used to move the head.
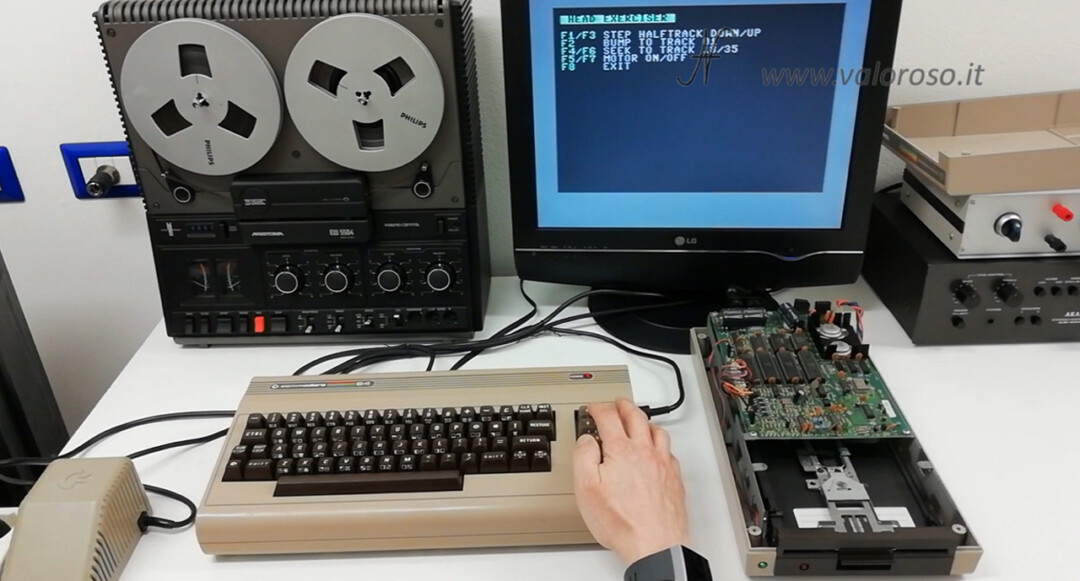
Through F1 and F3 you can move the head half a track forward and backward. The shift of half a track corresponds to a step of the stepper motor that moves the head.
Pressing F2 (Shift + F1), the head is slammed into track 1, a bit like it does before formatting a disk. With F4 (Shift + F3), the head moves to track 18, approximately in the middle of the record, while with F6 (Shift + F5) moves to track 35.
Moving the head, for example, is useful if you want to lubricate the guides.
With F5 and F7 you can turn on and off the motor that rotates the disc. Finally, with F8 (Shift + F7) you exit the program and return to the main menu.
I - Send I0: restart the Commodore Drive 1541
Pressing I, the initialization command is sent to the drive, which is used to reset the Commodore 1541 drive and reread the file allocation table.
K - Reverse Knock to make the head slammed into track 42
Also from the main menu of the diagnostic cartridge 1541, the key K it is used to send the head to track 42 and make it hit a few times on the limit switch. A bit like formatting in track 1, but on the opposite side of the guide.
This operation can be useful for attempting a partial realignment of the head, making it slam on the opposite side to the usual one.
S - Speed Check to verify and adjust the speed of the disk rotation engine
Pressing S, you enter the utility that is used to adjust the rotation speed of the disk, which must be as close as possible to 300 revolutions per minute. If the speed is too low or too high, it is possible to act on the trimmer that adjusts the rotation speed, which is located under the mechanics of the drive.
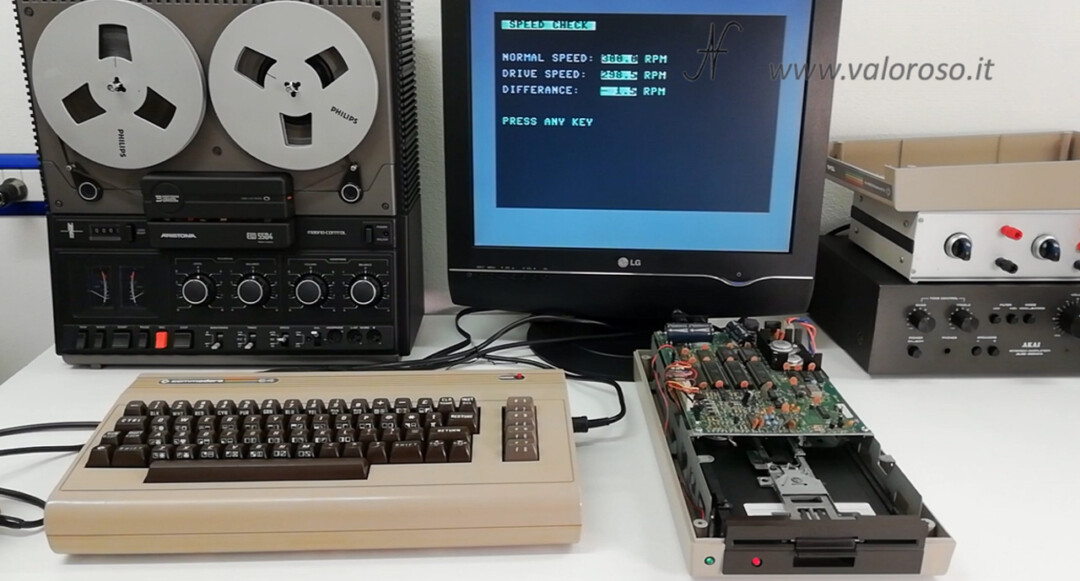
I had made a video on how to adjust the drive rotation speed using Piergiorgio Zambrini's Speed Test, which is very precise and has numbers that are easily readable even from a distance.
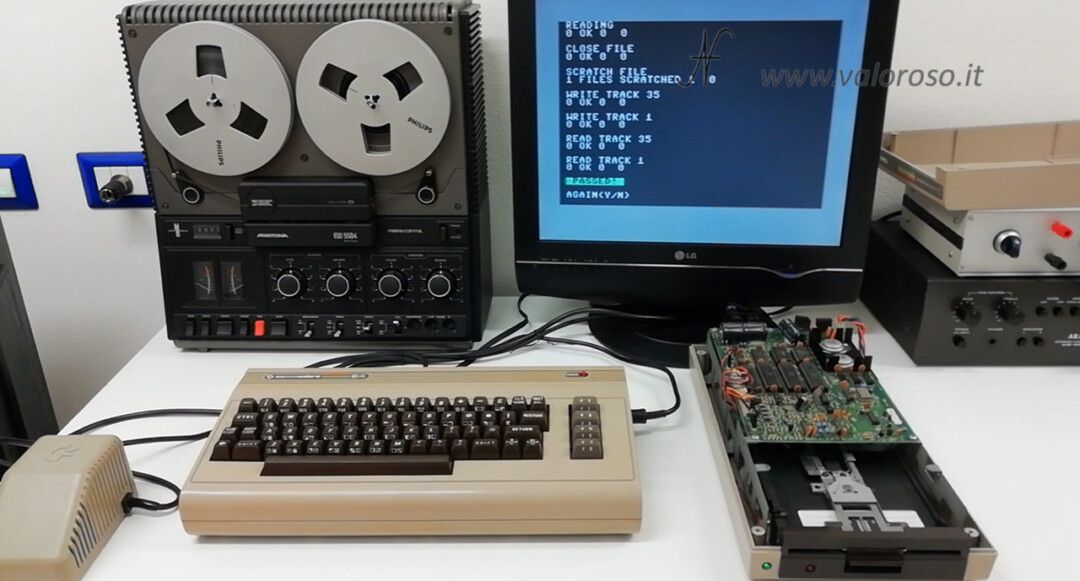
P - Performance Test to evaluate whether the Commodore 1541 drive works well
From the main menu of the 1541 Diagnostic Cartridge by Jani, there is also the Performance Test, which is a complete test for the drive. This test is accessed by pressing P.
This test is very important and allows you to assess the health of the drive after it has been aligned and adjusted. The test starts with a disk format, then destroys all data on it.
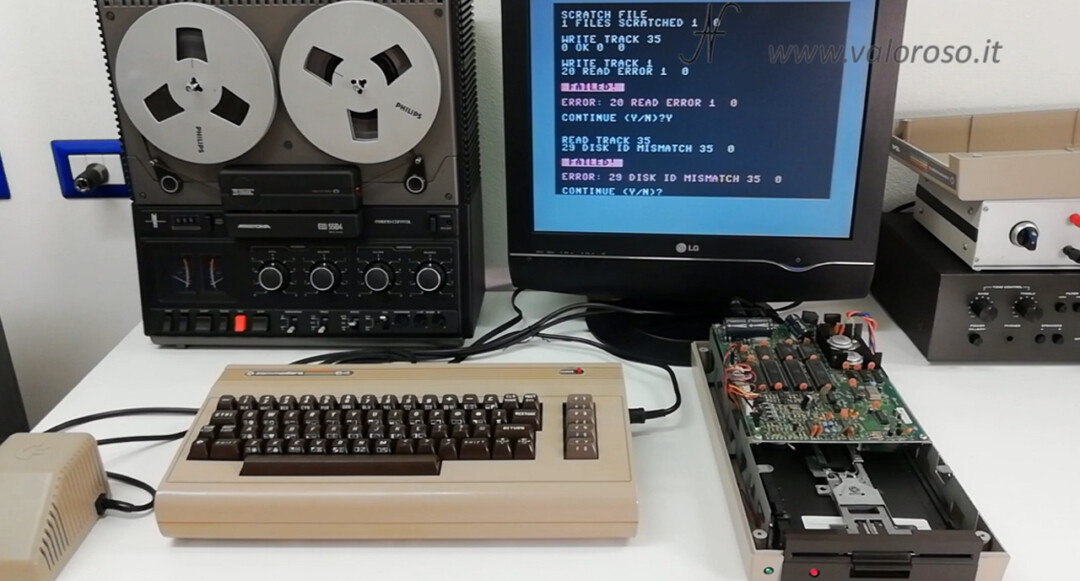
Terminata la formattazione, scrive un file, lo rilegge e lo cancella. Valuta la funzionalità del drive anche nelle tracce esterne: la 1 e la 35. Se il drive funziona correttamente, il test termina con successo con la scritta "PASSED!".
Qualora il test terminasse con degli errori (con le scritte "FAILED!" e "ERROR:"), prima di dare la colpa al drive, provate a pulire la testina del drive con un cotton fioc ed alcool.
Try the test with other disks as well. In fact, the Commodore 1541 drive may fail to write and read on particularly worn discs.
V - valid disk, to remove any files that are not properly closed
The command V it is used to validate the disk. The drive scans the various files on the disk and keeps only those that are open and closed correctly, eliminating those that may be left open by some program, which can cause problems.
The dos (the firmware that runs in the floppy disk drive Commodore 1541) has a map indicating which disk sectors are used. The map is located on track 18, sector 0. It is the Bam that we saw before. When the command Validate It is sent to the drive, the BAM is reconstructed starting from the list of files in the directory.
But how can files not closed properly cause disk problems?
When deleting a file (using the Scratch), two things happen:
- the byte relative to the file type, in the directory, is set to 0;
- DOS follows the chain of sectors that make up the file and marks each sector it encounters as available for new data in the BAM.
The last sector of a file that has not closed correctly has never been written on the spot. As a result, the penultimate sector aims at a sector that is not really part of the file. The DOS does not realize it and continues to follow the chain of sectors of the file, scoring them as available. In the most unfortunate case, the unwritten sector will aim for another file! When this happens, the DOS marks the sectors that, in reality, are part of an existing file available. The next writing operation on the disk will fill these sectors with other data, creating a lot of confusion on the disk, with data loss.
The command Validate it stops if there are bad sectors on the disk.
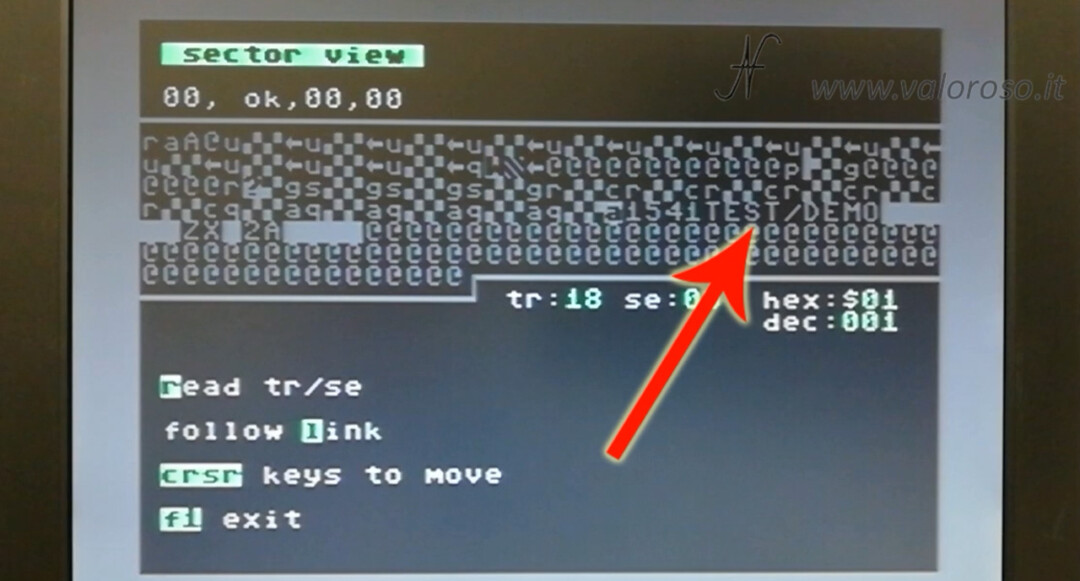
W - Sector View to view the tracks and sectors of the disc
The latest utility in the Commodore 1541 drive's diagnostic cartridge is Sector View. It starts by pressing W.
Through this utility it is possible to see the data written in the various sectors of the disk. You press R and enter the track and sector number to read.
For example, in track 18, sector 0 there is the BAM. If we change the Commodore's character set by pressing the keys Shift + Commodore, everything is much clearer. You can see the name of the disk.
In track 18, the file directory starts from sector 1. We can see the names of the files that are present on the disk.
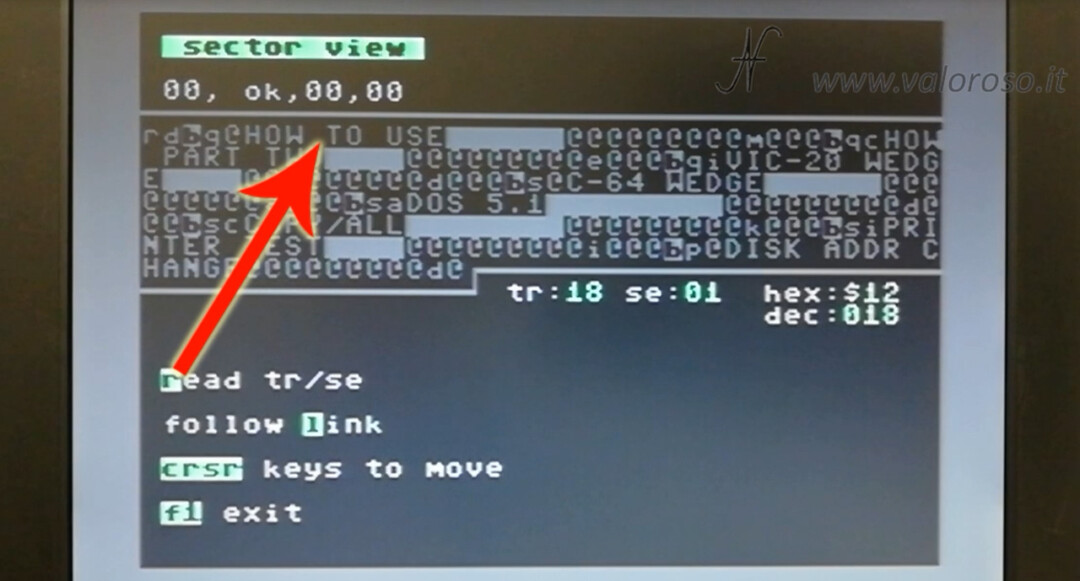
It is possible to view the data of all tracks and sectors of the disk, which may or may not contain data.
Download files related to 1541 Diagnostic Cartridge (v 1.0) by Jani
here is the file 1541DiagnosticCart.zip containing:
- BIN files to program different types of EPROMs;
- the CRT file to be loaded with the Kung Fu Flash.
To make the video, I consulted with Stefano Sorry, Giuseppe Ribecca, Piergibio zambrini (zibrates) and Jani Tahvanainen (Jani), whom I thank for the invaluable support!
Credits: in the video tutorial, SID music is the theme of Ghosts n Goblins by Mark Cooksey.
To be notified when I publish more tutorials, experiments and reviews related to retro computers and vintage electronics, I invite you to subscribe to the YouTube channel and activate the notification bell!