
Connecting remotely to your home or office LAN offers multiple features. To do this, in this article, we see how to create a VPN server (Virtual Private Network, or Virtual Private Network), which acts as a bridge between the remote computer and the local home and office network.

Surfing the net from the remote computer that connects to the VPN, the browsing IP address is no longer the same as the computer, but that of the home or office. In fact, the computer that connects to the VPN server, while having its own Internet connection, uses the home or office network to route browsing data. For this reason, many also use the VPN for privacy, so as not to make known the IP address of their device that connects to the Internet. In our case, however, we do not make it a matter of privacy, since the IP address shown would still be that of home or that of the office. To browse with an IP address different from ours, perhaps an IP address from other countries, you have to use an online VPN service.
In this article we see how to create a VPN server for the convenience of connecting remotely to your home or office LAN.
By connecting remotely to your home or office LAN, you can access your shared files and printers, just as if you were physically connected to your local network.
If a NAS (Network Attached Storage) is connected to your local home or office network, you can access all the files inside. Obviously the data must pass through the Internet, so the performance depends on connectivity (in particular, the data transfer performance is affected by the upload bands).


It is possible to access the various computers via remote desktop, without turning the ports on the router and ensuring greater security: the only open port is that of the VPN server.
Obviously, all devices must be connected to the same subnet where we set the local bridge in the VPN Server (and soon we will see how to do it).
In addition to computers, printers and NAS, we can also connect to the photovoltaic system, the DVR, the home automation system, in short, to all the devices connected to the network at home or in the office.
In this article we study how to configure a computer to host and create a VPN server, in a very simple way. I describe the software to install on remote computers in this other article.

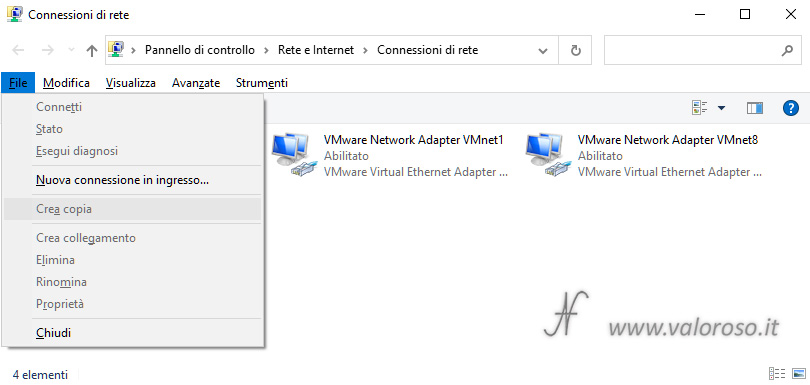
Why we don't use the built-in Windows feature to create a VPN?
From the window Network Connections, you can press Alt + F to create a New incoming connection. This option only works if the router, which we have at home or in the office, is able to turn the GRE (Generic Routing Encapsulation) protocol to the computer that acts as a VPN server. Often, routers can only run the TCP and UDP protocols, so we would never be able to connect with the native Windows VPN, missing the GRE protocol.
Free alternative to create a VPN and connect to the home LAN or office
I did some tests with OpenVPN and Softether VPN and, in the end, I chose to create a VPN server to connect to the home LAN or office with SoftEther VPN.
SoftEther VPN is free, open source and, moreover, also quite simple to install and configure. It offers many features. In this article, I explain how to create a VPN server by installing SoftEther VPN Server on a Windows computer that we have designated as a server.
This second article show how to install SoftEther VPN Client On remote computers that you want to connect to the home LAN or office via VPN.
What is Softether VPN?
SoftEther VPN ("SoftEther" significa "Software Ethernet") è uno dei software VPN (Virtual Private Network, o Rete Virtuale Privata) multiprotocollo più potenti e facili da usare. Funziona su Windows, Linux, Mac, FreeBSD e Solaris.
SoftEther VPN is open source. You can use SoftEther for any personal or commercial use for free.
Softether VPN is an excellent alternative to Openvpn and Microsoft's VPN servers. Softether VPN has an openvpn server clone function. It is possible to integrate from OpenVPN to Softether VPN. Softether VPN also supports Microsoft Sstp VPN.
SoftEther VPN can be used to realize BYOD (Bring Your Own Device) in the company. If you have a smartphone, tablet, or laptop PC, SoftEther VPN's L2TP/IPsec server feature allows you to establish a remote access VPN from your local area network. SoftEther VPN's L2TP VPN server is compatible with Windows, Mac, iOS, and Android.
Softether VPN has a strong compatibility with today's most popular VPN products in the world. It has interoperability with OpenVPN, L2TP, IPSEC, Etherip, L2TPV3, CISCO VPN router and MS-SSTP VPN client. Softether VPN supports SSL-VPN, OPENVPN, L2TP, ETHERIP, L2TPV3 and IPSEC, as a single VPN software.
Softether VPN is a free software because it has been developed as a search for Daiyuu Nobori's degree thesis at university.
Set the static local IP address of the computer hosting the VPN Server
We choose a computer, possibly that consumes little power, which must remain on to allow remote users to connect to the home or office network. In this article I describe how to configure a computer with Windows 10 operating system, to create a VPN server.
This computer, on which we install and configure SoftEther VPN Server, must have a static local IP, because the last step involves opening ports in the router and directing incoming connections to this computer.
To set a static local IP address to your computer, you can do this in two ways.
The first way to set a static local IP address, not always possible, can be found in the router: on some routers you can assign static addresses to some computers, in the DHCP function.
Alternatively, you have to go to the Windows Settings, Network and Internet, Network and Sharing Center, Change tab settings.
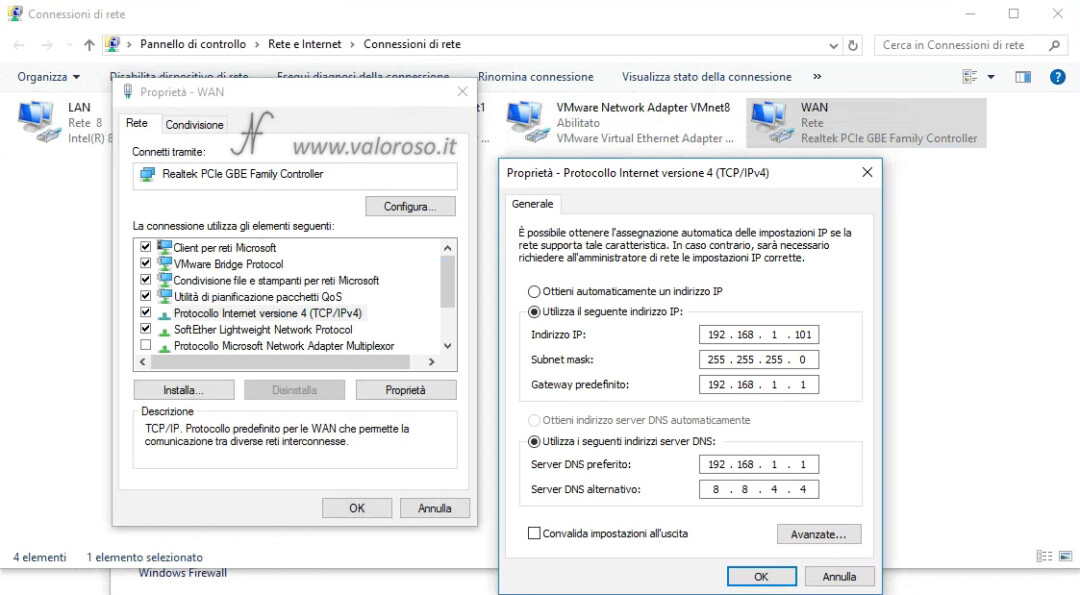
Select the network card where the Internet connection is present and, with the right mouse button, open the menu and click yes Property.
Click on Version 4 Internet Protocol (TCP/IPv4) and then press Property.
Set a static IP address, of course it must be a free IP address, not used by other computers in the local network.
Set up tables Use the following IP address and Use the following DNS server addresses.
How to install SoftEther VPN Server
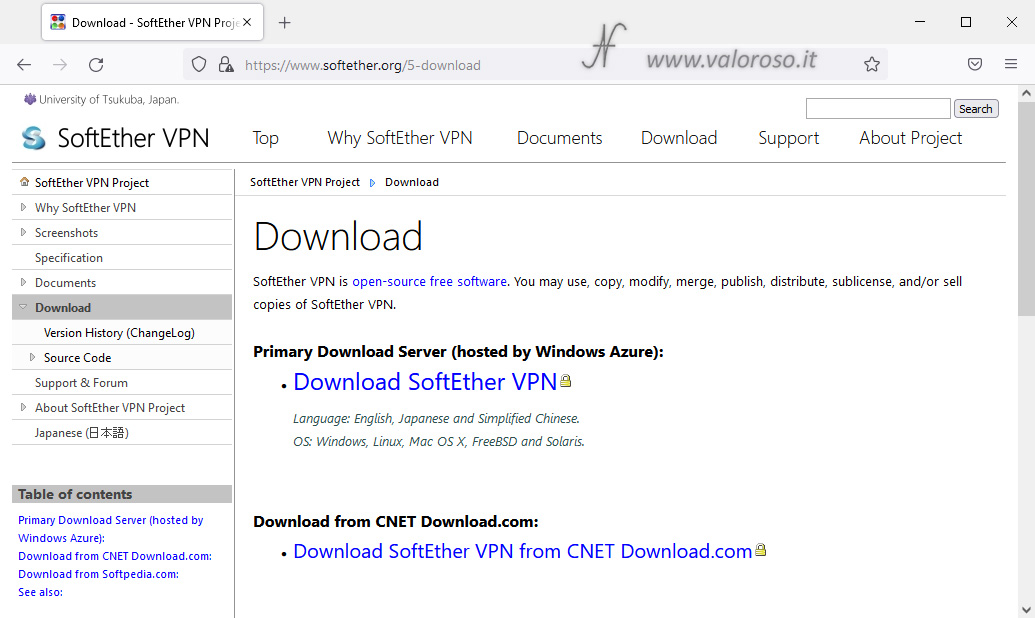
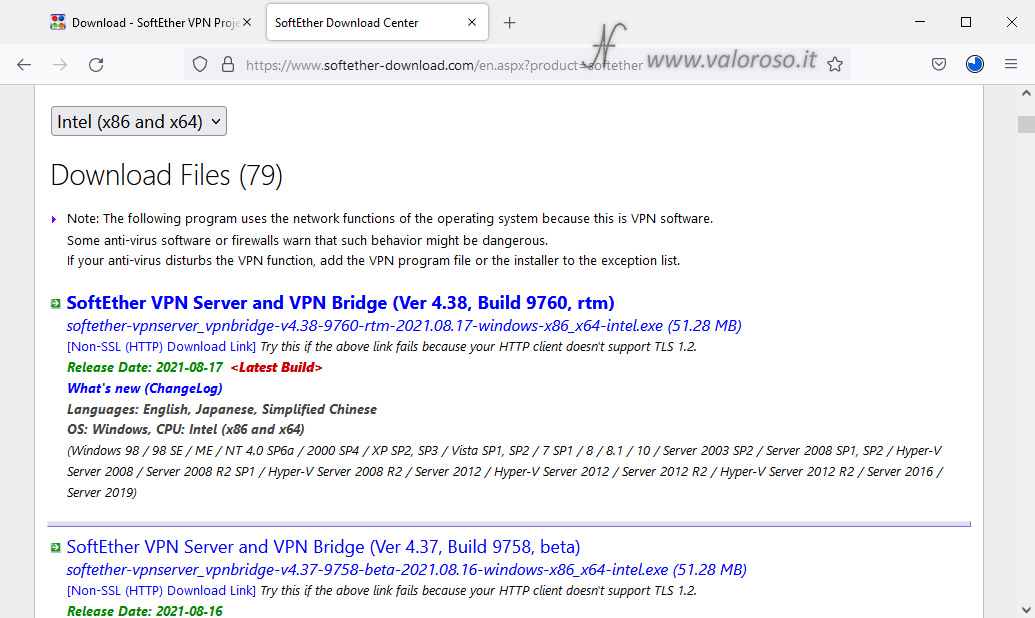
Download now SoftEther VPN Server from the official website of SoftEther (SoftEther Download Center).
Select the platform (in this case Windows, but you can also install the VPN server on FreeBSD, Linux, Solaris and Mac OS X computers).
Select the CPU that, when installed under Windows, has a single choice (x86 and x64). On Linux, you can also choose other types of CPUs in addition to Intel, such as, for example, ARM.
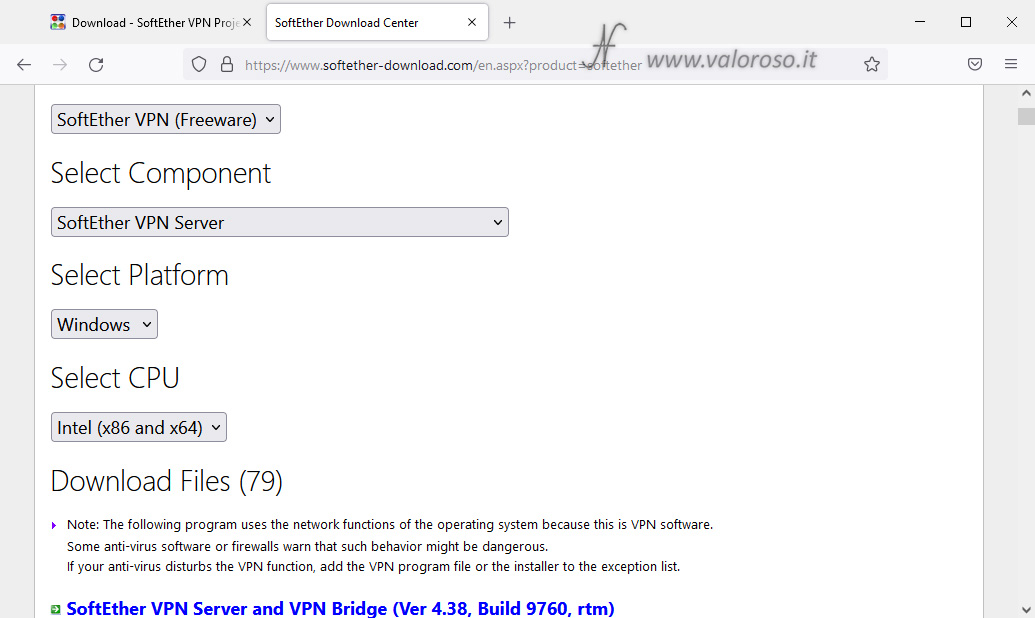
From the list of files that is formed below the selection boxes, download the latest version of SoftEther VPN which, at the time of writing this article, is:
SoftEther VPN Server and VPN Bridge (Ver 4.38, Build 9760, rtm)
softether-vpnserver_vpnbridge-v4.38-9760-rtm-2021.08.17-windows-x86_x64-intel.exe (51.28 MB)
After downloading the installer, we can find it in the downloads folder.
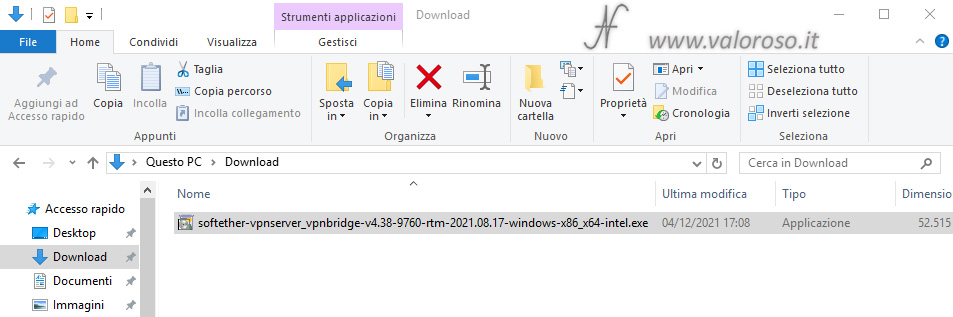
We launch the installer you just downloaded.
Obviously, you have to own the privileges of the computer administrator, otherwise we will not be able to continue with the installation.
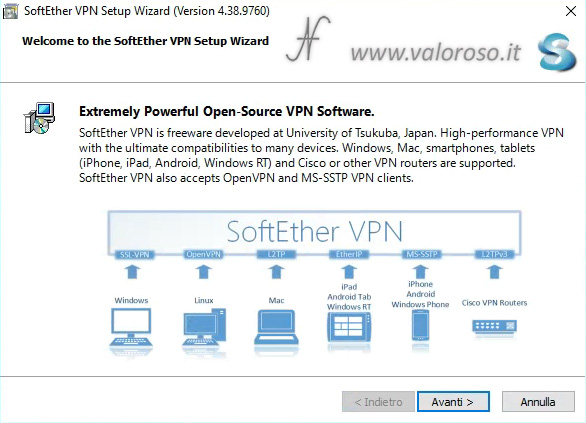
The installation starts with a presentation window: SoftEther VPN is a freeware (free) and Open-Source program, developed at the University of Tsukuba, Japan.
Let's press Avanti >.
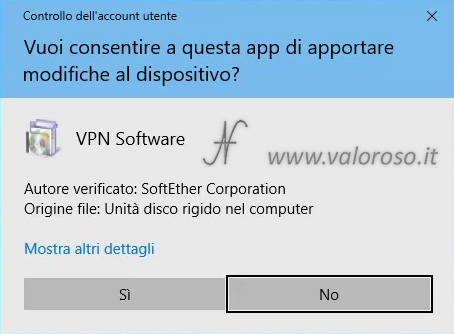
Windows prompts you to confirm that you can allow the app to make changes to your device. Obviously you have to press And.
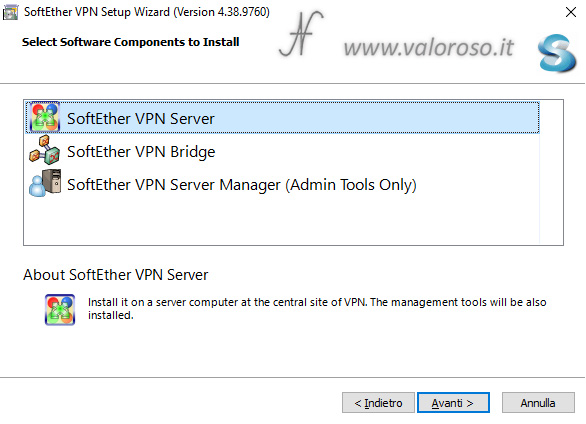
We want to install the VPN server, which allows other remote computers to connect to the local LAN network of your home or office.
Let's select SoftEther VPN Server and click on Avanti >.
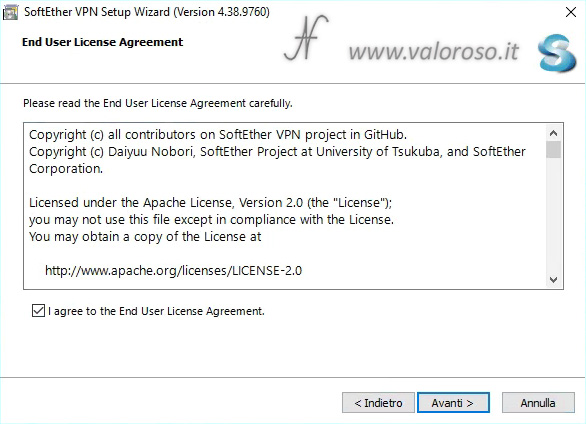
We must accept the End User License and then click on Avanti >.
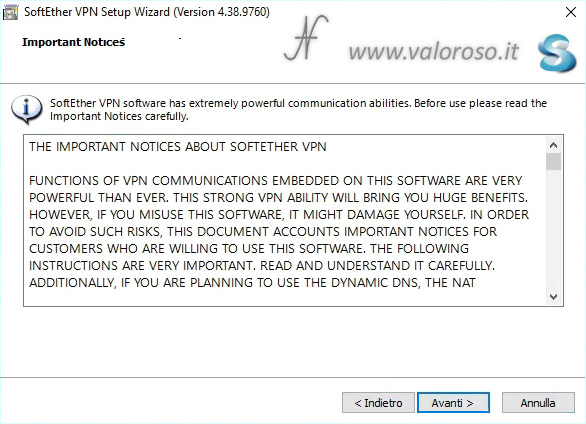
A window opens with warnings. In summary, they explain that the software is very powerful and comes with a lot of features. Precisely for this reason, if configured or used poorly, the software may harm the User.
In addition, external services such as the Dynamic DNS (DDNS) that we will see later, TRANSVERSAL NAT, VPN Azure may not always be available.
After reading the warnings, you can continue with the installation.
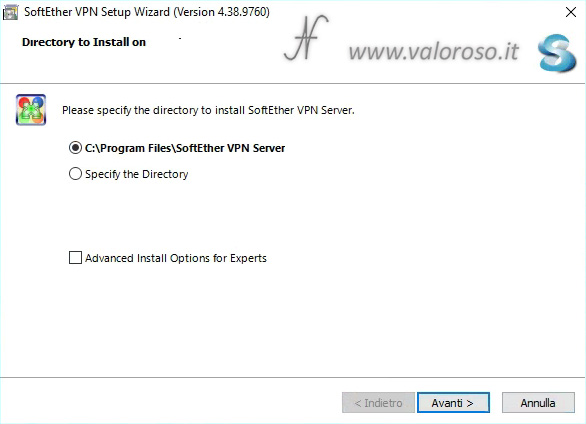
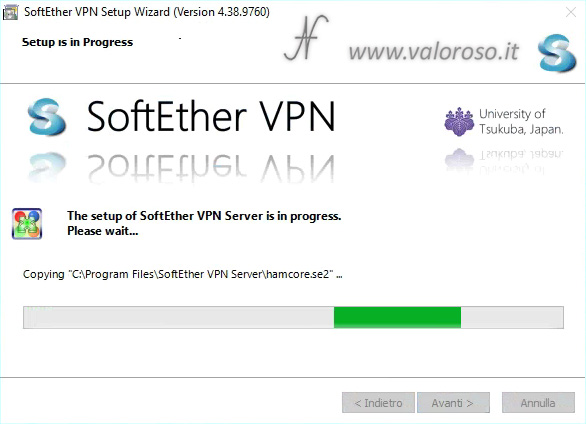
The program is installed in the folder:
C:\Program Files\SoftEther VPN Server
Let's select Avanti >, without the advanced options. We can then proceed to install the software, pressing again on Avanti >.
Before installation, Windows creates a restore point.
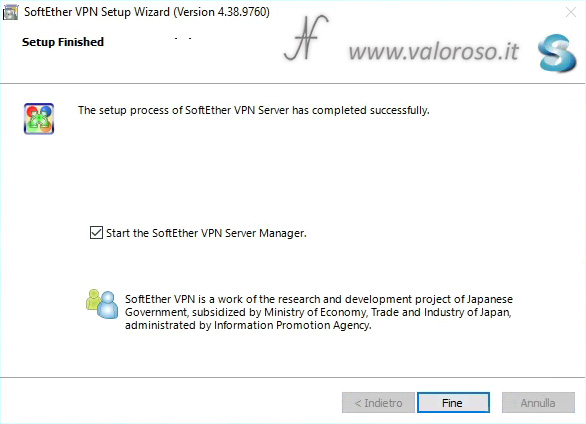
At the end of the installation, we press on Done, making sure it is selected Start the SoftEther VPN Server Manager. We are therefore halfway through the process of creating a VPN server.
Configure virtual private network (VPN) with SoftEther VPN Server Manager
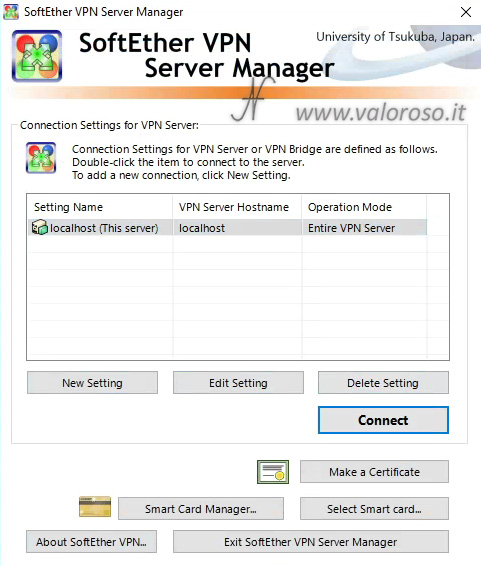
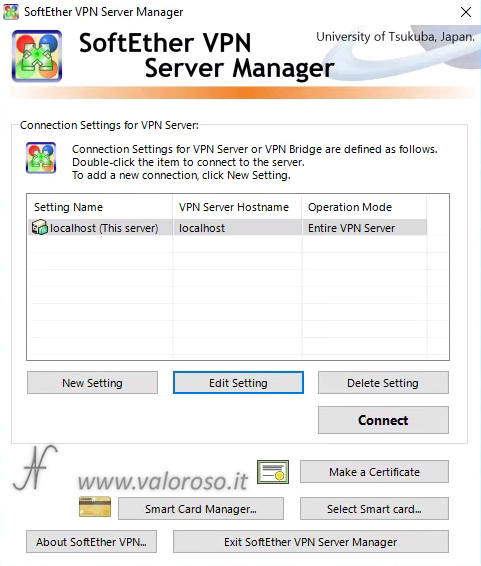
Just started, SoftEther VPN Server Manager it comes with an empty configuration. First of all, let's select the only available configuration localhost (This server).
At the moment, we do not change the settings, so we do not have to press the button yet Edit Setting.
We must connect to the VPN Server, which we have just installed, to configure it. Therefore, we click on Connect or we double click on the name of the configuration.
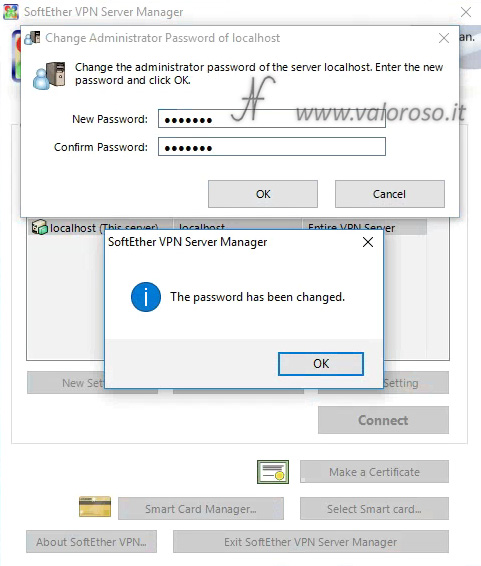
We set the password to access the configuration. This password is only used to configure the VPN Server and should not be confused with the password that we will use to access the local network remotely. Type the password both on New password, both in Confirm Password, then press Ok.
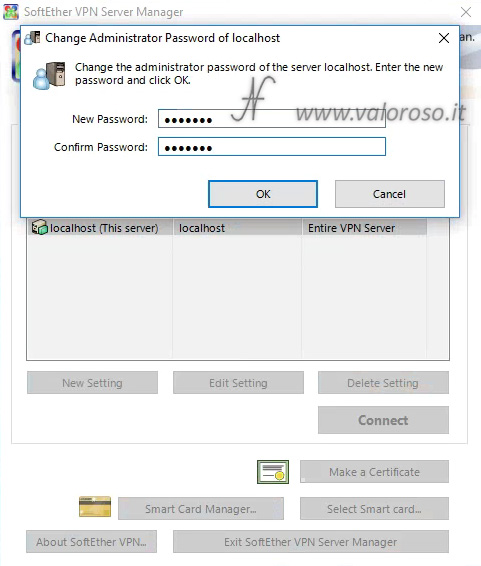
Press again Ok on notice: The password has been changed.
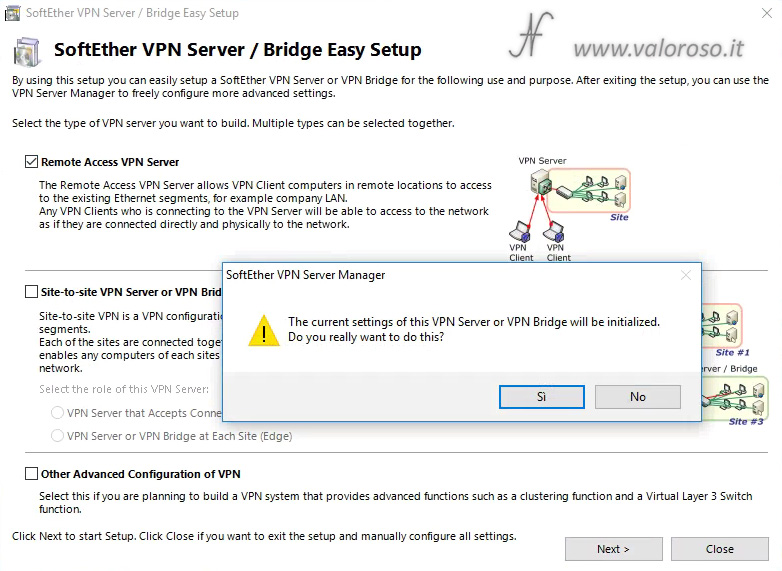
In the window that opens, we select Remote Access VPN Server and we click Next >.

This is the setting that allows you to configure a VPN server to remotely access the LAN network of your home or office.
Confirm that you want to initialize the server.
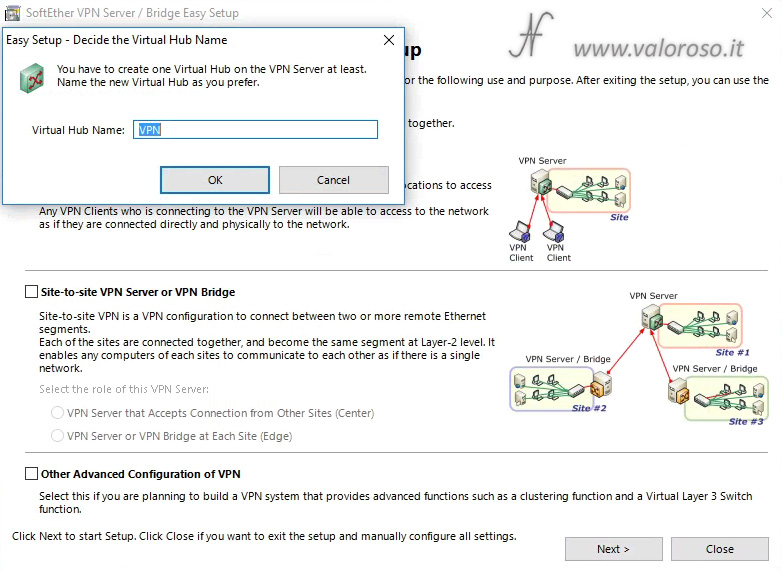
SoftEther VPN asks what we want to call our Virtual HUB. We can call it, for example ValorosoIT.
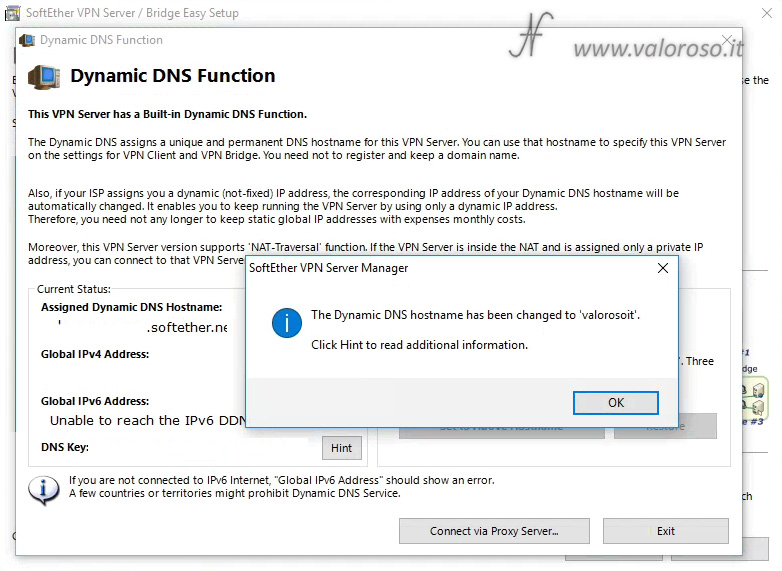
The window for configuring Dynamic DNS opens. This feature is useful if you don't have a static IP address. Set the name of the virtual network hostname. Then click Set to Above Hostname.
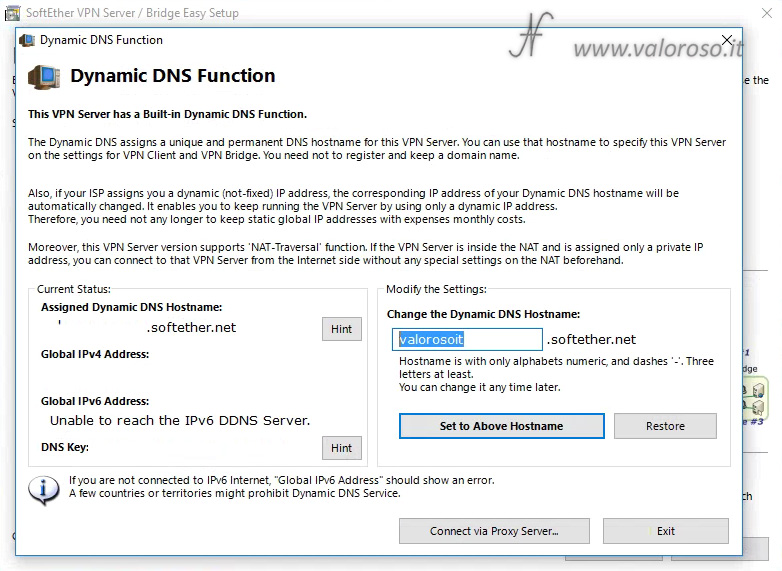
If the hostname is available, the name is changed to what you just typed. Confirm by pressing Ok and then Exit.
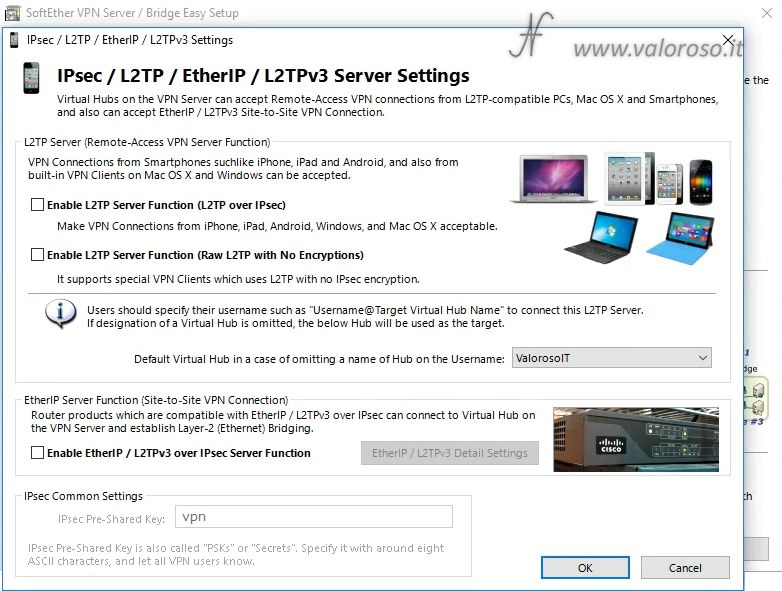
there are other settings to allow access to the local network through protocols IPsec, L2TP, EtherIP, L2TPv3. These protocols are used to allow access to the local network to devices such as Smartphones (iPhone, iPad, Android phones), other PCs and Mac OS X. At this time, we do not set any of these functions. In fact, the purpose of this article is to connect a remote Windows (or Linux) computer to the local network of our home or office.
Therefore, we reward directly Ok without enabling any function.
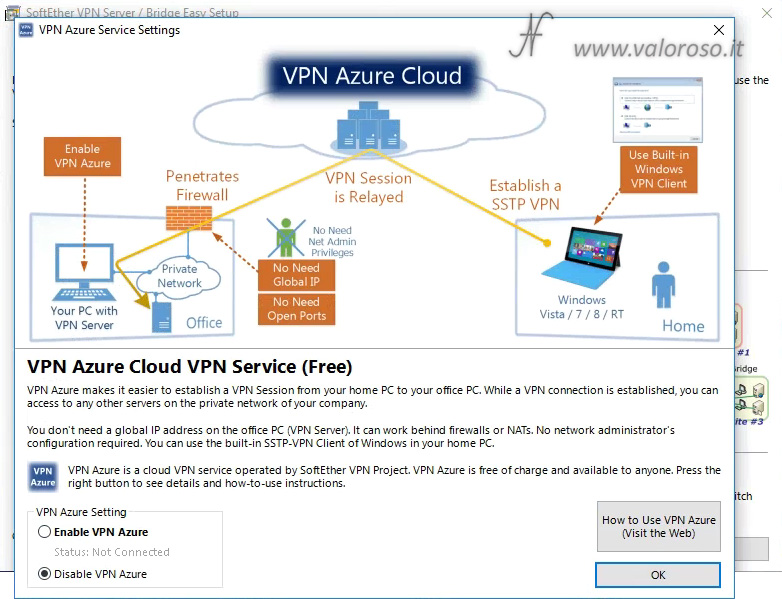
The same goes for the VPN Azure Cloud. At the moment we are not interested, so we select Disable VPN Azure and click ok.
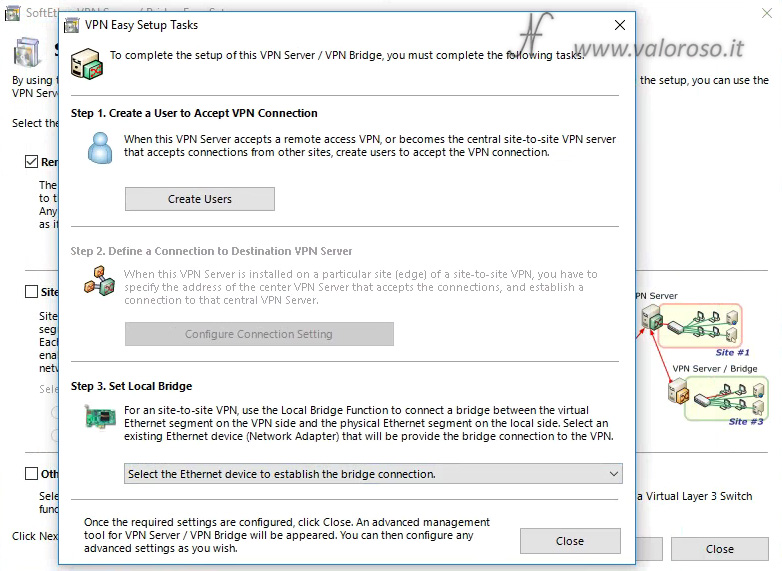
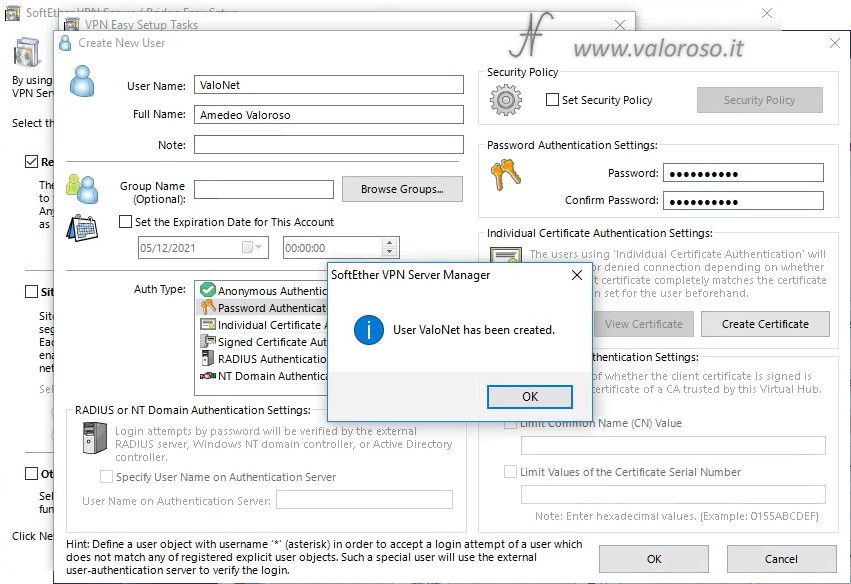
Now let's define the username of the VPN connection. Click on Create Users.
- User Name: we set the username, for example ValoNet;
- Full Name: we type the user's name;
- On Auth Type, we select Password Authentication;
- We type and confirm the password;
We can press Ok.
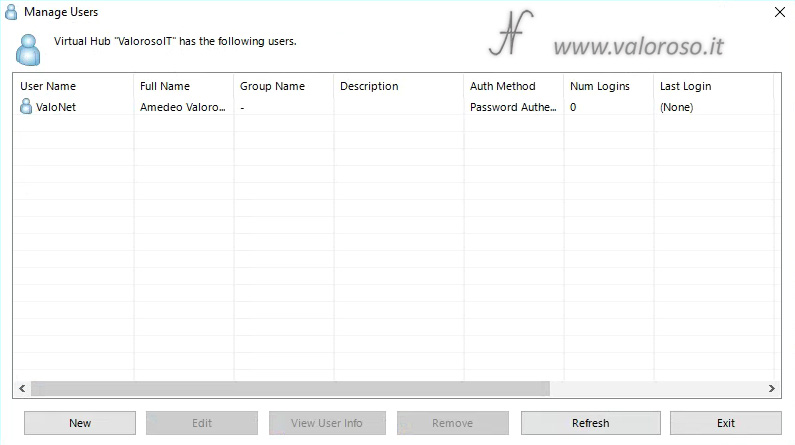
The user is created. We reward again Ok.
For the purpose of this article, we can create a single user. A single user still allows you to connect multiple remote computers to your local network. You may need to create multiple users, for example, in the office. Using multiple users to log on to the network is convenient to change the passwords of the individual user, or to remove a user if necessary.
Let's press Exit.
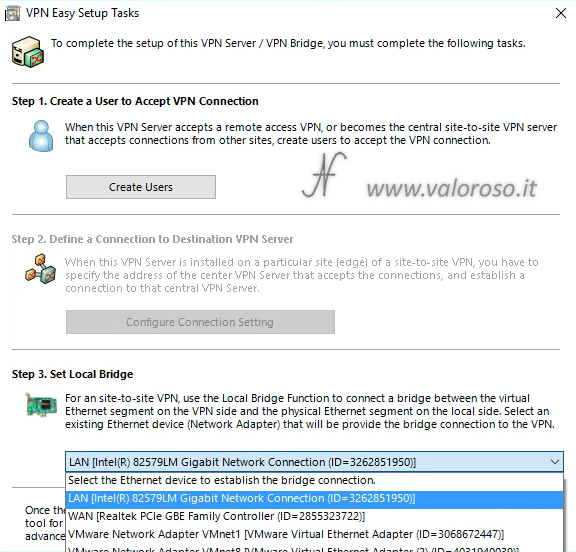
The computer returns to the previous window, where we must set the local bridge. We select the network adapter that connects to the local network.
If your computer (our VPN server) is equipped with only one network card, we have little to choose from! If the computer is equipped with multiple network adapters, such as a network adapter that connects to the WAN (Internet) and one that connects to the LAN (local area network), we must select the card that connects to the LAN.
With the remote computer, in fact, we can only connect to devices connected to the same subnet as the network card that we use as a local bridge.
Let's press Close.
Well, our server is configured!
You can see that it is always possible to change the configurations from this screen. Even if we did not set them during installation, it is always possible to enable the protocols for connecting smartphones, etc...
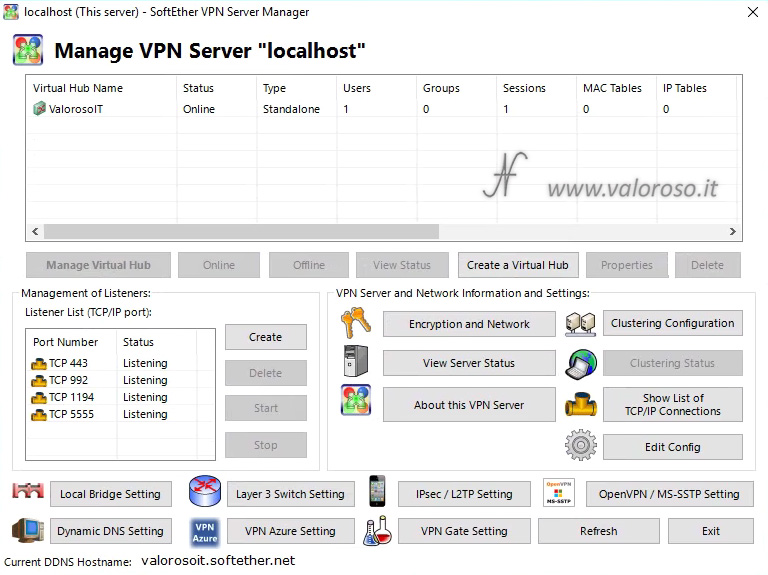
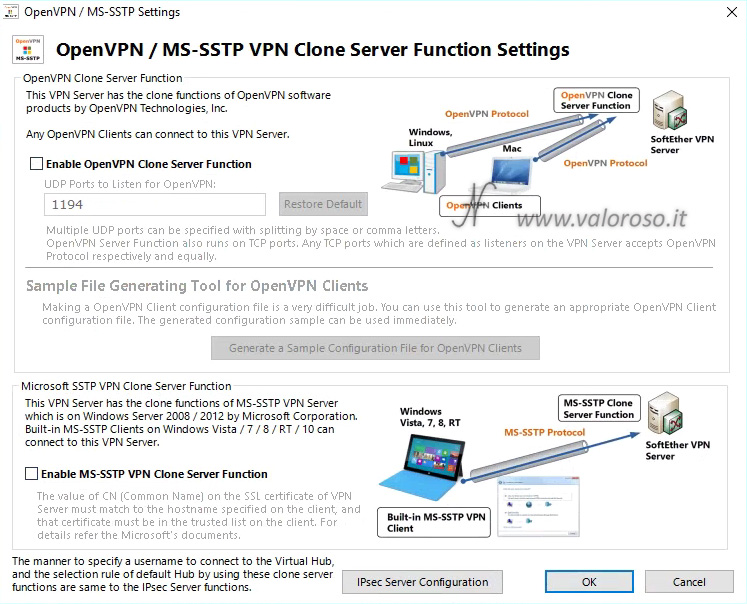
If we don't need it, we can disable OpenVPN access. OpenVPN is another software for creating VPNs.
We click on OpenVPN / MS-SSTP Setting and we disable everything. Then we reward Ok.
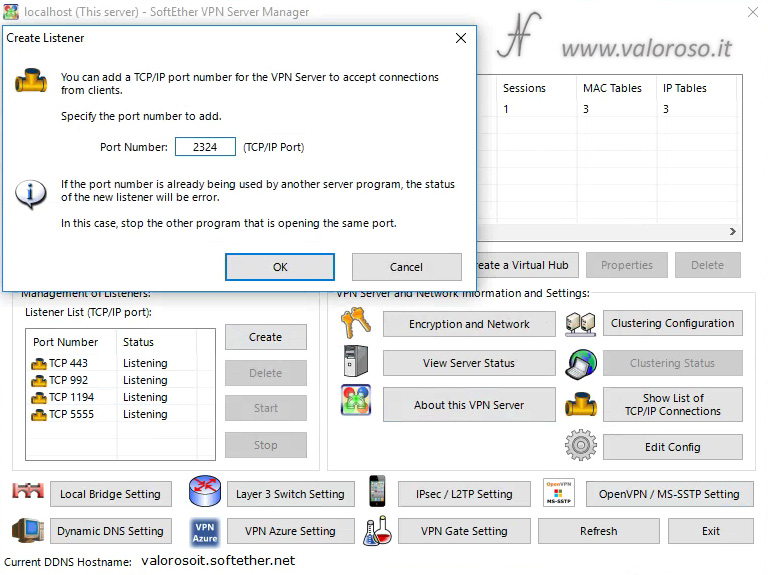
To make our VPN server a little more secure, we can change the port to which the remote connections arrive. By default, ports 443, 992, 1194, and 5555 are open.
We can set another one, for example port 2324. We will have to make a way that our router turns the remote connections intended for port 2324 to the local IP address of our VPN server. Later, at the bottom of this article, we will see how to do it.
For this reason, as already explained before, the IP address of the computer where we install SoftEther VPN Server, must have a static local IP address.
First we create the new listening port: the 2324, for example. In Listener List Table (TCP/IP port), we press the Created. We type 2324 and then Ok.
Next, we remove the doors that we do not use: the 443, the 992, the 1194 and the 5555. We click on each port and then on Delete. Confirm.
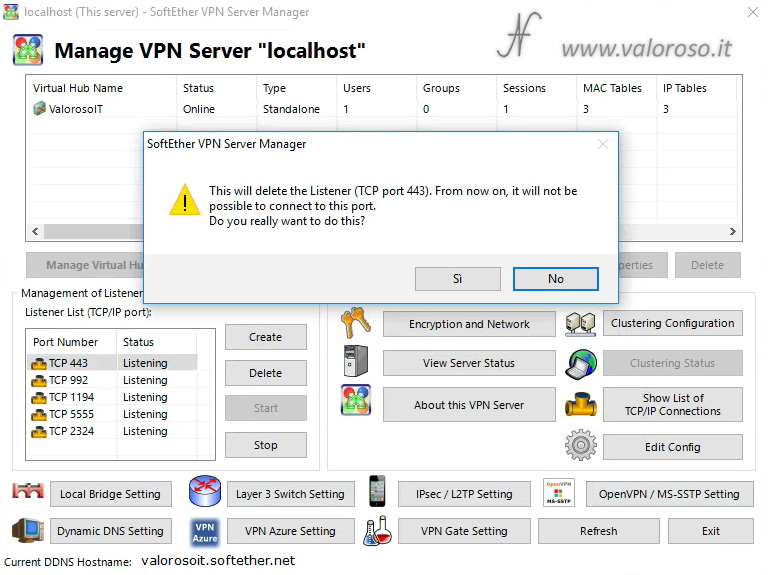
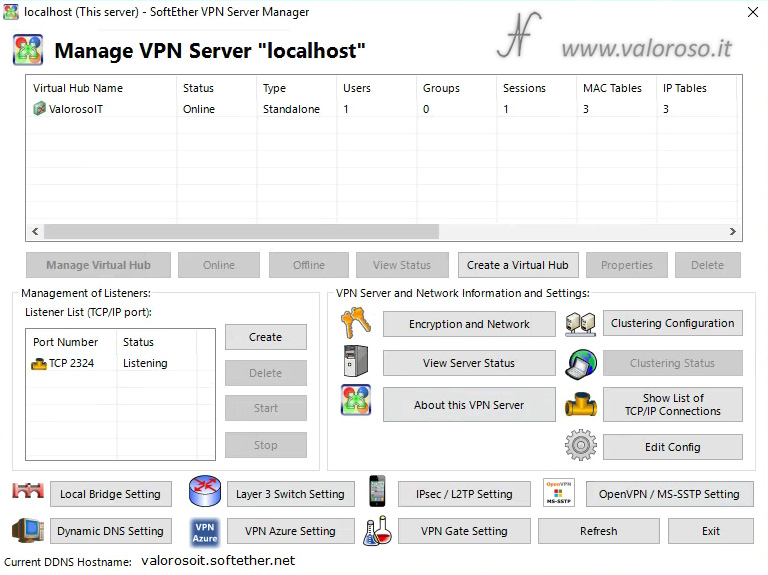
We remain only with port 2324. This is optional to increase security. In fact, port 5555, being by default, is known. The new door is known only by those who created it.
Perfect! Everything is set: we can press Exit.
From the initial window of the SoftEther VPN Server Manager, we need to update the connection settings.
In fact, trying to connect now to change the settings, you can no longer enter the server, because we have changed the listening port.
We select the setting localhost and click on Edit Setting.
We can set the Setting Name with a fancy name. I set ValorosoIT.
In addition, we modify the Port Number with the port we created before, in my case 2324.
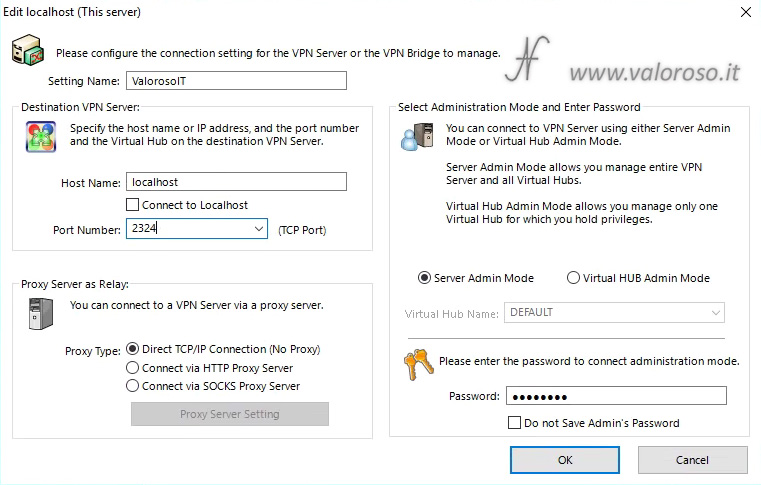
At this point, the settings access is also set. You can try pressing Connect and see if you can enter the VPN Server settings.
Now that the server is in place, we can configure the router.
How to turn the ports of the router to allow the VPN connection
So that a remote computer can connect to the local network, through the VPN server that we have just created with SoftEther VPN Server, you must enable incoming connections on your home or office router. Some call this operation - "turn the ports of the router".
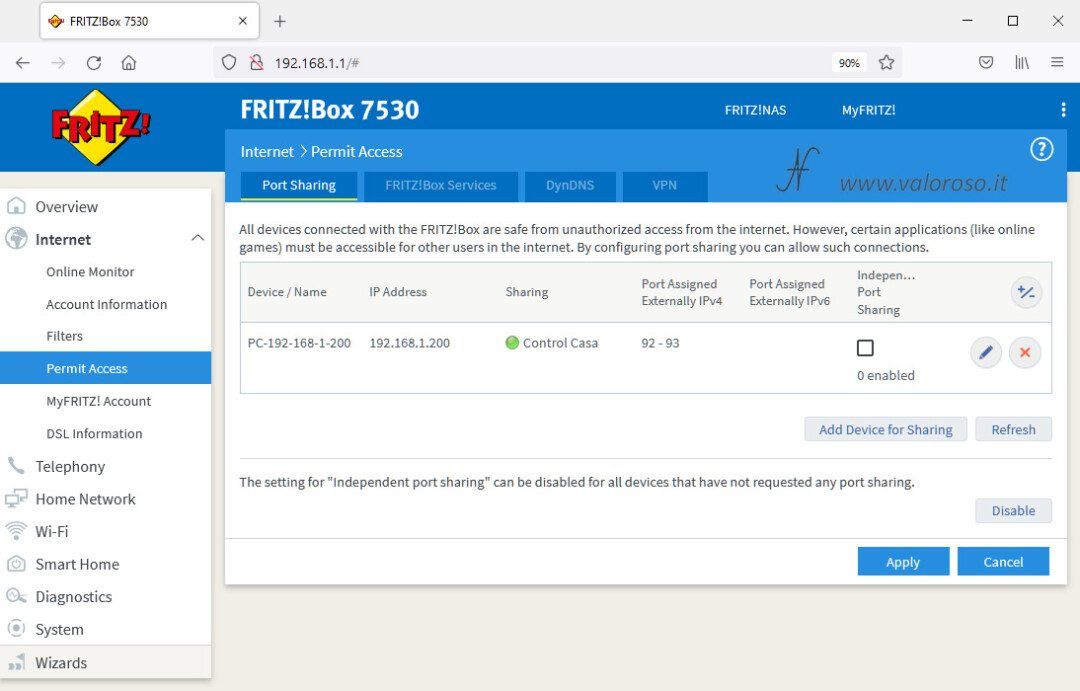
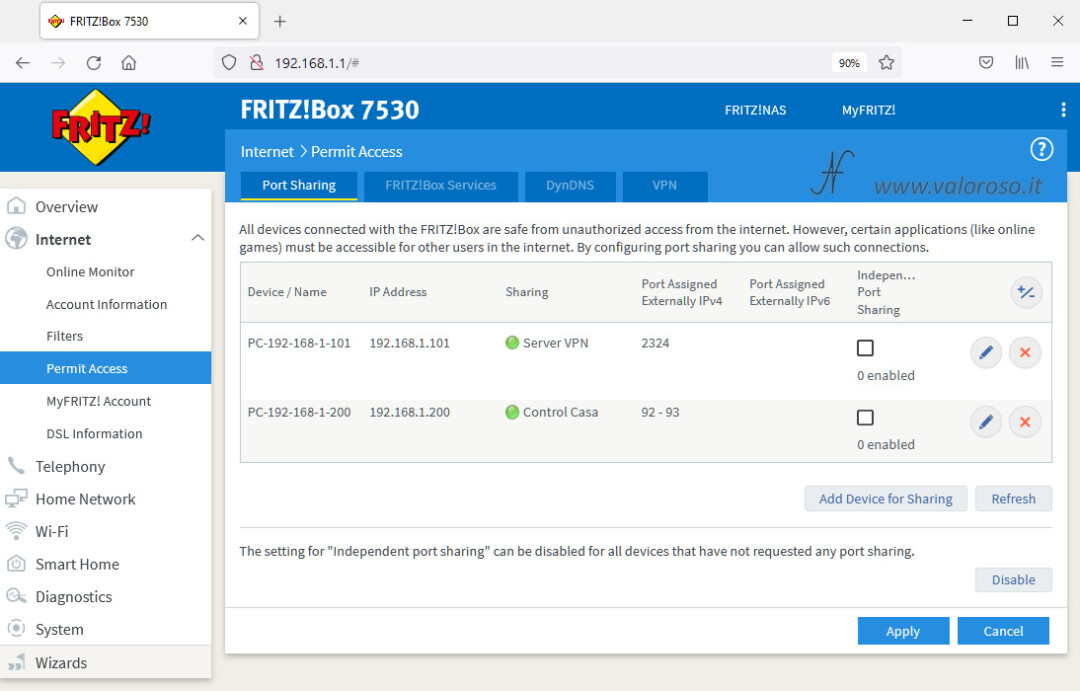
This is different from router to router. For example, in the FritzBox router, you have to go to Internet, Permit Access. From the table Port Sharing, you have to click on Add Device for Sharing.
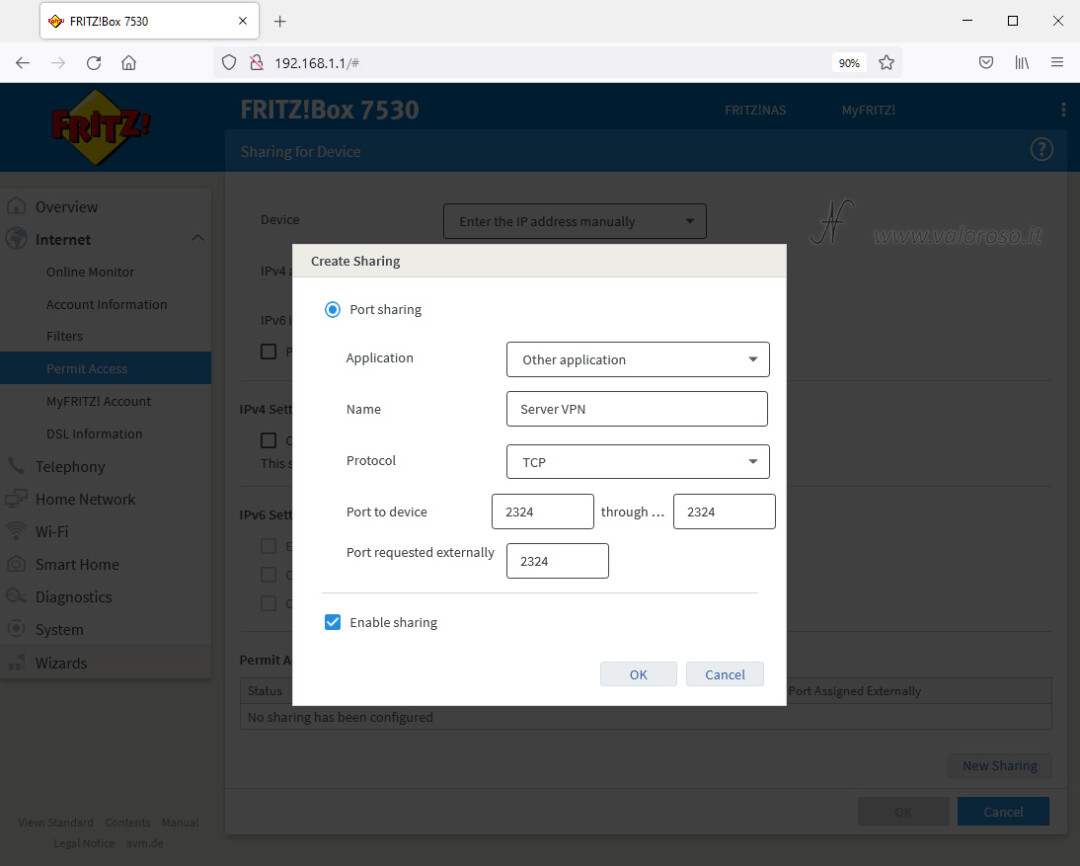
Indicated Enter the IP address manually, then type in the local IP address of the computer where we installed SoftEther VPN, in my case 192.168.1.101. At the bottom, click New Sharing.
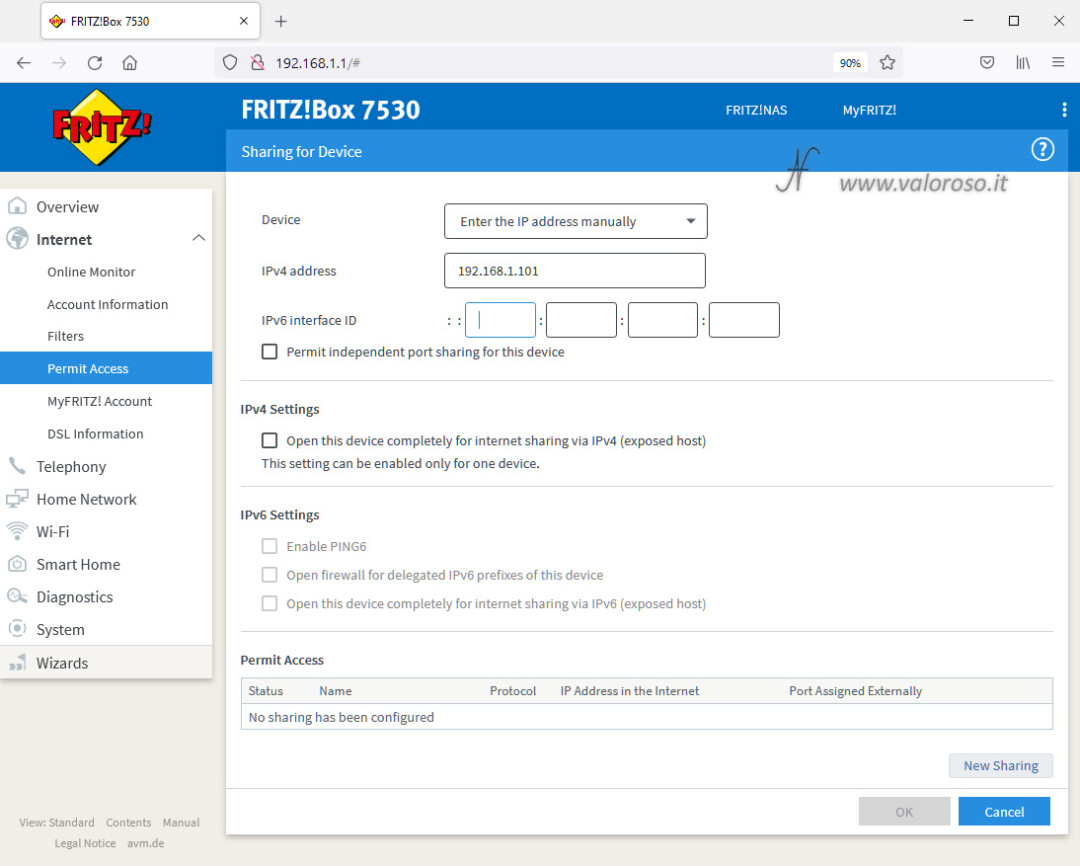
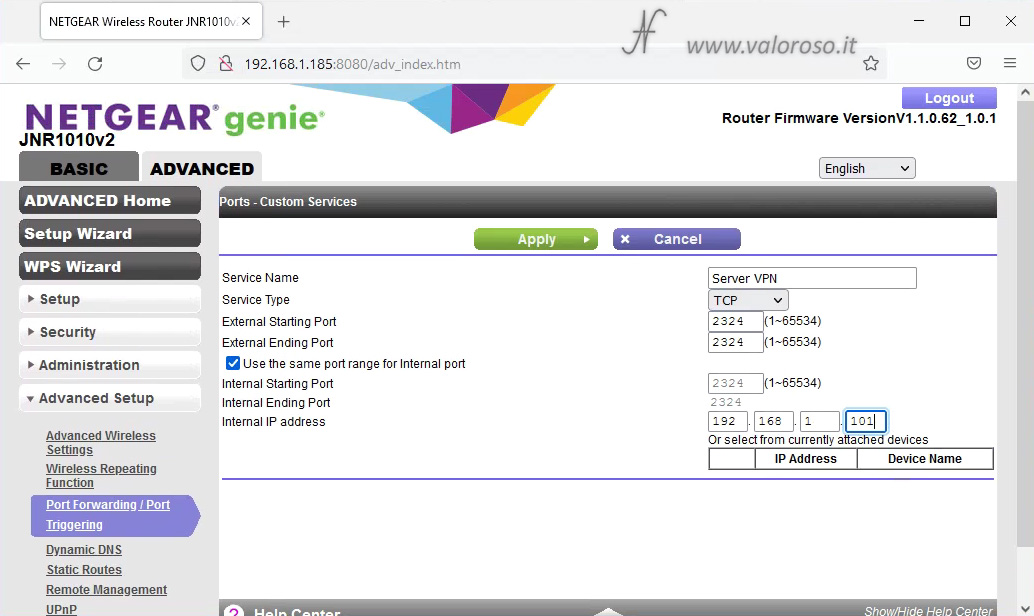
Select Other application, as a name we can enter VPN Server, TCP protocol, external port 2324 (or the port you chose before). Make sure that Enable sharing is checked. Press Ok.
Press again Ok to save the VPN server port enablement.
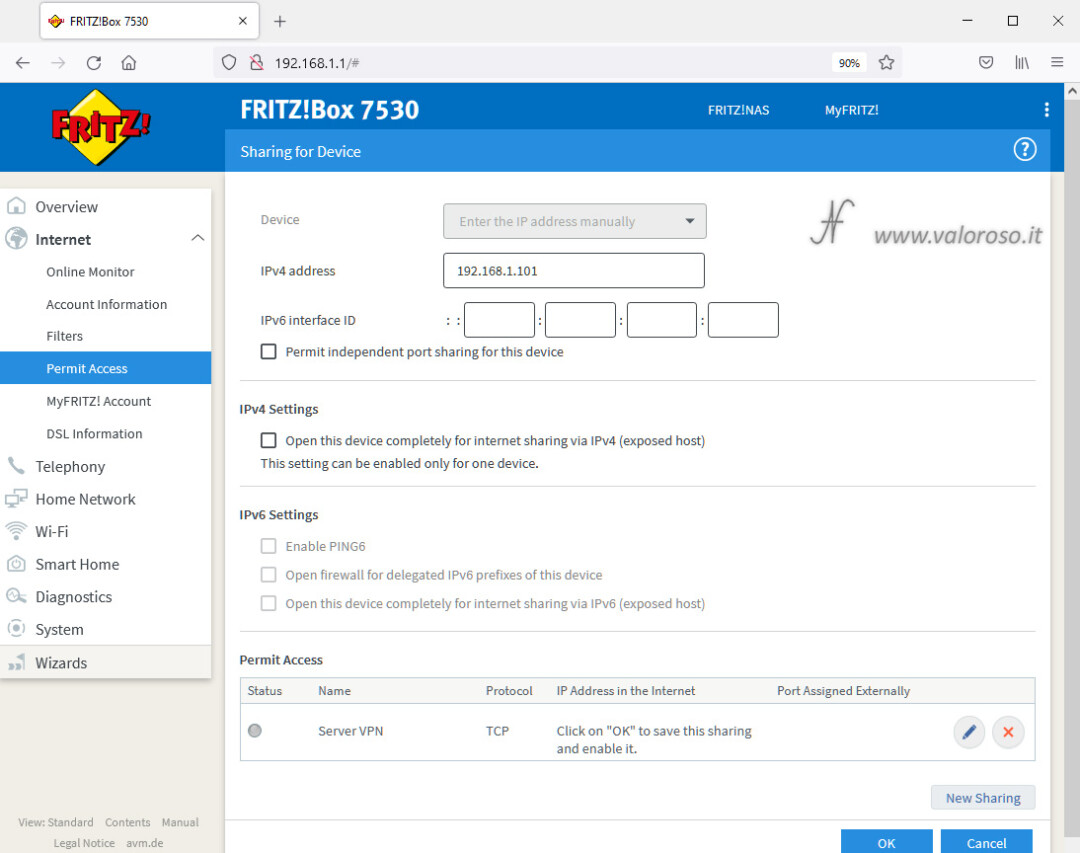
The port is opened and turned to the computer with the IP address indicated (which must be the static IP address of the computer where we have installed SoftEther VPN Server). The green dot lights up the moment an incoming connection is turned.
Other routers may have different ways to open (or turn) ports and direct requests to a specific computer.
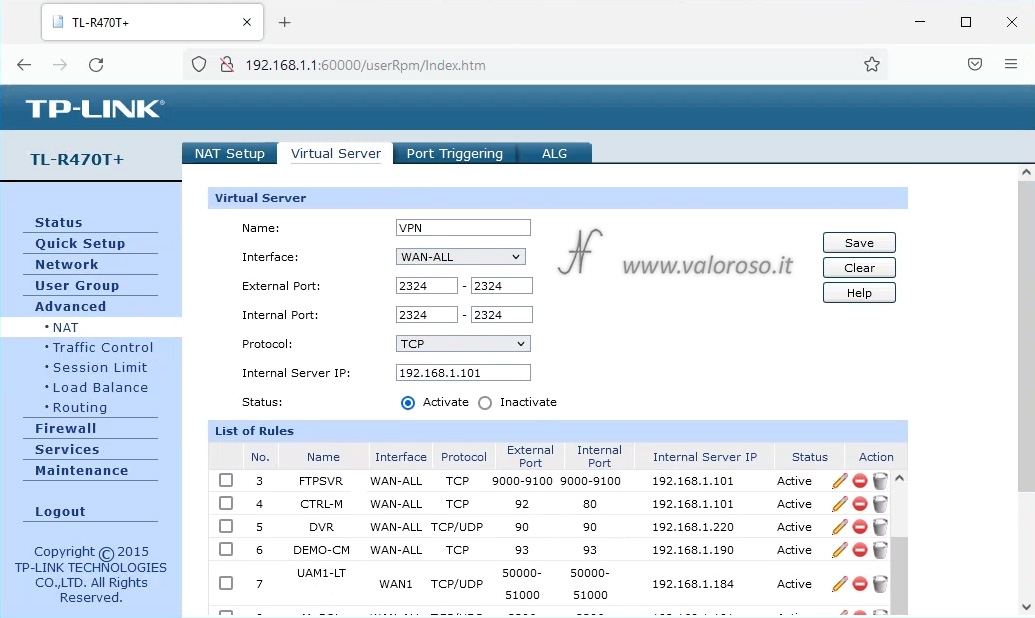
For example, in the Balanced Touter TP-Link, the settings are located in Advanced, NAT, table Virtual Server. Set the port with the same logic seen before: TCP protocol, port 2324 pointing to the internal computer 192.168.1.101.
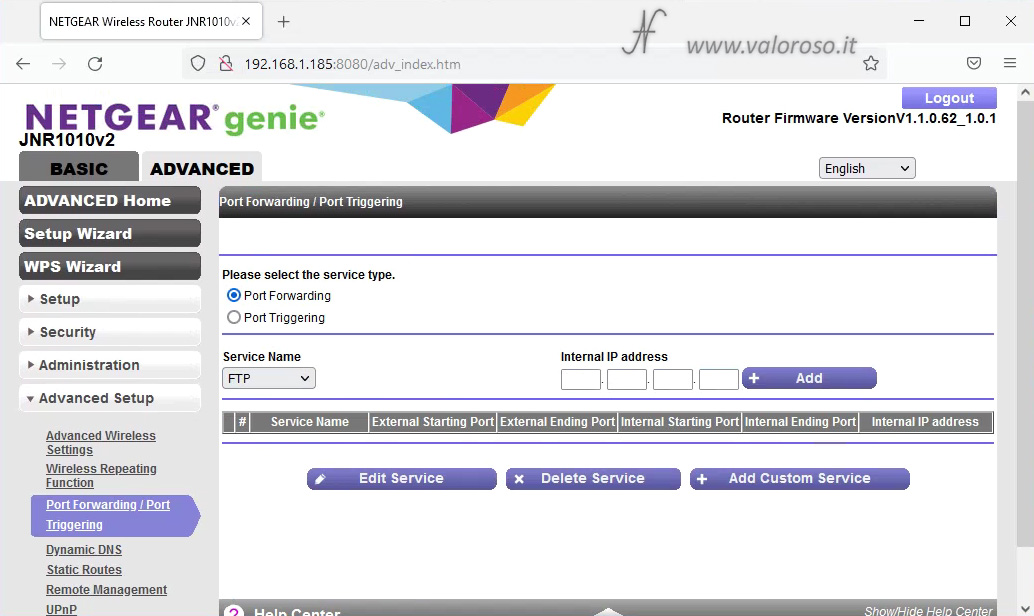
In the NetGear Genie router, the settings to enable the VPN server port can be found in the table Advanced, Advanced Setup, Port Forwarding / Port Triggering.
In the LinkSys router, to turn the ports you have to go to Applications & Gaming, Single Port Forward. Enter the settings, as we have seen them above, and click on Save Settings down.

Continues...
Now that the VPN Server and the router are configured, we can proceed to install the client on the various remote computers that need to connect to the VPN.
The procedure for downloading, installing and configuring SoftEther VPN Client for remote computers is described in this other article.
Is it possible to use configure UDP ports?
Do you only use TCP? Can't use UDP ports?
The method I described in the article is based on TCP/IP. In any case, there are other VPN configuration options, including compatibility with OpenVPN (UDP).
There are several VPN configuration options, including OpenVPN (UDP) compatibility.
Good morning
I really appreciated the article for VPN.
My necessity is to install a VPN on a computer always on at home, and connect remotely abroad with an Android mobile phone, where I have the nowtv app, which allows you to download streaming content, so even if the connection is slow I would see them once downloaded.
The only point that is not clear to me is to turn the Nat doors.
at home I do not have ADSL, but I use a 4g modem, with an Iliad sim.
It is a soap modem from Huawei; maybe to turn the NAT ports I need a better 4G modem?
Can you recommend a specific modem?
Thank you
Good morning! Unfortunately, many 4G operators do not offer the public IP service and the doors are not girable, as is done with the ADSL or with fiber. In my opinion, you should contact your telephone operator to find out if they can offer you the public IP service and how to make the doors possibly.
Bikausera,
Thank you for the two articles on how to configure softether servers and clients. I did when described in the articles and the server and client connect perfectly. I can't use the Windows Remote Desktop software, I can't figure out what ip address of the client I need to use.
Can you give me a hand?.
Thank you for your kind reply
Good evening! I am happy that the tutorial is useful. When you connect to the VPN, then you have to use internal IP addresses, for example: 192.168 ...
Hey, very nice blog!
Thank you!
Good morning! Through VPN connection from abroad, then to a server in Italy, would it be possible to pass the connection for a specific Italian Internet operator? I ask for sky q without parable, in which there are restrictions about the operators. In practice, if the telephone/internet operator is not among those currently compatible with Sky Q's without parable, the vision will be suspended. I am not in this field, for this reason I am trying to understand if a simple connection is enough via VPN, or for the operators' issue it is not enough. Thanks for your reply
Good morning! The VPN does this: it is as if you were connected directly to the operator where there is the computer that serves at home. Having said that, it should be tried if the VPN band is sufficient and if there are no other restrictions.
Hi to every one, it's genuinely a good for me too pay a visit this website, it includes important Information.
Thanks!
As a security measure, it's crucial to change the default login credentials for 192.168.1.1 to prevent unauthorized access to your router.
Correct, thank you!
Good morning, guide done very well, understandable and clear.
I managed to make the connection but in the client network I do not see the pc of the company's network.
May I ask you for some ideas?
Thank you so much
Ivano
Howdy. If you call them directly with \NOME_PC can you reach them?
Hello, a really well done guide.
Do you think the configurations are the same for a NAS installation?
My Netgear pre-installed it and I would like to try ...
Thank you
Greetings! Thanks for the compliments. If the NAS already has an VPN server, it doesn't need another one. There will be settings on the router, similar to what I described in the article.
Good morning Amedeo,
Thank you for your reply.
In my previous message I think I haven't explained myself too well. On my nas (Netgear RN202) there is
already a pre-installed package of SoftEther VPN, a rather dated version to be honest. I followed your guide
but server and client do not communicate and so I was wondering if for an installation on NAS there was some corrective
compared to what you wrote.
Thanks again.
Mark
Good morning. I'm sorry, but I don't know that NAS and I can't tell you if it's a matter of protocols or updating. I advise you to check that the enabled protocols are the ones I set. Nothing else comes to mind, I'm sorry.
Thanks anyway.
Mark
Grazie mille per l'ottima guida, solo una domanda: volendo connettermi dal pc aziendale senza installare software (hanno impostato un blocco per i siti "gaming" tra i quali anche twitch che guardo nei momenti di pausa) esiste un'estensione Firefox, Chrome o di altro browser che svolga le stesse funzioni navigando solo da quel browser senza "smanettare" sulle impostazioni internet del pc aziendale? Ho fatto una ricerca ma trovo solo estensioni dei soliti provider DNS con impostazioni predefinite.
Thank you and congratulations for the blog!
Thank you! Which knows I can use browser work, which has an integrated VPN. Or you can use the Tor Browser, which protects privacy and allows anonymity. There are also extensions for Chrome, as you notice, but I've never tried them.
Kudos for the guide. The setup procedure is explained in detail, step-by-step, comprehensively and comprehensively!
Thanks so much!
Good morning, guide done very well, understandable and clear.
I managed to make the connection but in the client network I do not see the pc of the company's network.
May I ask you for some ideas?
Buongiorno. I computer da mettere in rete devono essere impostati come rete "privata" e non "pubblica". Ha provato a digitare il nome del computer al posto che cercarlo? Ad esempio: \\COMPUTER\NOME_HARD_DISK
Good morning Mr. Amedeo
Congratulations for the guide is perfect , I just wanted to ask you a question , the PC where I installed
Does the server don't connect to the client? The client that lies in shed far from the office where the server is installed works great
and I can connect with all the PCs on the LAN where the server resides, I thought I could also do it from the server to the client but I can't. I tried to look for a solution but I couldn't. Maybe you can tell me something more?
Thank you very much and congratulations
Buongiorno! Grazie per il complimenti. E' il client che si collega al server. Una volta collegato, è come se il client fosse in una sottorete del server. Per questo motivo, se è attivata la condivisione dei file e delle stampanti e la rete è impostata come "sicura", allora è possibile che anche dal server si possano vedere i file e le stampanti del client. Però, come dicevo, la connessione deve iniziare dal client. Altre possibilità di collegarsi ad un computer remoto sono: Desktop Remoto, TeamViewer, Supremo. Non hanno la stessa funzione di una VPN, ma potrebbero essere utili per avviare la connessione del client al server, pur non essendo fisicamente presenti sul client.